
|
|
SUBSIM: The Web's #1 resource for all submarine & naval simulations since 1997
|
SUBSIM: The Web's #1 resource for all submarine & naval simulations since 1997 |
 11-18-07, 09:58 AM
|
#1 |
|
Sea Lord
 Join Date: May 2005
Location: Under a thermal layer in chilly Olde England
Posts: 1,842
Downloads: 0
Uploads: 0
|
Since there seems to be some interest in following people's modeling escapades, I thought I'd start a thread tracking how I get along with the Alanger 1:350 'Akula'.
This is one of those kits that can be hard to get hold of, as it is not supposed to be sold outside of Russia. I don't think that's because it's going to be giving secrets away, but more to do with distribution rights, even so, I eventually managed to track it down through Hannants online shop in the UK, although they did tell me a couple of times that it was going to be hard to get hold of, on one occasion phoning me to inform me that it had been discontinued and another time saying I could cancel the order if I wished, as it looked like it was going to be a no-show, nevertheless, it eventually showed up, but it did take nearly two months! Probably easier to track down a real one than that:rotfl: There are one or two 'Akula' kits about, including several different resin ones at this scale, plus a number of smaller scale versions, as well as a very large one suitable for radio control, but the Alanger one seems to be fairly popular as it is not that expensive in comparison to many of the other choices. However, there's bad news as well as good on that score; this kit has quite a few inaccuracies and some of these are not merely minor cosmetic ones, so we'll see how I get on with sorting all that out. First inspection reveals that it is actually quite crisply produced in greyish/black plastic, with some fairly sharp detailing, although much of that detailing is raised rather than inscibed, and there is no piercing of flood holes or grills, so that's a few things that will need sorting out straight away. 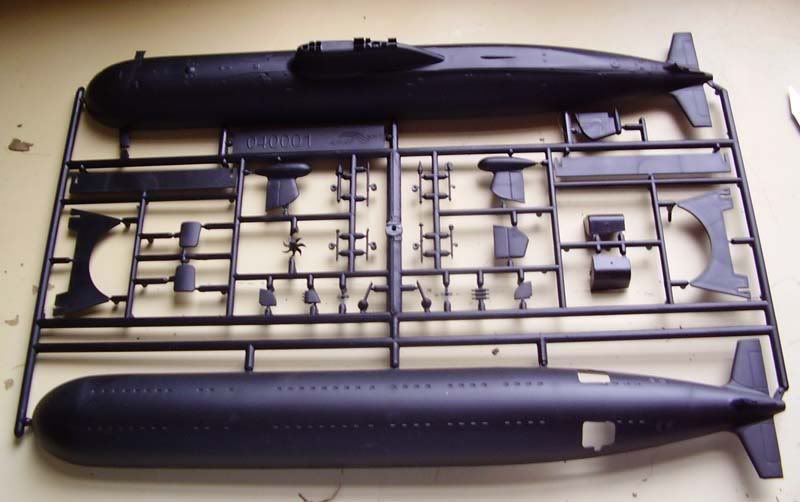 Building it straight from the box would not take long at all, since it is basically a case of sticking two hull halves together and adding the 'sticky out' bits, it's even not a bad colour without paint, so if you just wanted a reasonably close representation, it's not disastrously inaccurate. The instruction sheet reflects this simplicity, Being a folded black and white A3 paper with just six simple line drawings showing where stuff goes and resplendent with poorly translated English worthy of Babelfish, including such gems as: 'Avoid details approach into mouth and gullet, in case of - apply to medical help immediately' and 'Childern are to work with glue and paints with growths assistance only. Do not approach children younger than 3 and home animals to working place' Building straight from the box would not result in a particularly pleasing model of course, although it would probably look reasonably okay. But to really look like the real thing is going to take a fair bit of work. Two glaring problems present themselves, these being the poor representation of the screw and the sail. Being one of the few parts on a sub that isn't black, a naff-looking screw will really stand out, so that's definitely got to change. 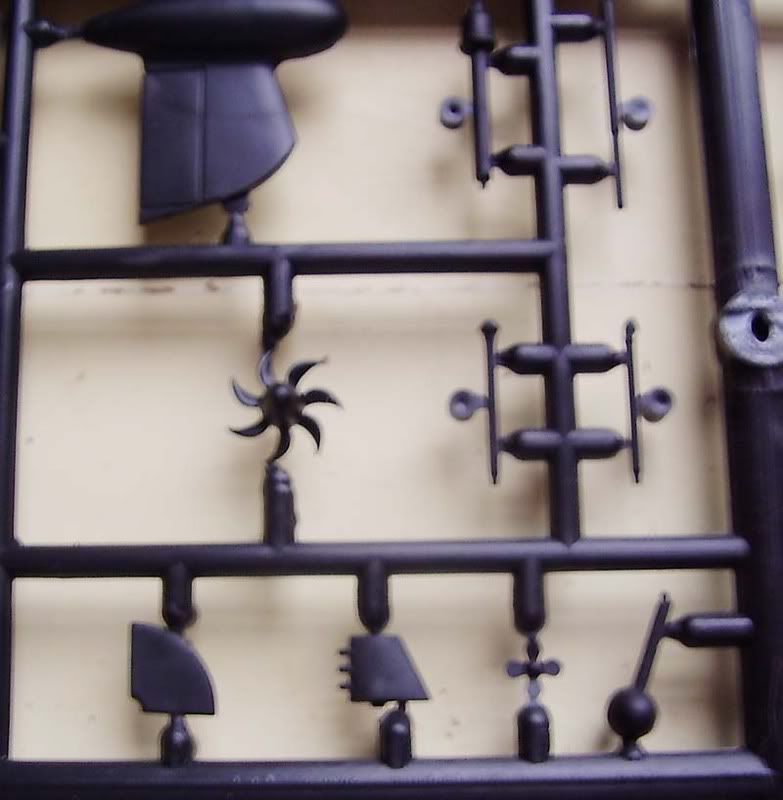 The problem with the sail, is that it is quite poorly done as far as profile is concerned, and the problem is compounded by the kit's optional inclusion of a smaller towed array housing of the type seen on the 'Gepard' improved variant, which would be at odds with the rest of the hull since that variant has a different sail cross section.  That said, if one is to attempt to correct the sail profile, then correcting it for either variant is a possibility, so that doesn't exclude the choice of making the 'Gepard' out of this kit as long as you don't mind a bit of 'cutting and shutting'. lastly, there seems to be an error with the hull's length behind the stern planes, so that will need extending a bit from the looks of things. 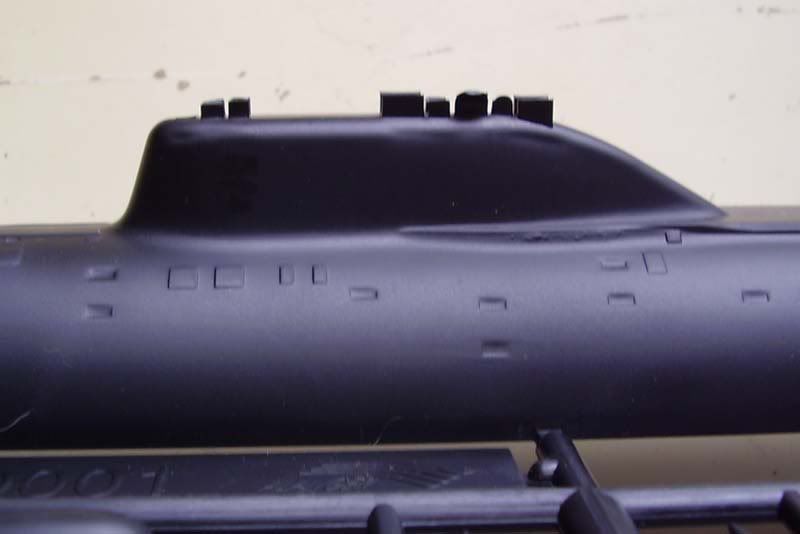 Clearly I'm going to need some decent reference. Fortunately, there is quite a bit available for the 'Akula', notably Wayne Frey's excellent book, 'Russian submarines: Guardians of the Motherland' (ISBN 0-7414-3447-4), and although the pictures in this book are perhaps not repro'd as well as they could be, it's still an invaluable source of info. On top of that, there are numerous pictures on the 'net of various 'Akula' models, as well as quite a few schematic drawings. I even found a picture of one boat being constructed; these are the sort of pictures you probably could have got a million bucks for twenty-five years ago! To be continued...  Chock Chock
__________________

|

|

|
|
11-18-07, 01:50 PM
|
#2 |
|
Loader
 Join Date: Sep 2007
Location: Somerset, UK
Posts: 89
Downloads: 0
Uploads: 0
|
Nice one Chock,
It's good to see more 'in progress' modelling going on here. I'll be following your build closely  Sav. |
|
|
|
|
11-18-07, 03:38 PM
|
#3 |
|
Sub Test Pilot

Join Date: Mar 2005
Location: UK + Canada
Posts: 7,090
Downloads: 68
Uploads: 7


|
I have one of these good kits however they are not so good falling from your shelf to the floor then having your 19 stone dad stand on it.
Nether the less it lasted a year !
__________________
DONT FORGET if you like a post to nominate it by using the blue diamond    Find out about Museum Ships here: https://www.museumships.us/ Flickr for all my pictures: https://www.flickr.com/photos/131313936@N03/ Navy general board articles: https://www.navygeneralboard.com/author/aegis/ |
|
|
|
|
11-18-07, 11:47 PM
|
#4 |
|
Sea Lord
Join Date: May 2005
Location: Under a thermal layer in chilly Olde England
Posts: 1,842
Downloads: 0
Uploads: 0
|
Well, there's the answer for the US Navy's hunter killers then, just give your dad a call:rotfl:
Update: Further investigation reveals that the sail problems are manifest. The front faired-in angle is too steep on the sail in the kit, and the rear slope of the sail sweeps down incorrectly, starting in the wrong place and being too severe rather than emulating the graceful curve of the real thing. This can be seen on the composite comparison shot below; even though the shot angles differ, the error is still apparent, as is the wildly inaccurate and oversized door placement for the masts and the incorrect placement of the cockpit: 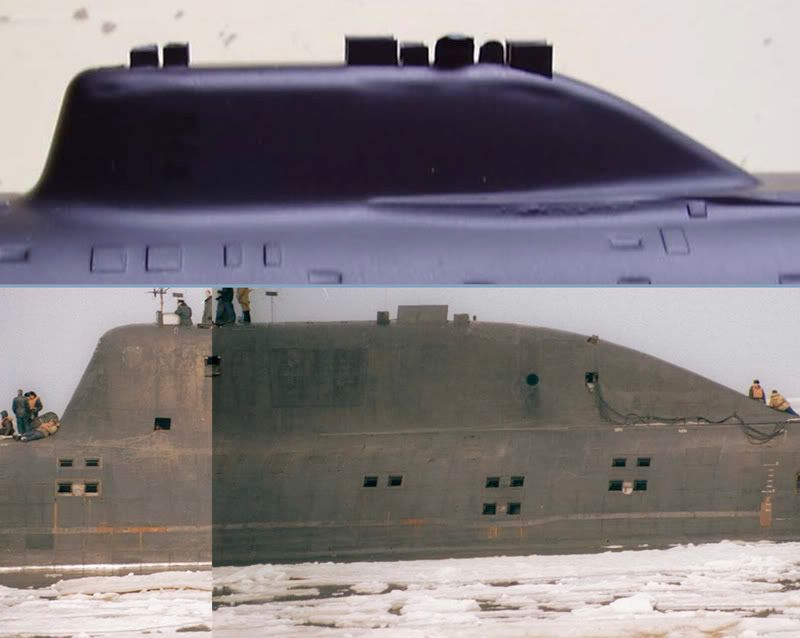 So, it was out with the scalpel and needle files to remove it all! Thus, filling it all in and re-drilling the location holes for the masts is on the cards, as is constructing the cockpit more accurately with the correct windscreens, but before that, I'll have to reprofile the sail, which should be possible with filler and some more comparisons with photographs and schematic drawings. Picture of the crappy detail having been removed: 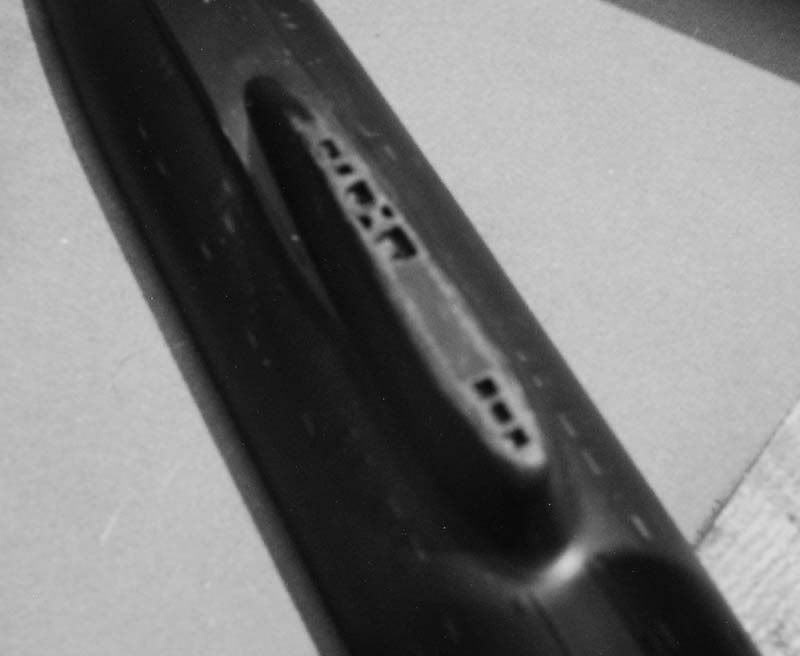 Chock Chock
__________________
|
|
|
|
|
11-19-07, 05:55 AM
|
#5 |
|
Rear Admiral
 Join Date: May 2006
Location: Malaga, España
Posts: 10,750
Downloads: 8
Uploads: 0

|
Good luck, chock. thats going to be a hell of a task to do. HunterICX
__________________

|
|
|
|
|
11-19-07, 07:25 AM
|
#6 |
|
Sub Test Pilot
Join Date: Mar 2005
Location: UK + Canada
Posts: 7,090
Downloads: 68
Uploads: 7
|
Yeah good luck with it and hope your one lasts longer than mine, my bed room at the moment looks like a russian naval shipyard i have models half finnished with bits here and there and other models worse for wear lol.
Good luck!
__________________
DONT FORGET if you like a post to nominate it by using the blue diamond Find out about Museum Ships here: https://www.museumships.us/ Flickr for all my pictures: https://www.flickr.com/photos/131313936@N03/ Navy general board articles: https://www.navygeneralboard.com/author/aegis/ |
|
|
|
|
11-19-07, 09:13 PM
|
#7 |
|
Sea Lord
Join Date: May 2005
Location: Under a thermal layer in chilly Olde England
Posts: 1,842
Downloads: 0
Uploads: 0
|
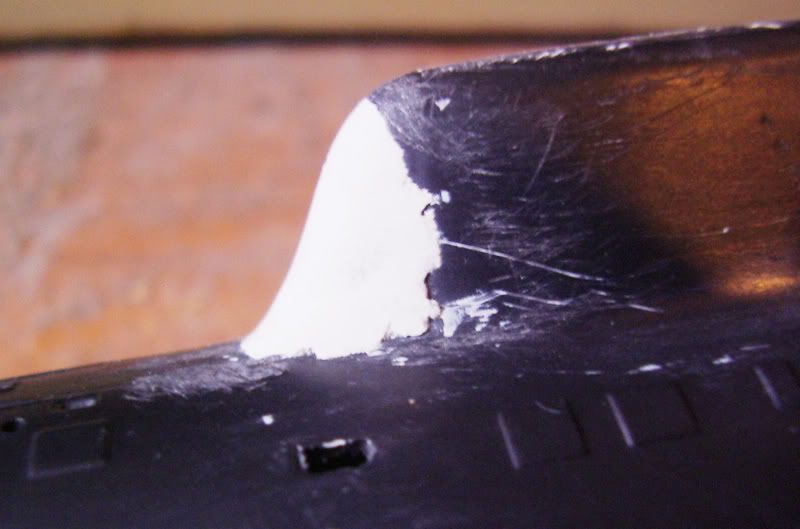
Another quick update:
All vent holes on the upper hull drilled out and filed square (ish), still need a little tidying but reasonably close to looking okay. I also started the correction to the forward part of sail and filled in all the incorrect placement holes, this is probably going to take two or three stages to be really satisfactory, and it's always a temptation to try and sort it all in one go, but, I restrained myself and settled for a rough profile. When that's hardened off, a little sanding should make it apparent what needs to be done to get it more like the correct profile: 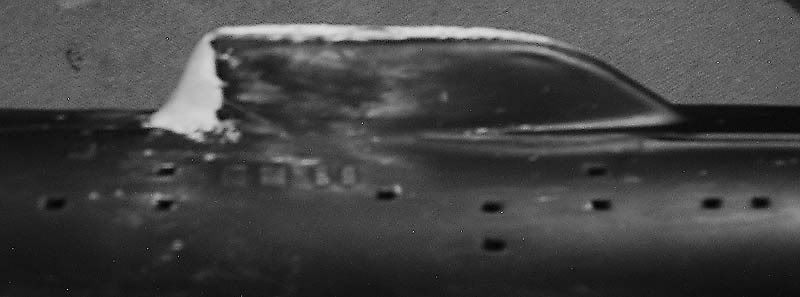 Chock Chock
__________________
|
|
|
|
|
11-20-07, 01:03 AM
|
#8 |
|
Fleet Admiral

 Join Date: Jul 2003
Location: Patroling the Slot.
Posts: 17,925
Downloads: 90
Uploads: 0
|
__________________
 
|
|
|
|
|
11-20-07, 01:32 AM
|
#9 |
|
Sea Lord
Join Date: May 2005
Location: Under a thermal layer in chilly Olde England
Posts: 1,842
Downloads: 0
Uploads: 0
|
Thanks for posting the link
I have already got most of those shots, but there were one or two that I haven't seen, so it's appreciated. Incidentally, most of them reveal a lot more detail if your drop the darker tones with the curves palette in Photoshop, which is good for getting panel location info. Chock
__________________
|
|
|
|
|
11-20-07, 10:50 AM
|
#10 |
|
Sea Lord
Join Date: May 2005
Location: Under a thermal layer in chilly Olde England
Posts: 1,842
Downloads: 0
Uploads: 0
|
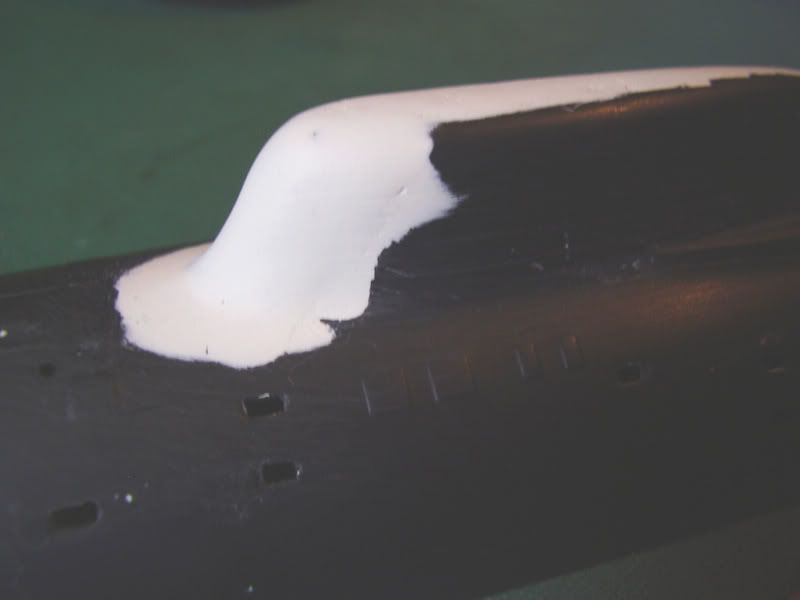
Two more shots in better lighting after some cleaning up of the initial reprofiling job reveal that it actually wasn't a bad first shot at things:
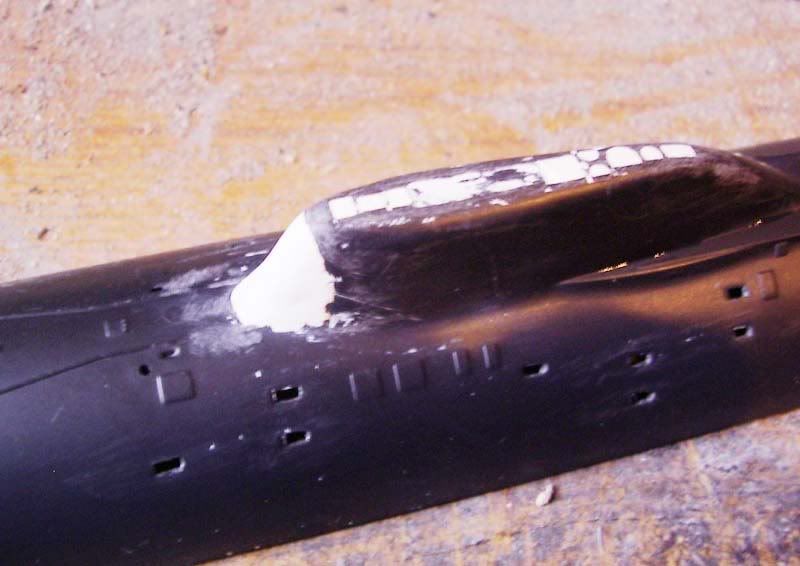  Extending the sail slightly to form the correct profile means that the raised detail of the deck safety line attachment rails has to go, but this is not a disaster as I intended to replace that with fine wire anyway, I think that will look much more convincing than the original molded on detail. Most of the other raised details, such as the oversized square hatch detailing is going to be going too, it would be much better represented simply by masking and painting it in at this scale, so that's what I intend to do. One advantage doing this 'nose job' on the sail will confer, is that it will be easier to add the SOKS wake detection array to the front of the sail. There is no attempt to model this in the original kit, which is not surprising as it would be fairly tricky to do in plastic at this scale. Even so, it is very noticeable on most shots of the Akula, so I'm going to add it. Currently I'm thinking that the heads of either dressmaking pins or sewing needles inserted into the putty which forms the reprofiled sail front will make a pretty good lookalike, but in case that isn't as good as it sounds, I bought some very fine steel rods from a model shop the other day as a back up solution. I took the precation of filling the inside of the sail with modeling putty too, as all this sanding might end up making the sail's original plastic rather thinner than it was to start off with, and the tip of the sail where it nears the cockpit location has had quite a lot of plastic shaved off, so it will definitely be getting on the thin side at that point. Had an email from Flagship Models yesterday too, letting me know that the replacement screw set I ordered has been posted, so that's good news. Since I will be displaying the completed model in a rather unusual way (watch this space!) which calls for the creeper motors to be in their retracted position, this gets around the problem of their two tiny screws having to be either corrected or replaced. Even with the close up photographs of these in Wayne Frey's book, I suspect they would be more guesswork that a true depiction of the real things as the casings and support stanchions don't look too accurate in the kit compared to the (few) pics you can get which show them for real, besides which, the screws for the creeper motors appear to be behind some sort of protective grille on the real deal, which I daresay would be impossible to emulate at this scale in any really convincing fashion, so I'm glad this is not going to be an issue. Shame you can't get those creeper motors on the 'Akula' in Dangerous Waters, that would be really cool! Chock
__________________
Last edited by Chock; 11-20-07 at 11:32 AM. |
|
|
|
|
11-20-07, 11:50 AM
|
#11 |
|
Master of Defense
 Join Date: Mar 2000
Posts: 1,502
Downloads: 125
Uploads: 0
|
Quesiton: Did you simply putty-up the leading edge of the sail to get the profile, or was there chopping involved? Also, from the pics you posted it looks like the trailing edge also needs some work, agreed?
__________________
My Dangerous Waters website: |
|
|
|
|
11-20-07, 12:58 PM
|
#12 |
|
Sea Lord
Join Date: May 2005
Location: Under a thermal layer in chilly Olde England
Posts: 1,842
Downloads: 0
Uploads: 0
|
Basically, most of the work is going to be achieved with the putty, so it initially just had a piece of that added, however, as you point out, it does appear to me that the very top of the front of the sail just in front of the cockpit requires a bit of minor shaving of the plastic original bit too. This is why I filled the inside of the sail with putty, so that if this proves to be the case, there'll be plenty of spare material underneath the plastic to allow that to happen.
Just before typing this, I added another very thin layer of putty over the thing to smooth out the reprofiled bit and allow it to blend smoothly into the deck, the more I can get this blending into the deck to work without having to sand and file it, the easier it will be, so that took a bit of deft work with the old fingers! Basically that was done in a manner not dissimilar to placing a pastry 'lid' over a pie in its dish, then smoothed into the deck and sail with fingertips. Messy on your fingers, but it looks pretty good so far, I'll post a picture of that when it has dried and hardened a bit so I can wash all the crap off it and make it easier to photograph. I also corrected a couple of molding sink marks in the plastic toward the back of the sail whilst I was at it. I agree, the trailing edge of the sail does indeed need some work, as it it does not portray the attractive sweep downwards that the real thing displays, this is even more apparent upon removing the oversized antenna/mast doors that were on the original kit, but to correct this is going to be simpler than correcting the front, as it is not a compound reversing curve like it is at the front, which is quite good news! In addition to these inaccuracies, when viewed from the front and rear, the cross section of the sail is in fact more akin to the Gepard than earlier versions of the Akula (i.e. not so blended into the decking, although still incorrect) so that's going to need sorting out too, as it is rather different from the pictures I have where the safety rail meets the termination of the sail about halfway along its length. I did phone Vladimir Putin and ask him to sail one of his Akulas up the Mersey so I could get a good look at it, but for some reason he hasn't returned my call, so I'm stuck with Wayne's book and pictures off the 'net! Guess I've opened something of a can of worms in attempting to make it more realistic, but then again, if it was easy, it wouldn't be a challenge, and I think it will be worth the effort. Of course one of the nice things about doing all of this is that the Akula (like many modern subs) actually does look rather lumpy and bumpy with its anechoic covering, so any very minor imperfections in all this tweeking will be okay, but at the scale it is depicted here, I can't rely on that too much to cover any sins. There is one big plus point to this kit over the more expensive resin kits though; It's a hell of a lot easier to open up the vents in the hull on a plastic kit than it would be on a resin one! Thanks again for posting the link to that source for the replacement props by the way Bill, it seems they are on the ball when it comes to completing orders, as they are apparently on the way. Chock
__________________
Last edited by Chock; 11-20-07 at 01:28 PM. |
|
|
|
|
11-20-07, 04:44 PM
|
#13 |
|
Sparky
 Join Date: Feb 2007
Location: LA Ca.
Posts: 152
Downloads: 0
Uploads: 0
|
Chock,
Get some Ever Coat Metal Gaze from the auto paint store. You will not find a better filler. Mixes like bondo, sets and 15 minutes and is ready to sand unlike Bondo. It also sands very easily. I was lost until I David Merriman turned me onto this product. You can fix anything with it. Build up anything in minutes with the material. I only use spot putty or Squadron to fill deep scratches now. Steve |
|
|
|
|
11-21-07, 09:06 AM
|
#14 |
|
Sea Lord
Join Date: May 2005
Location: Under a thermal layer in chilly Olde England
Posts: 1,842
Downloads: 0
Uploads: 0
|
Quick update just before I need to dive on a choo choo train to London to train someone in Photoshop (don't you just love it when work gets in the way of fun?). Here is the sanded and cleaned up nose job, it looks like one more minor correction will see that bit completed, god bless Milliput and steel wool; Number One, rig for silent sandpapering:
 Chock Chock
__________________
|
|
|
|
|
11-21-07, 03:59 PM
|
#15 |
|
Rear Admiral
Join Date: May 2006
Location: Malaga, España
Posts: 10,750
Downloads: 8
Uploads: 0
|
thats a fine correction HunterICX
__________________
|
|
|
|
 |
|
|


 Linear Mode

