
|
|
SUBSIM: The Web's #1 resource for all submarine & naval simulations since 1997
|
SUBSIM: The Web's #1 resource for all submarine & naval simulations since 1997 |
 01-30-11, 03:12 PM
|
#16 |
|
Lucky Jack
 
Join Date: Jun 2005
Location: In a 1954 Buick.
Posts: 27,343
Downloads: 90
Uploads: 0

|
Rusting material applied and drying.
__________________
You're painfully alive in a drugged and dying culture. ― Richard Yates, Revolutionary Road |

|

|
|
01-30-11, 03:38 PM
|
#17 |
|
Ocean Warrior
 Join Date: Dec 2007
Location: Between test depth and periscope depth
Posts: 3,021
Downloads: 175
Uploads: 16
|
What's the purpose of the salt?
__________________
USS Kentucky SSBN 737 (G) Comms Div 2003-2006 Qualified 19 November 03 Yes I was really on a submarine. |
|
|
|
|
01-30-11, 07:15 PM
|
#18 |
|
Lucky Jack
Join Date: Jun 2005
Location: In a 1954 Buick.
Posts: 27,343
Downloads: 90
Uploads: 0
|
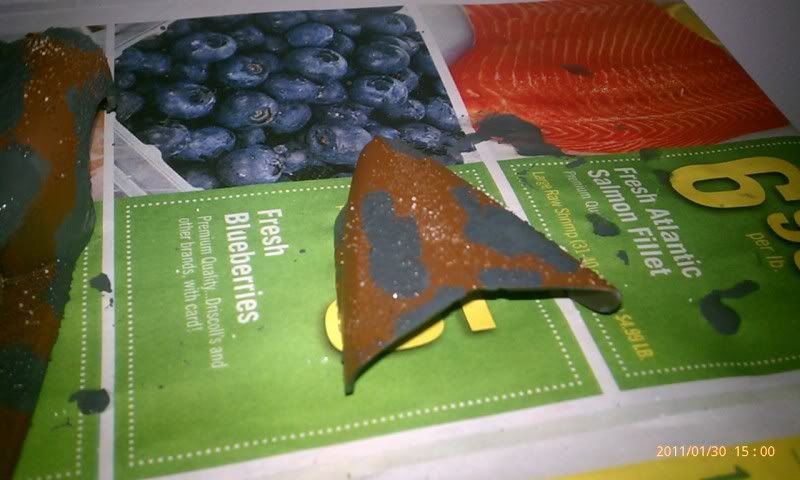
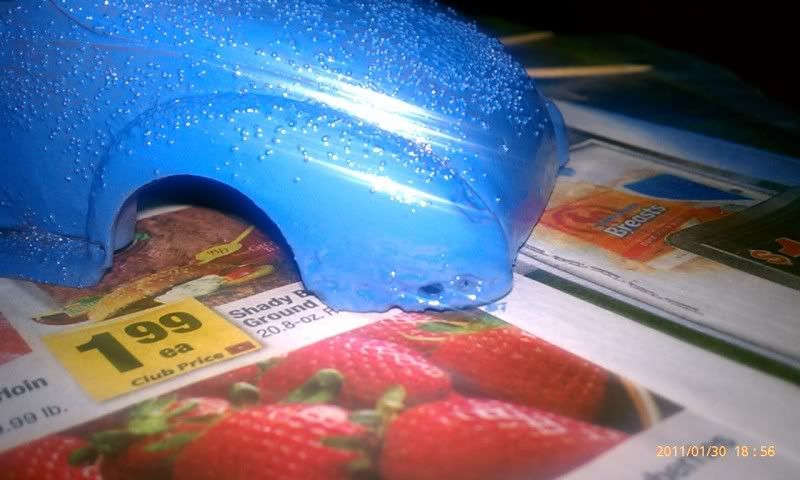
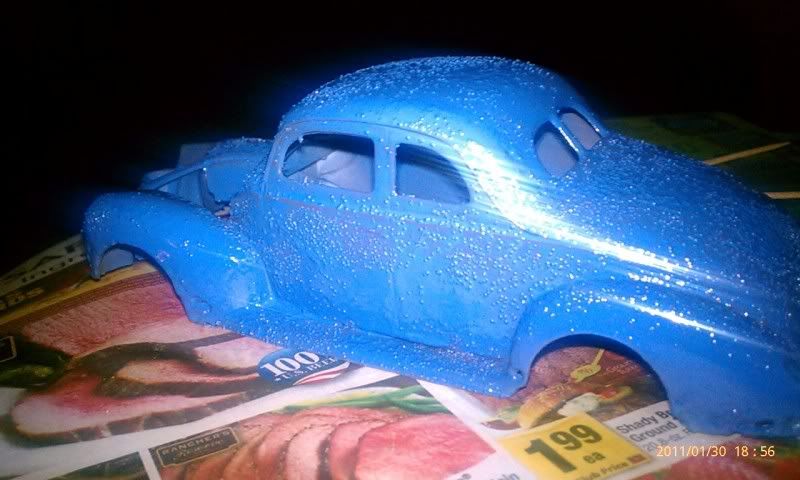
What the salt does is create pitted paint. It will cover the paint below it. Then you use your next color coat to cover it. When you peel the salt away it remove the final coat and exposes the coat underneather giving you pitted paint.
Here is an example: 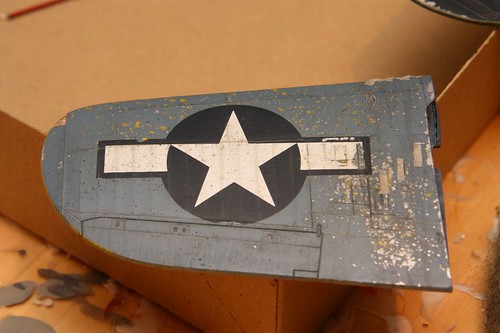 A tan color was used and salt added. Then the gray/blue color was sprayed on top. Once dry use light sanding to remove the salt. It exposes the tan paint and gives the pitted paint look. 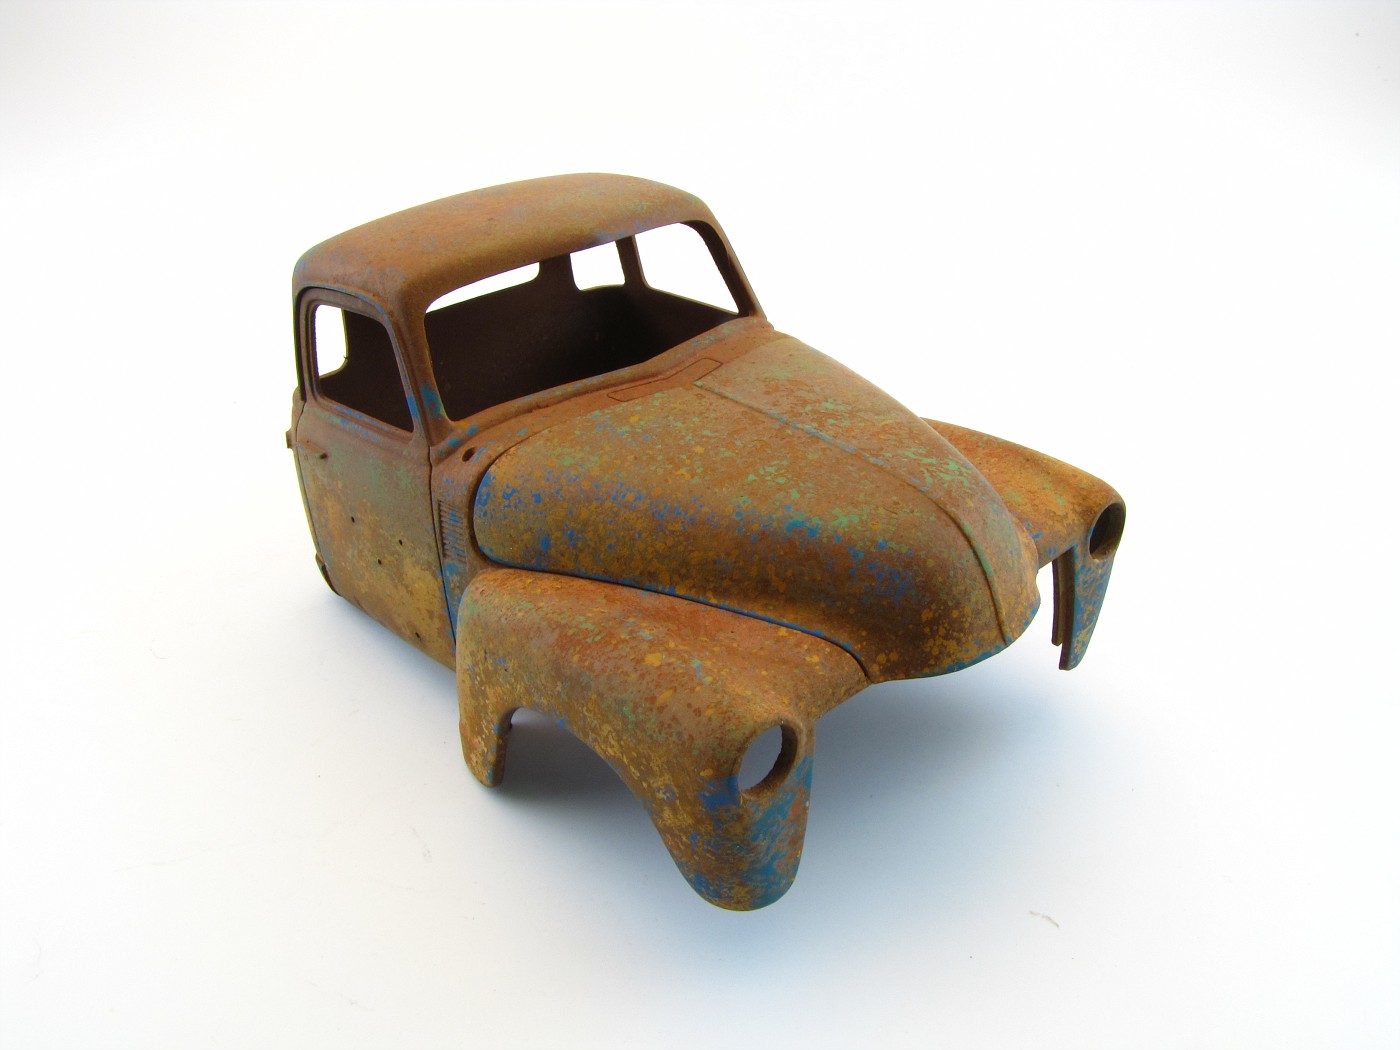
__________________
You're painfully alive in a drugged and dying culture. ― Richard Yates, Revolutionary Road Last edited by AVGWarhawk; 01-30-11 at 07:34 PM. |
|
|
|
|
01-30-11, 07:33 PM
|
#19 |
|
Lucky Jack
Join Date: Jun 2005
Location: In a 1954 Buick.
Posts: 27,343
Downloads: 90
Uploads: 0
|
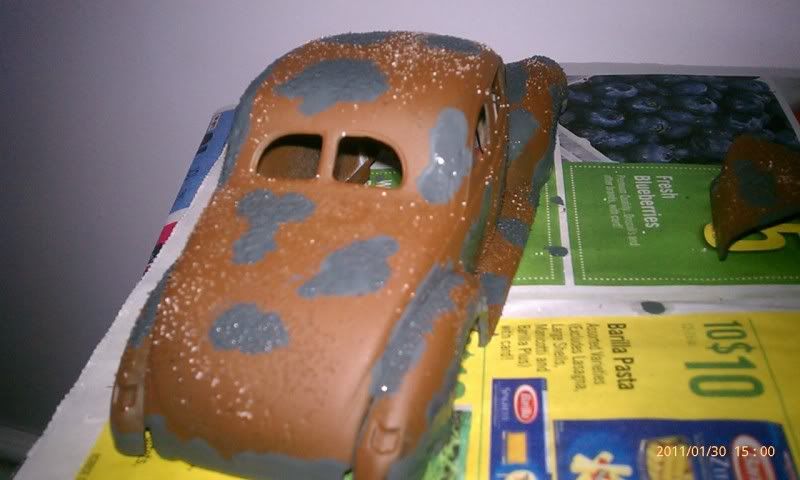
And my final coat needing to dry until tomorrow.
  Once this dries I lightly sand the salt away and the rubber cement covering the material(basically iron paint) and apply the activator that creates the rust overnight. I should be able to do this tomorrow if time permits.
__________________
You're painfully alive in a drugged and dying culture. ― Richard Yates, Revolutionary Road |
|
|
|
|
01-30-11, 09:18 PM
|
#20 |
|
Lucky Jack
Join Date: Jun 2005
Location: In a 1954 Buick.
Posts: 27,343
Downloads: 90
Uploads: 0
|
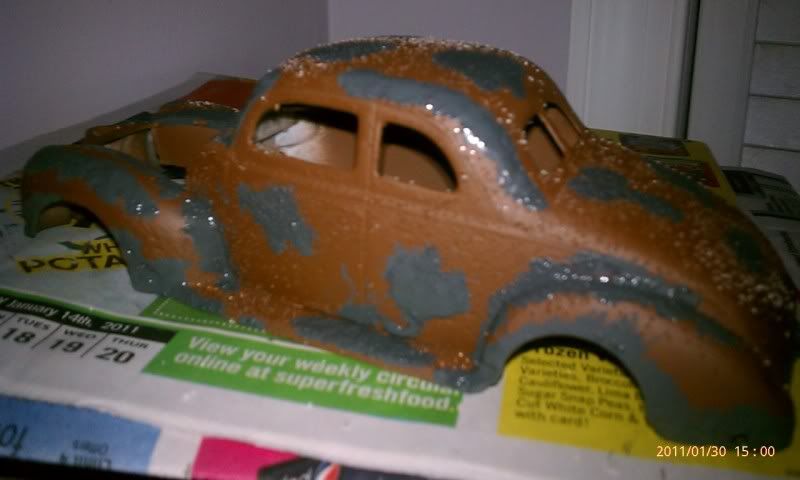
A stroke of luck. The top coast was dry so I gave it a first sanding. I still have some salt to remove and I will do that later. The desired effects look to be achieved. I have added the activator to create rust and this will have to sit overnight. Here is what I have now:
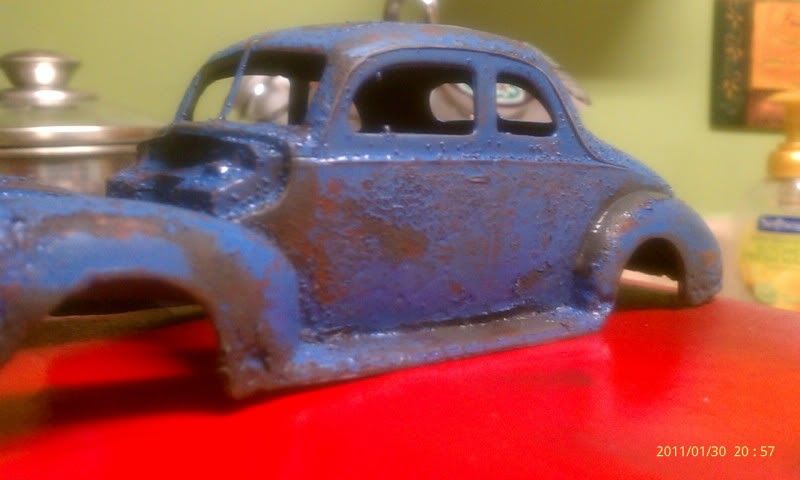 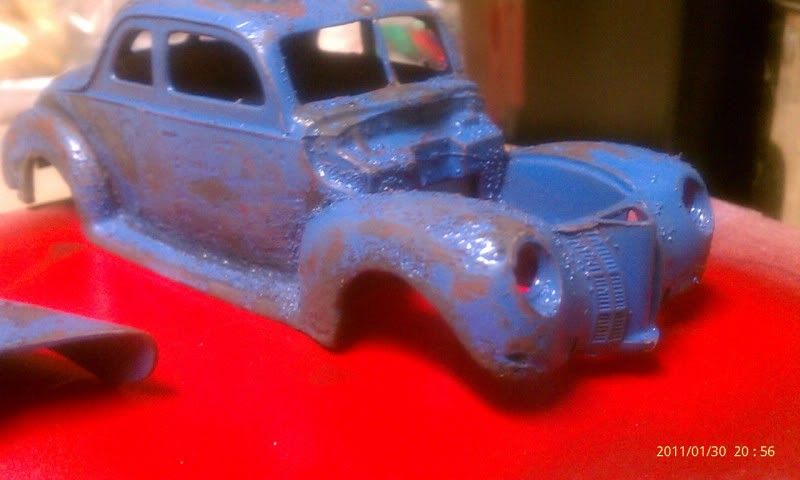  The dark black color is the iron that I applied the activator on to create rust. It is real rust as it is real iron in the mix. Once I applied the activator I had to bag the body in a zip lock baggie. Let's see how we look tomorrow.
__________________
You're painfully alive in a drugged and dying culture. ― Richard Yates, Revolutionary Road |
|
|
|
|
01-30-11, 09:41 PM
|
#21 |
|
Admiral
 Join Date: Aug 2003
Location: Michigan, USA
Posts: 2,387
Downloads: 21
Uploads: 0
|
Your rusty '40 Ford is lookin great so far!
 I never thought to use salt to create paint pits. I've always wanted to create my own rusty heap, but wasn't sure how to do it. For rust I was thinking of a tip off that forum I posted earlier. Some people take real rust, grind it to a fine powder, and then dry brush it on. Come to think of it, I don't remember if I read that on the car modeling forum or a ship forum. I never thought to use salt to create paint pits. I've always wanted to create my own rusty heap, but wasn't sure how to do it. For rust I was thinking of a tip off that forum I posted earlier. Some people take real rust, grind it to a fine powder, and then dry brush it on. Come to think of it, I don't remember if I read that on the car modeling forum or a ship forum. I'm glad the forum gave you some ideas. I have been a member there for a while and got a whole slew of ideas from that site. That was a year ago and by now I forgot most of them.  I really need to get another model. Here's a few threads I bookmarked about a year ago. They helped me. I hope they can give you some ideas, too, if you don't already know it. I really need to get another model. Here's a few threads I bookmarked about a year ago. They helped me. I hope they can give you some ideas, too, if you don't already know it. Bare Metal Foil substitute (I've had good results with cheap foil.) http://www.modelcarsmag.com/forums/i...are+metal+foil Interior Detailing - Flocking http://www.modelcarsmag.com/forums/i...84&hl=flocking 1949 Mercury (This thread is done by one of the most talented guys on that forum. That's hard to say when so many are very talented.) http://www.modelcarsmag.com/forums/i...howtopic=22834 The Dreaded Orange Peel http://www.modelcarsmag.com/forums/i...726&hl=acrylic |
|
|
|
|
01-31-11, 10:32 AM
|
#22 |
|
Lucky Jack
Join Date: Jun 2005
Location: In a 1954 Buick.
Posts: 27,343
Downloads: 90
Uploads: 0
|
I like that flocking thread.
I looked at the Ford this morning and the rust is forming. I will post up the kit I got so others may try it. I will take some pics of the car tonight and post.
__________________
You're painfully alive in a drugged and dying culture. ― Richard Yates, Revolutionary Road |
|
|
|
|
01-31-11, 10:38 AM
|
#23 |
|
Lucky Jack
Join Date: Jun 2005
Location: In a 1954 Buick.
Posts: 27,343
Downloads: 90
Uploads: 0
|
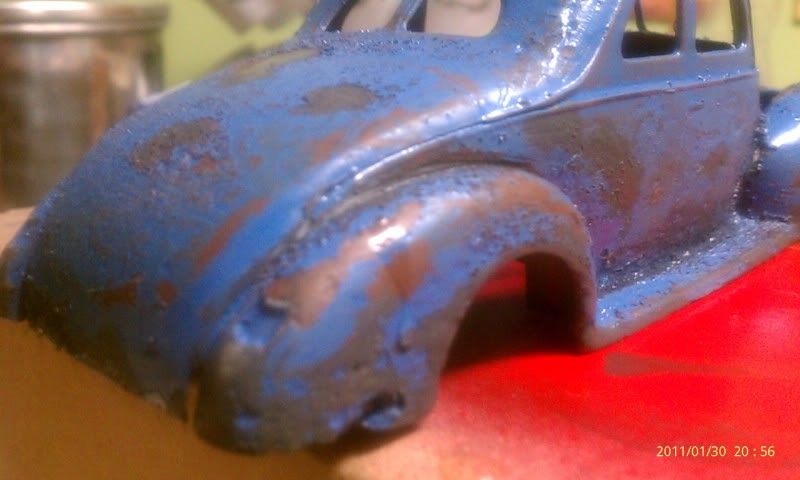
Judging by this picture my running boards need to be black. I suspect these had rubber covering them. That should be easy to do with some flat black. I just need to keep it tattered and rusty. I will use silver for the chrome pieces running the side of the body.

__________________
You're painfully alive in a drugged and dying culture. ― Richard Yates, Revolutionary Road |
|
|
|
|
01-31-11, 10:40 AM
|
#24 |
|
Lucky Jack
Join Date: Jun 2005
Location: In a 1954 Buick.
Posts: 27,343
Downloads: 90
Uploads: 0
|
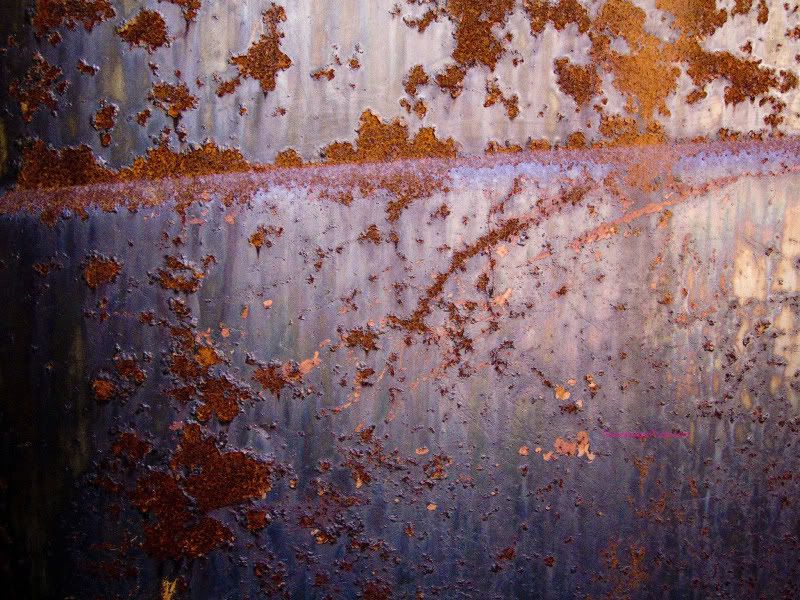
Here is the paint effect I'm shooting for. Looks like mine is darn close to the real thing.
__________________
You're painfully alive in a drugged and dying culture. ― Richard Yates, Revolutionary Road |
|
|
|
|
02-01-11, 09:00 AM
|
#25 |
|
Lucky Jack
Join Date: Jun 2005
Location: In a 1954 Buick.
Posts: 27,343
Downloads: 90
Uploads: 0
|
This is what the car body looked like after allowing the rusting material to do it's thing.
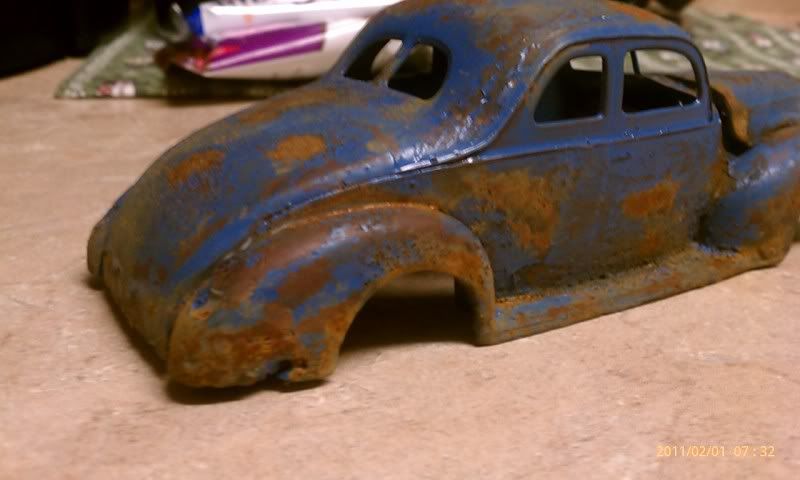 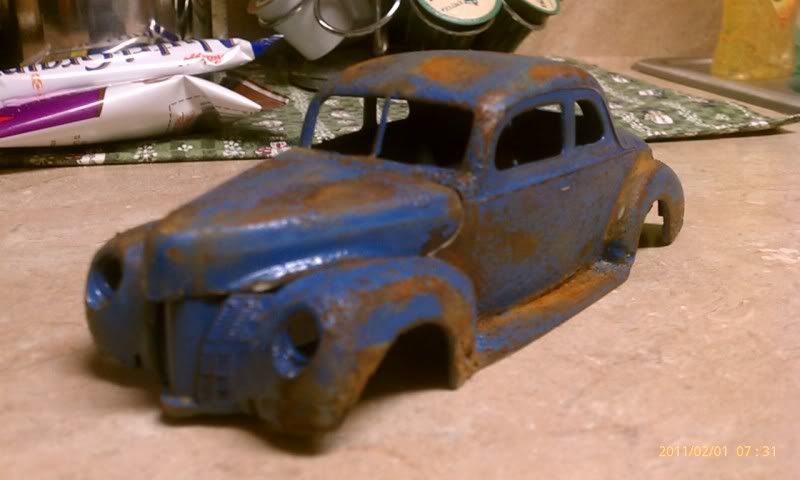 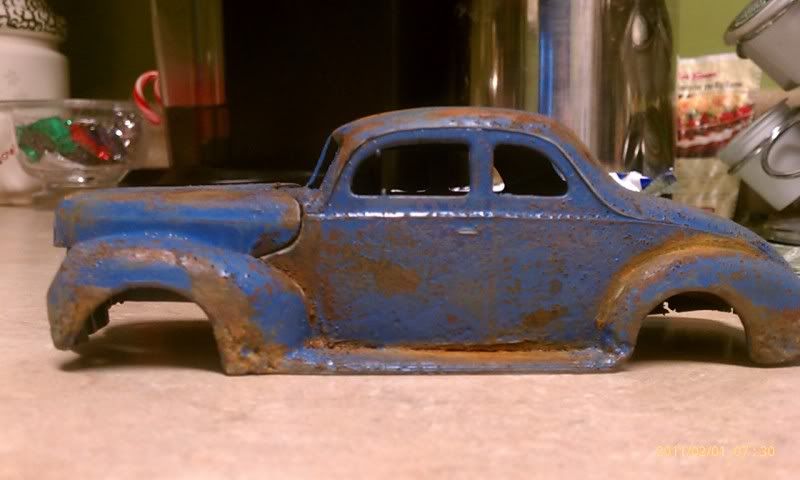 Now to add detail to the door edges (black shading) and the chrome work on the door handle and strip down the side. I'm quite pleased with the outcome.
__________________
You're painfully alive in a drugged and dying culture. ― Richard Yates, Revolutionary Road |
|
|
|
|
02-01-11, 09:05 AM
|
#26 |
|
Canadian Wolf

 Join Date: Jul 2006
Location: The one and only East Coast
Posts: 10,775
Downloads: 946
Uploads: 5

|
Nice work here Chris

|
|
|
|
|
02-01-11, 09:45 AM
|
#27 |
|
Lucky Jack
Join Date: Jun 2005
Location: In a 1954 Buick.
Posts: 27,343
Downloads: 90
Uploads: 0
|
Thank you sir! Ain't seen nothing yet!
 Much detail work to do on this body. Add my windows...one smashed and cracked of course. I will be working on my rusty rims and flat tires tonight. The chrome bumpers and grill will be getting the rust treatment. Then on to the engine (which will be mostly striped of parts and the engine bay needs the detail work. Plus, the frame/undercarriage will be getting the rust treatment as well. After completing this then I work on the flatbed trailer this junker will be sitting on. Much detail work to do on this body. Add my windows...one smashed and cracked of course. I will be working on my rusty rims and flat tires tonight. The chrome bumpers and grill will be getting the rust treatment. Then on to the engine (which will be mostly striped of parts and the engine bay needs the detail work. Plus, the frame/undercarriage will be getting the rust treatment as well. After completing this then I work on the flatbed trailer this junker will be sitting on.
__________________
You're painfully alive in a drugged and dying culture. ― Richard Yates, Revolutionary Road |
|
|
|
|
02-02-11, 06:36 AM
|
#28 |
|
Grey Wolf
 Join Date: Jul 2008
Location: Sweden
Posts: 831
Downloads: 101
Uploads: 0
|
Thats very nice,

__________________
 Liverpool is my relegion, Anfield is my church. True believers never walk alone. |
|
|
|
|
02-02-11, 11:36 AM
|
#29 |
|
Lucky Jack
Join Date: Jun 2005
Location: In a 1954 Buick.
Posts: 27,343
Downloads: 90
Uploads: 0
|
Thanks Refan. I started on the chassis last night. The rims got their first coat of primer. The interior was assembled and sprayed flat black. I did not spend much time on the interior. Hard to see inside and not worth my effort to paint details on a ratty old car. I did use cotton to make the seats look torn and ratty. The window were added and two given the cracked window treatment. I will try to post a few pics tonight.
__________________
You're painfully alive in a drugged and dying culture. ― Richard Yates, Revolutionary Road |
|
|
|
|
02-02-11, 08:00 PM
|
#30 |
|
Admiral
Join Date: Aug 2003
Location: Michigan, USA
Posts: 2,387
Downloads: 21
Uploads: 0
|
I really like how your Ford is turning out! Your rig is gonna look great when done.

|
|
|
|
 |
|
|


 Linear Mode

