
|
|
SUBSIM: The Web's #1 resource for all submarine & naval simulations since 1997
 |
SUBSIM: The Web's #1 resource for all submarine & naval simulations since 1997 |
 08-13-14, 12:09 PM
|
#136 |
|
Growing Old Disgracefully
|
Hi diego
Your mod list is ok. I cannot see any problems with it, looks good. You cannot get the next mission until you meet the date requirement. So it sounds like you have finished the Baltic Mission before the 4th and you have ended your patrol. The next patrol is Eastern British Coastal Waters starts on the 4th September 1939. If you are not using the mod ‘Change Days in the Bunker’ then the turn round time is 14 days. You need to too do the following. Load the ‘Autosave Enter Base.’ Go to the ‘Flotilla Leader.’ Select ‘Start Mission’ Select ‘Yes.’ Check the date on your ‘Navigation Map.’ Click on the ‘Anchor Icon.’ Select ‘End Patrol.’ Load the ‘Autosave Enter Base.’ Go to the ‘Flotilla Leader.’ Go to ‘What are my Mission Orders. You should now see your next patrol E.B.C.W. When you open the nav map up the grid should disappear. If you want to be able to use Sjizzle's grid chart so you can place it and size it on the grid then you will need to update 7-4-2- to 7-5-0 7-4-2 does not allow you to resize the grid chart. Peter
__________________
LSH3-2015 <> TUTORIALS <> ALL YOU NEED TO KNOW <> ALL IN ONE PLACE SH4 <> TUTORIALS <> HOW TO DO IT <> INFORMATION <> DOWNLOAD LINKS SH5 <> TUTORIALS <> HOW TO DO IT <> INFORMATION <> DOWNLOAD LINKS Always Here To Help A Fellow 'Subber' | Need An Answer to A Question Just Send Me A PM |

|

|
 08-13-14, 03:10 PM
|
#137 |
|
Swabbie
 Join Date: Aug 2014
Posts: 8
Downloads: 36
Uploads: 0
|
Excellent!
Thanks! |

|

|
 08-15-14, 12:22 PM
|
#138 |
|
Growing Old Disgracefully
|
Last updated 27th April 2018
JSGME How To Move A Mod To A New Postion In A Mep File. 1. I will show you How to Move a Mod to a New Position in a Mep File and How to Move a Number of Mods to New Positions by also using a Mep File. 2. The Mod DynEnv v2.9 - 12. Sounds is going to be moved and will be placed behind the DynEnv v2.9 - 11.a.III Sea Plants - Atlantic Kelp Forests (low resolution) Mod. 3. If you have been following my other 2 Tutorials in this series you will know that I have a Saved Mep File called Mep File 2 05.04.2015. (Picture 1) 4. This has been Saved to a Folder called Mep Files. (Picture 1) 5. Go to the Mep Files Folder. (Picture 1) Picture 1  6. Click on the Mep File 2 05.04.2015 once with your Mouse to Highlight it. (Picture 2) 7. Right Click with the Mouse on the Highlighted Section and Select Copy. (Picture 2) Picture 2 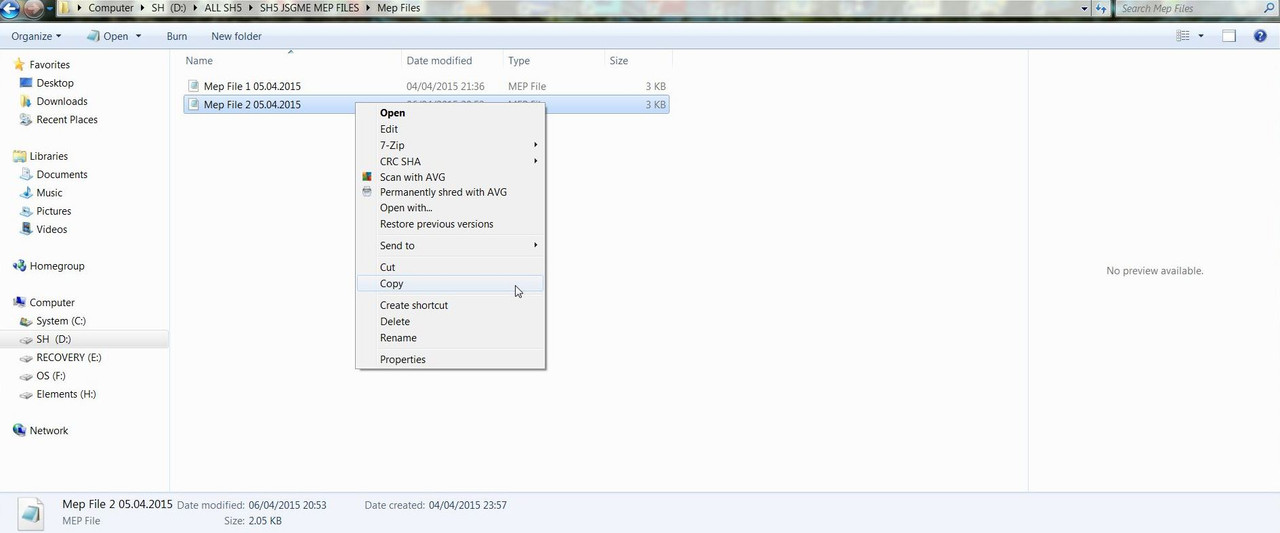 8. Go to an Empty Part of the Screen and Select Paste. (Picture 3) Picture 3 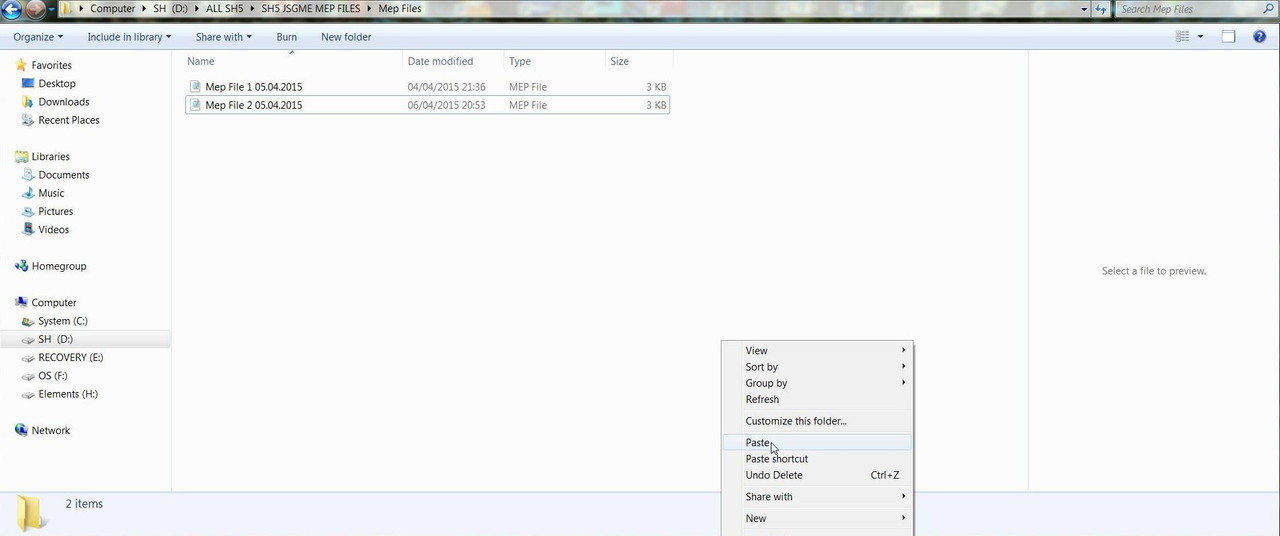 9. You will notice that we are now showing Mep File 2 05.04.2015 – copy (Picture 4) Picture 4 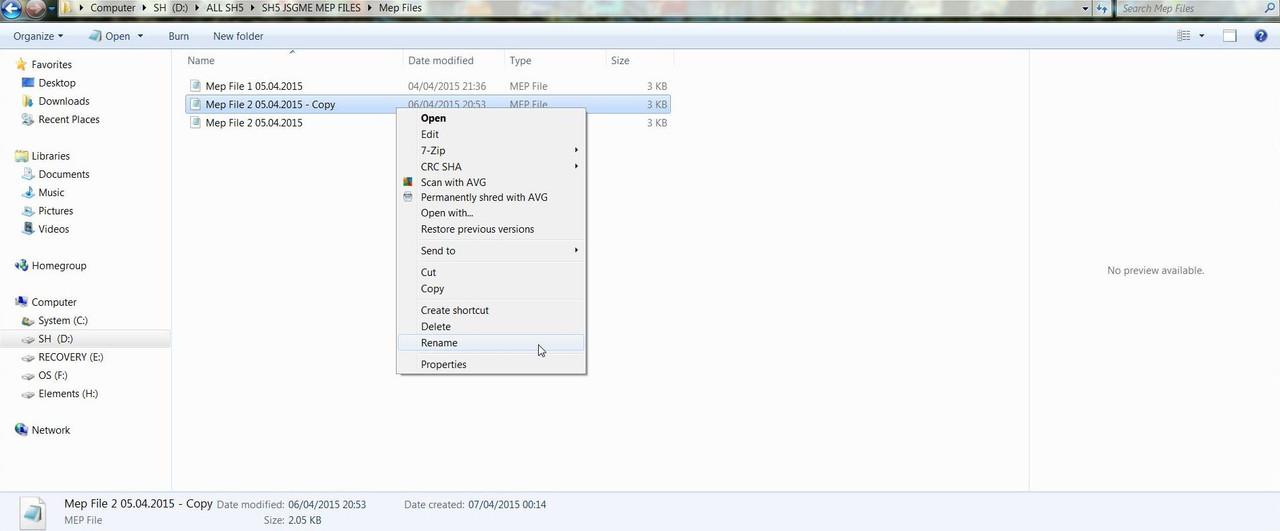 10. Select Rename (Picture 5) 11. I now the change the name to Mep File 3 07.04.2015 (Picture 5) Picture 5 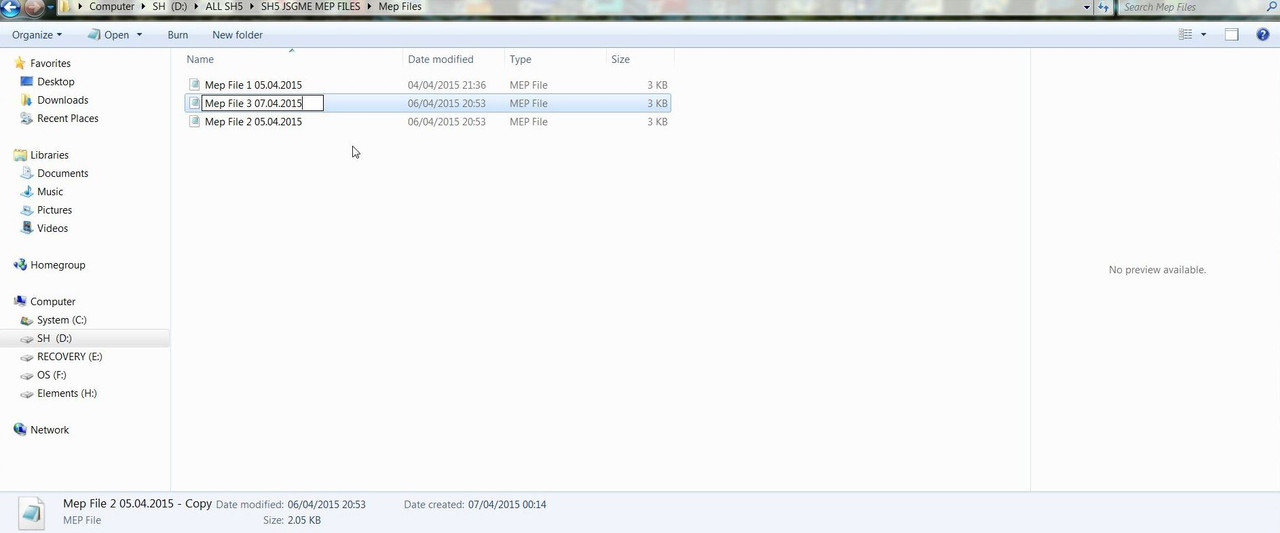 12. Double Click on the Mep File or Right Click with the Mouse and Select Open. (Picture 6) Picture 6 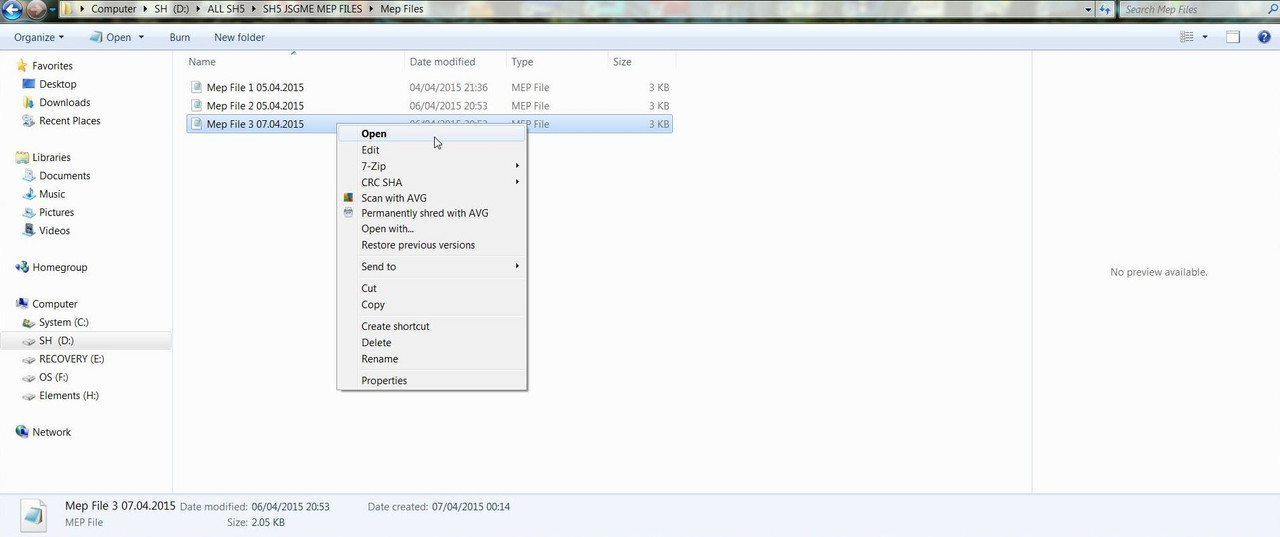 13.The Notepad has opened to show all the Mods Enabled in Mep File 3 07.04.2015 (Picture 7) Picture 7 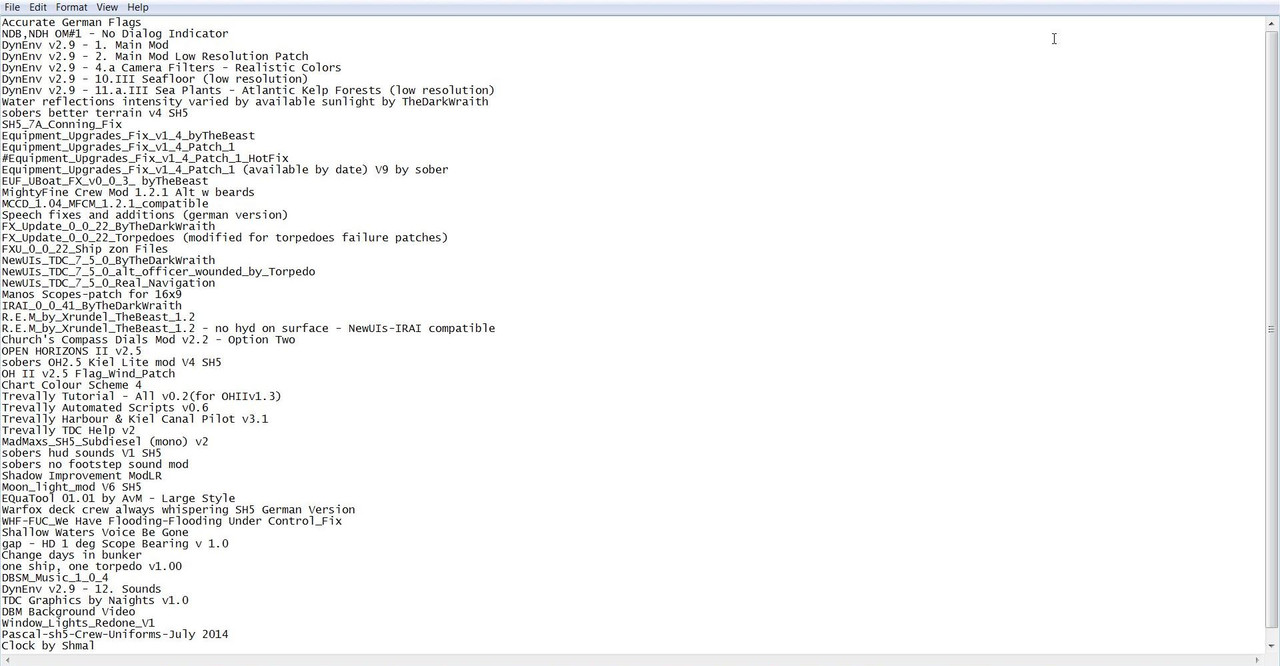 14. To Move the Mod to the New Position. 15. Place the Mouse so the Curser is at the end of the Mod > DynEnv v2.9 - 11.a.III Sea Plants - Atlantic Kelp Forests (low resolution) (Picture 8 ) Picture 8 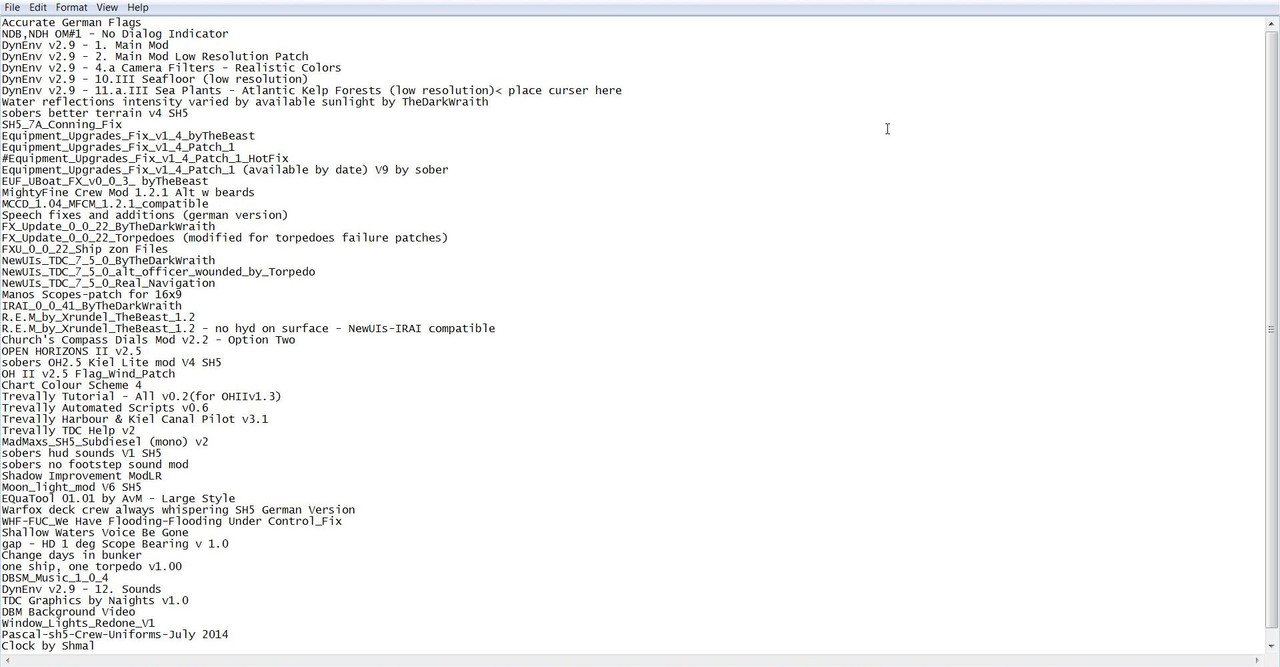 16. Press the Enter Key to enter a Blank Line Space. (Picture 9) 17. You can now see an Empty Line Space is showing. (Picture 9) Picture 9 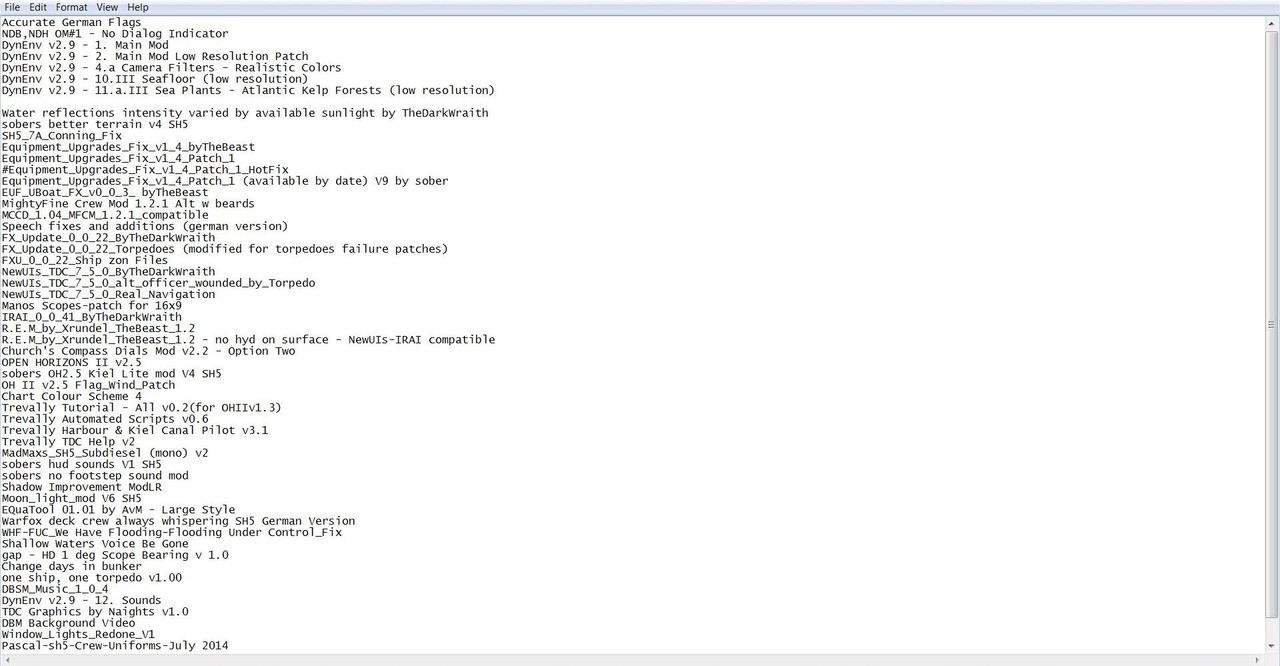 18. Highlight the DynEnv v2.9 - 12. Sounds Mod that is going to be moved. (Picture 10) Picture 10 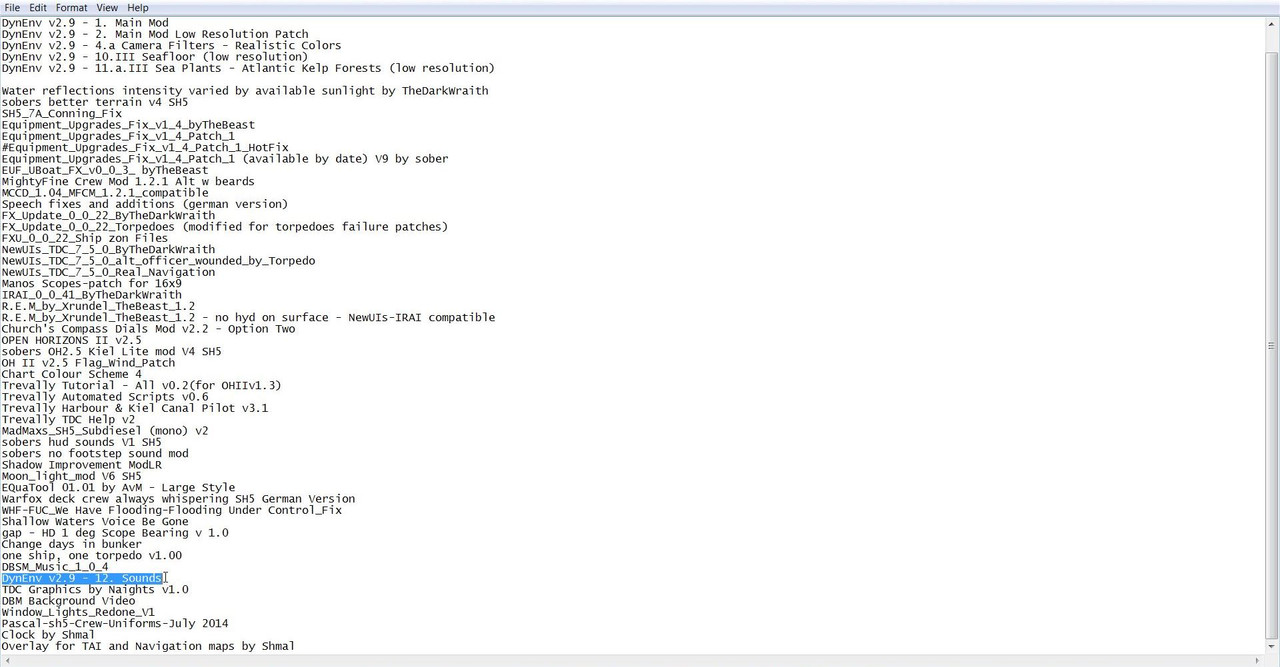 19. Right Click with the Mouse and Select Cut. (Picture 11 ) Picture 11 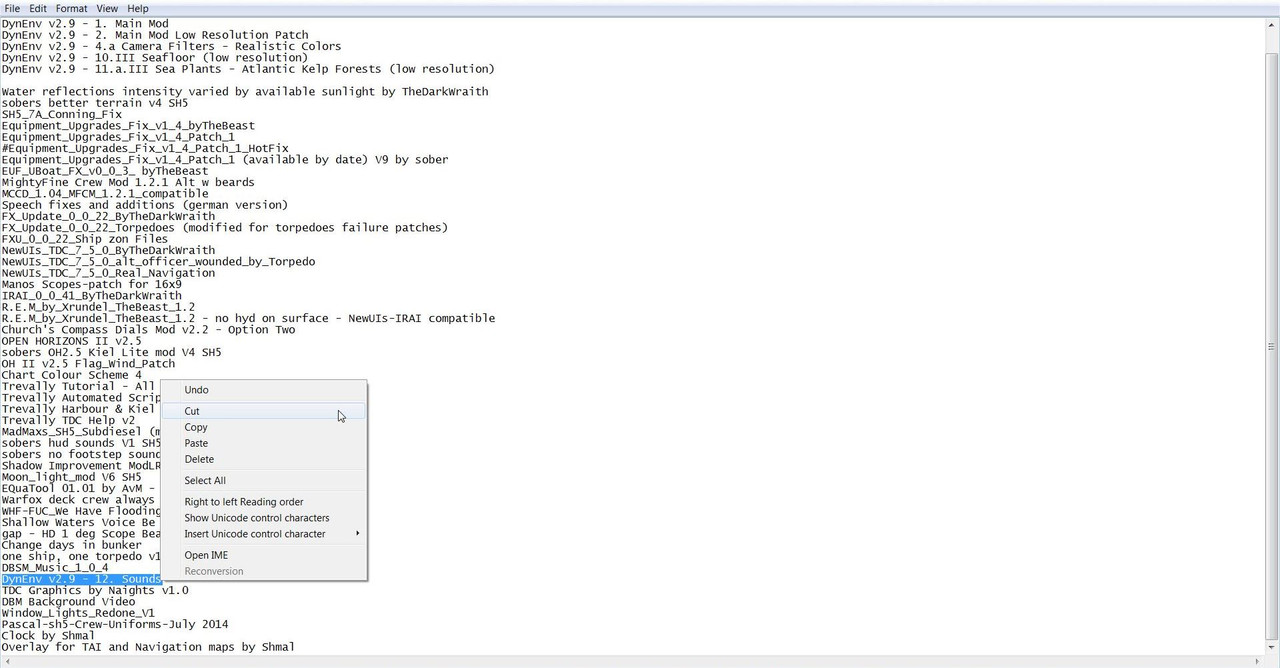 20. Place the Mouse Curser to the beginning (far left) on the Empty Space Line. (Picture 12) Picture 12 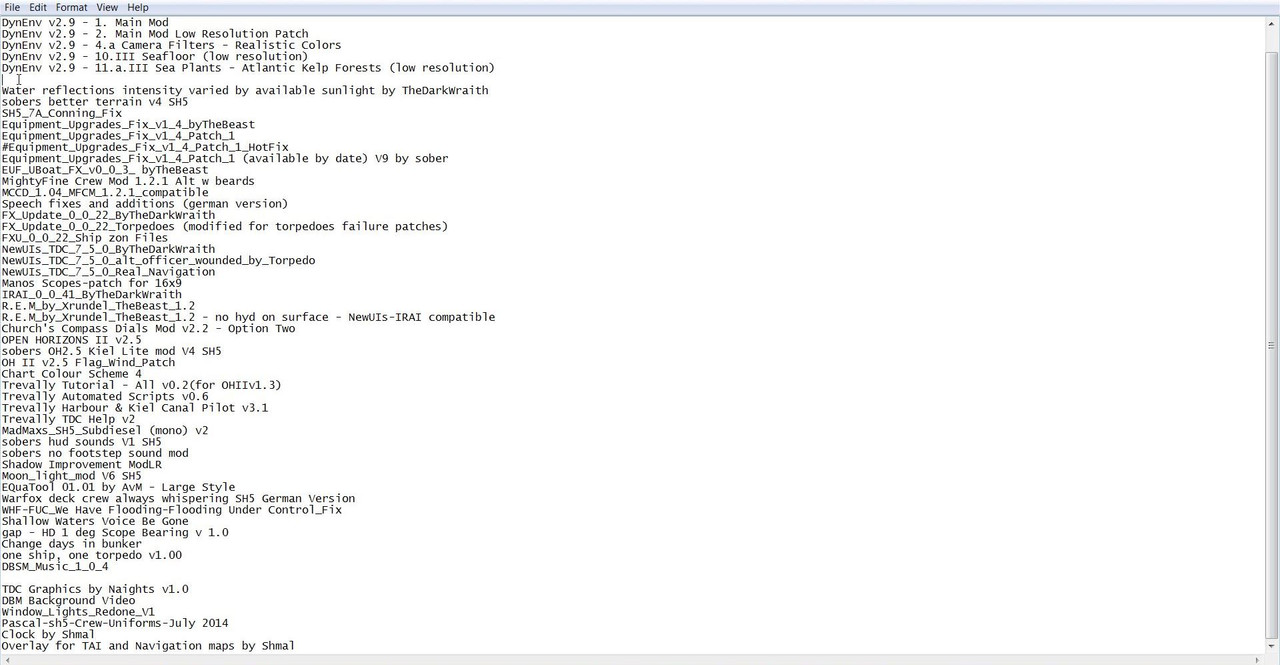 21 .Right Cick with the Mouse and Select Paste. (Picture 13) Picture 13 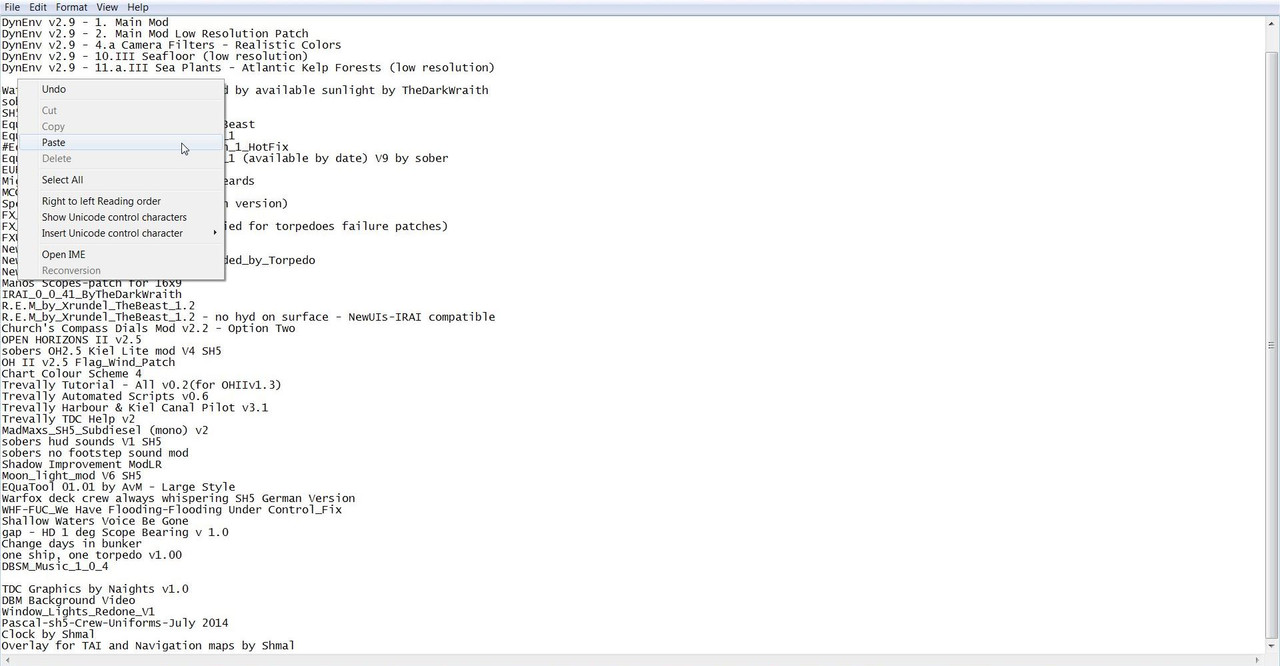 22. You now see the DynEnv v2.9 - 12. Sounds Modhas been Moved to its New Position. (Picture 14) 23. There is now an Empty Line Space where the Mod originally was. (Picture 14) Picture 14 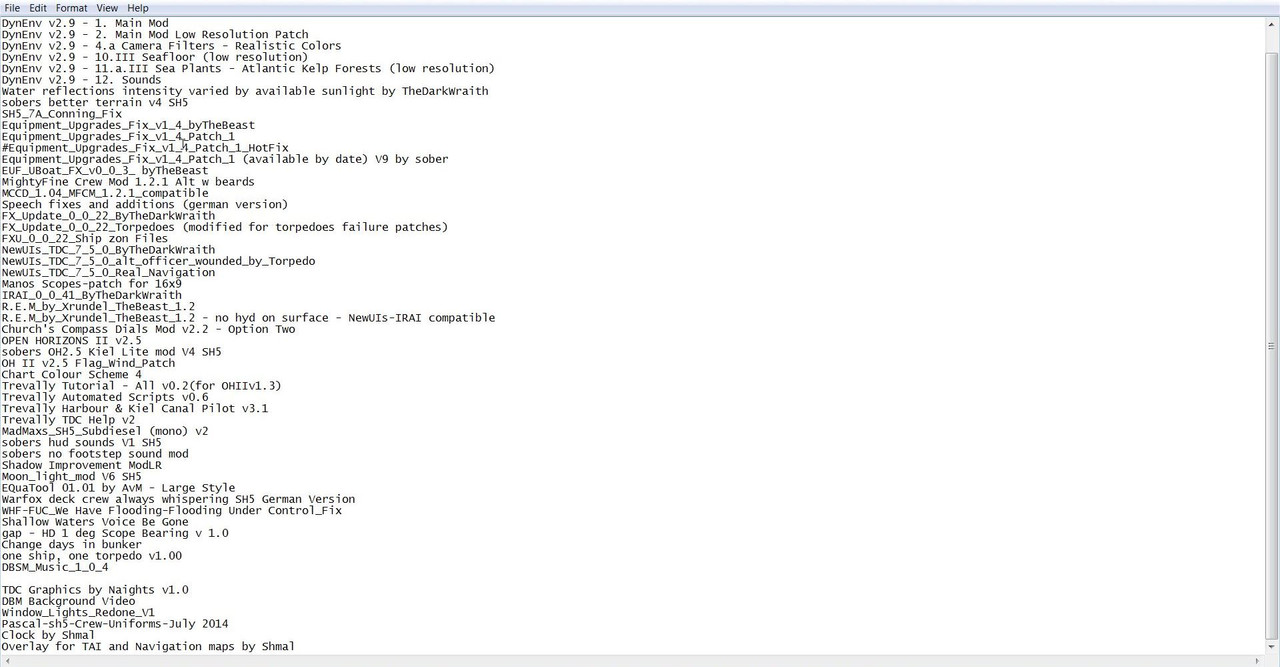 24. The Empty Line Space where the Mod was originally now needs to be Deleted. (Picture 15) 25. Place the Mouse Curser in the Empty Line Space and then Press Del Key. (Picture 15) Picture 15 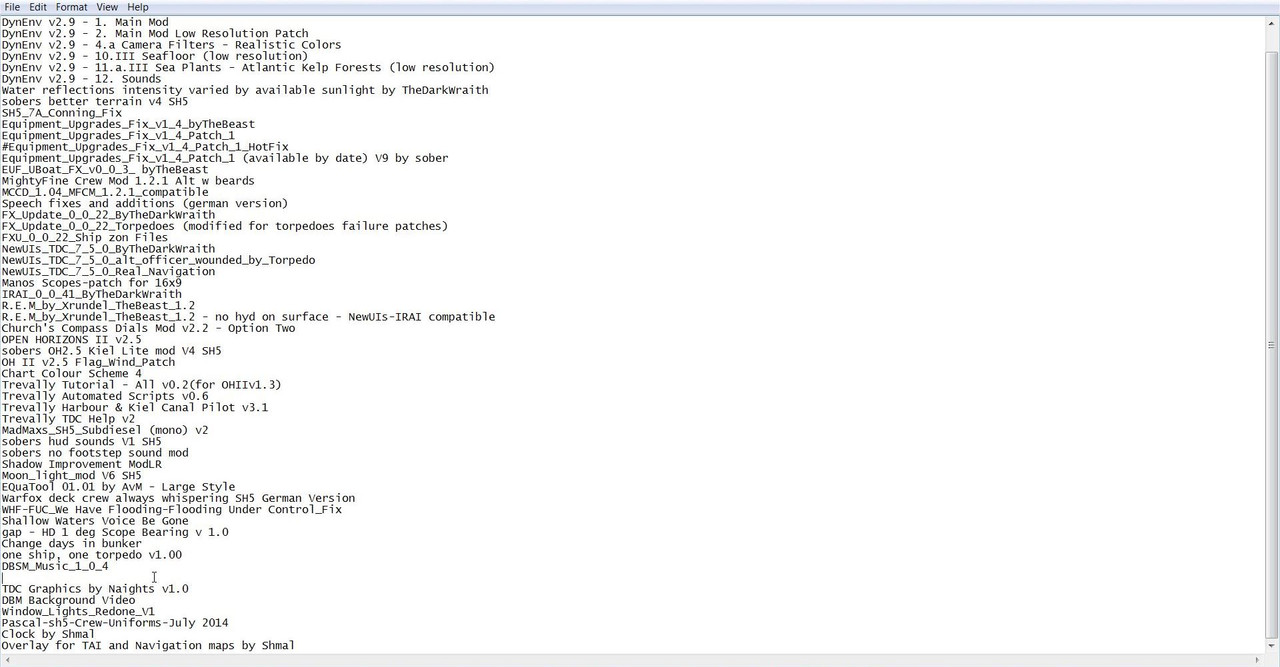 26. To Save this Mep File without a Load Mod Profile Error the Mouse Curser must be placed at the very end of the Last Mods Text. (Picture 16 place curser here) Please note this action is very important. (Picture 16) Picture 16 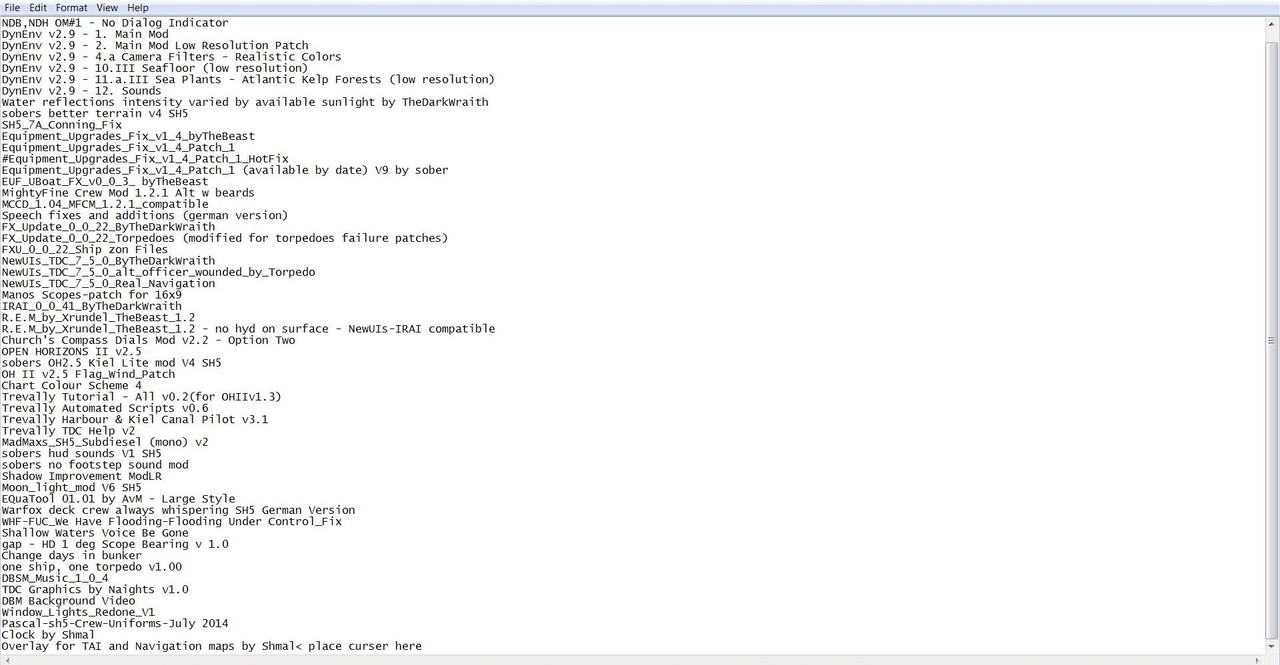 27. Go to the File Tab. (Picture 17) 28. Select Save (Picture 17) 29. After Saving you will notice in (Picture 17) that the Mouse Curser is correctly positioned at the end of the Last Mod. Picture 17 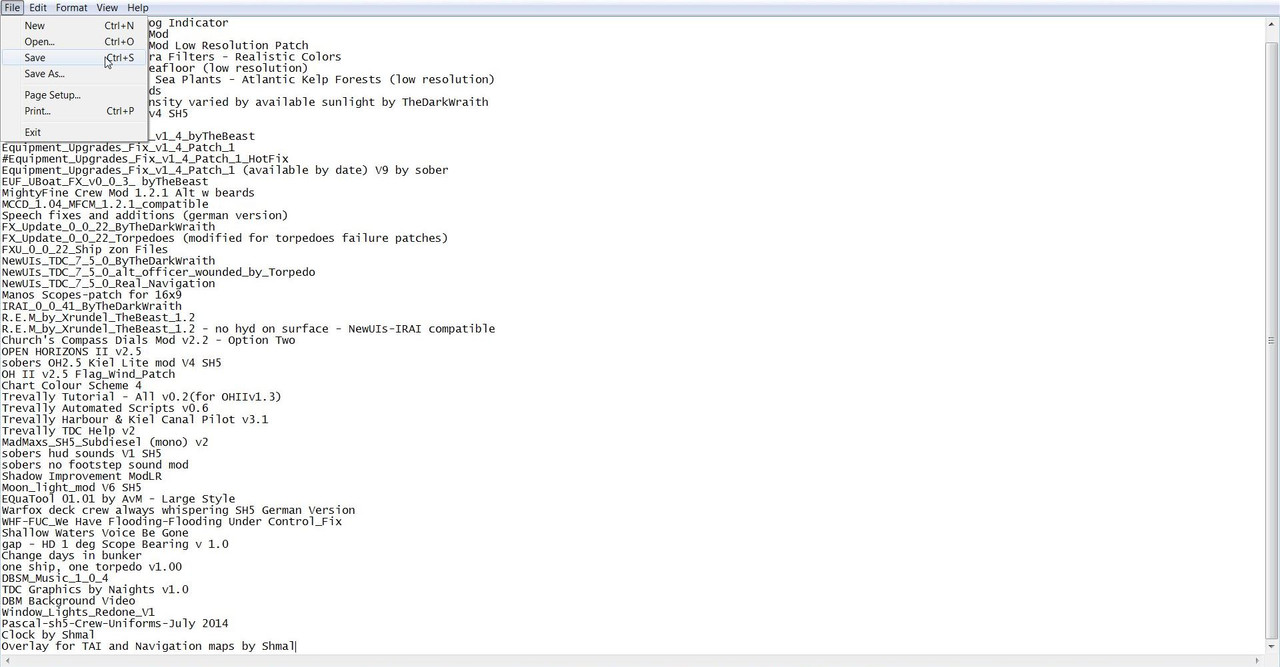 30. Exit the Mep File. (Picture 18) Picture 18 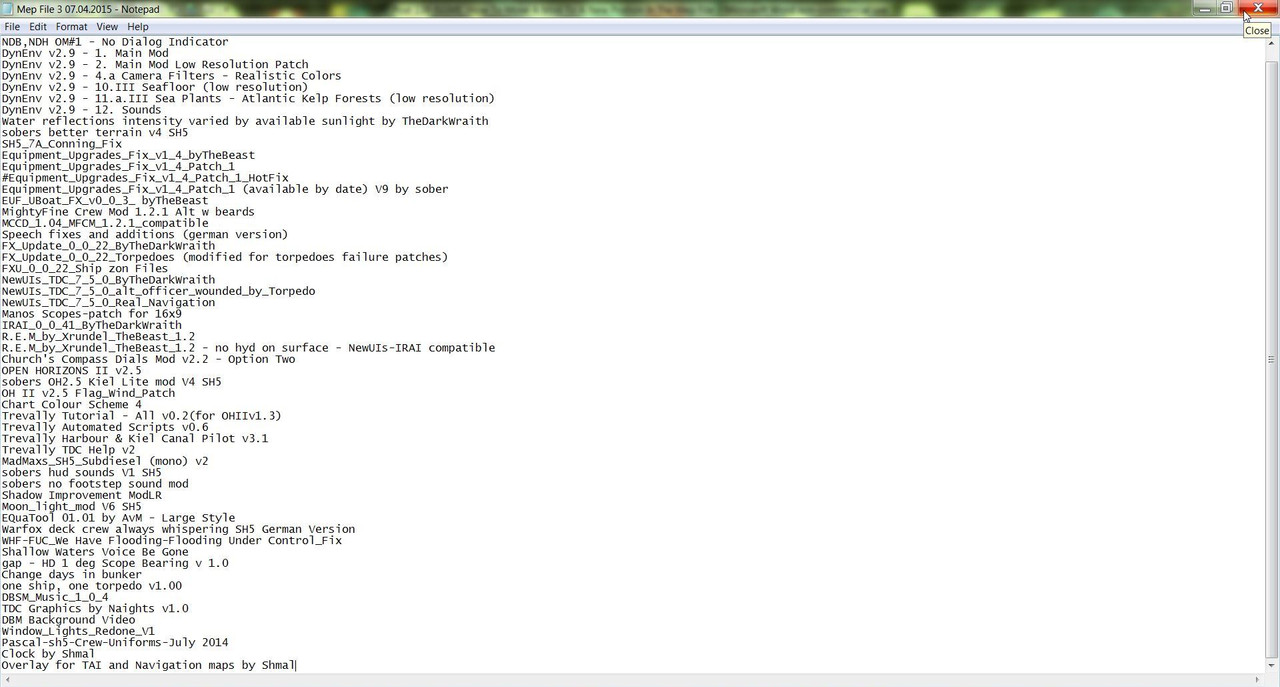 31. Open JSGME 32. Select Tasks and Load Mod Profile (Picture 19) Picture 19 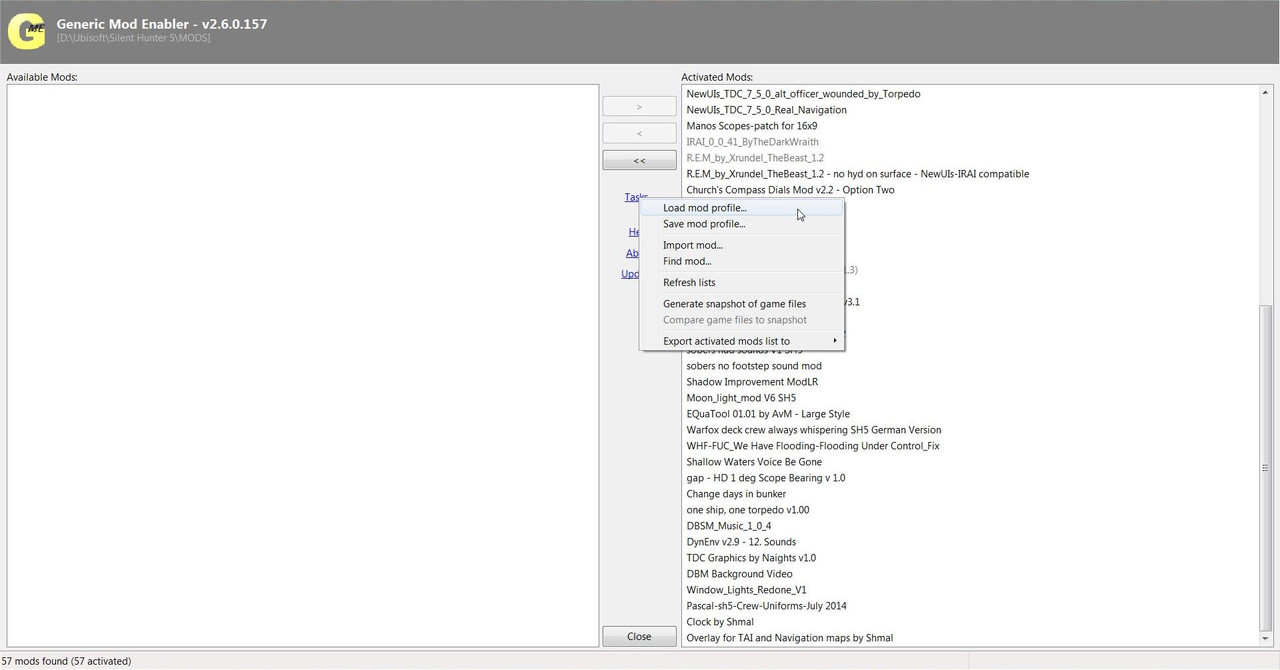 33. Go to the Mep Files Folder (Picture 20) 34. Double Click or Open the Mep File 3 07.04.2015 and JSGME will start its Disable and Enable processes. (Picture 20) Picture 20 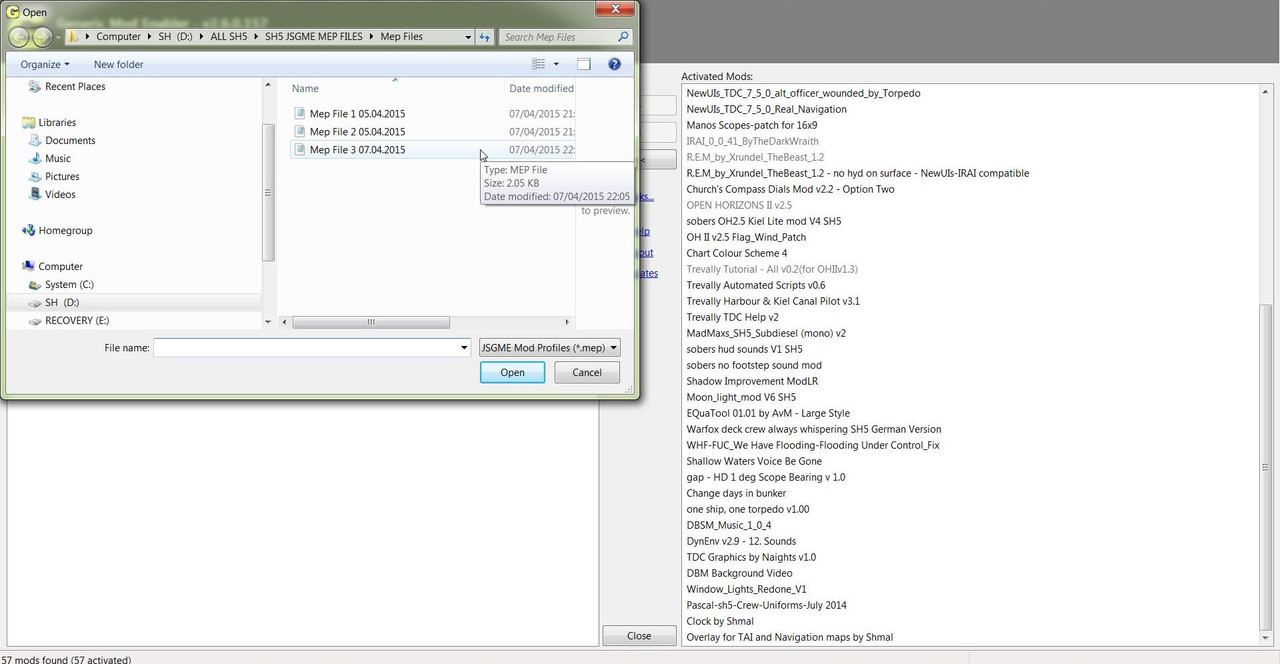 35. You can see in (Picture 21) JSGME has started its process of moving the Mods so it can place the DynEnv v2.9 - 12. Sounds Mod to the New Position it was Saved to in the Mep File. Picture 21 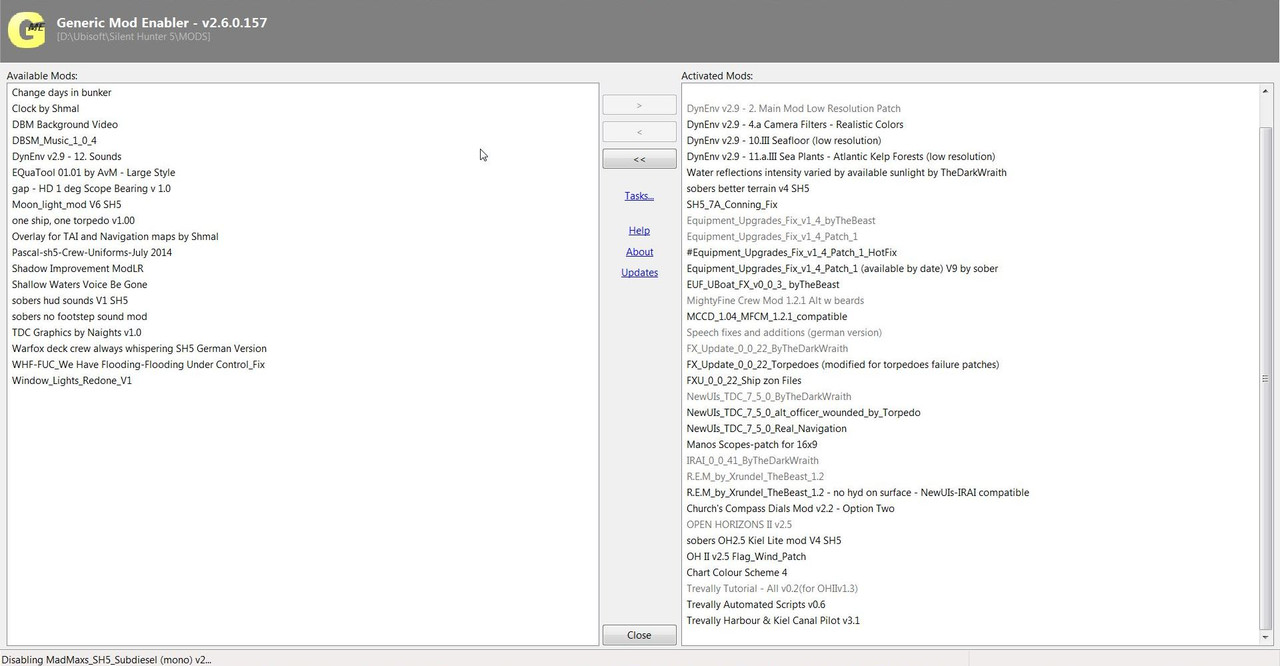 36. DynEnv v2.9 - 12. Sounds Mod has now been placed in its New Position. (Picture 22) Picture 22 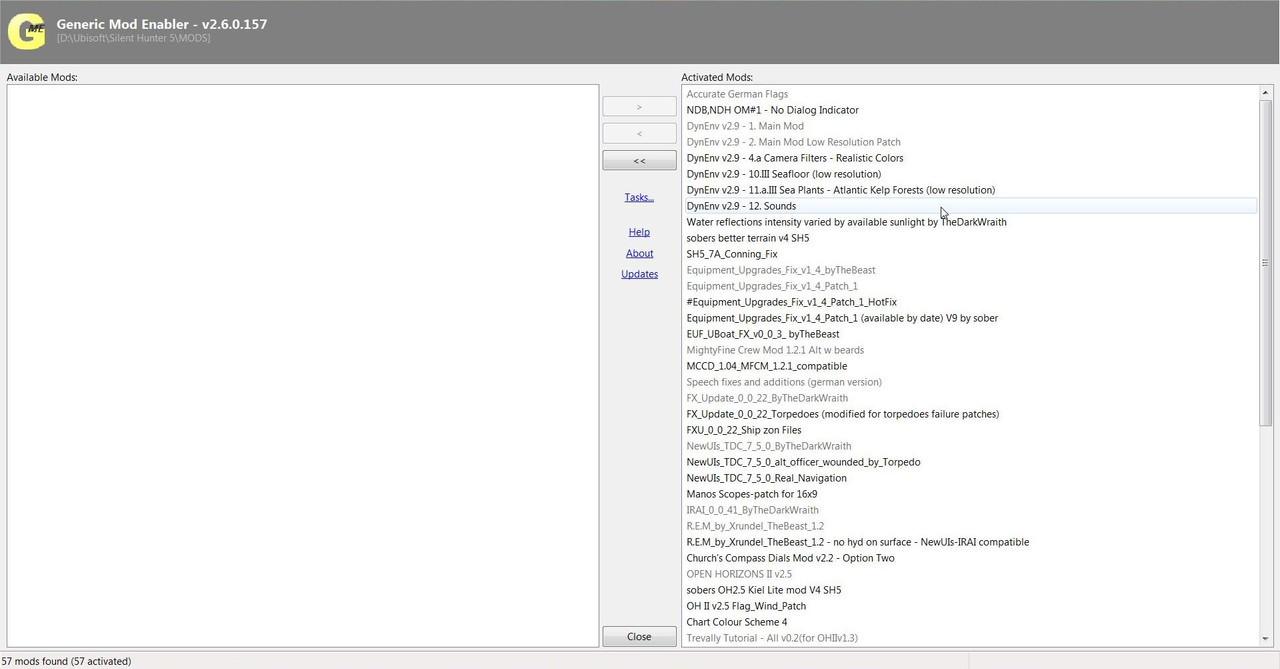 37. Close JSGME. How To Move More Than 1 Mod At A Time. 1. To Move a number of Mods around create multiple numbers of Empty Line Spaces for the number of Mods you want to move. Picture 8 Picture 9 2. Highlight the first Mod to be moved. Picture 10 3. Cut and Paste Mod 1 to its new position. Picture 11 Picture 12 Picture 13 4. Highlight Mod 2 3. Cut and Paste Mod 2 to its new position. 4. Repeat these actions with the remaining Mods. 5. Now Delete all of the Empty Line Spaces. Picture 14 Picture 15 6. If the Last Mod was one of the Mods Moved make sure there is no Empty Line Space behind the New Last Mod showing. Picture 16 7. Make sure the Mouse Curser is Placed at the End of the Last Mod Before Saving the Mep File as inPicture 16. 8. This is very important otherwise you will get a Load Mod Profile Error. 9. Save the Mep file as in the Tutorial. Picture 17
__________________
LSH3-2015 <> TUTORIALS <> ALL YOU NEED TO KNOW <> ALL IN ONE PLACE SH4 <> TUTORIALS <> HOW TO DO IT <> INFORMATION <> DOWNLOAD LINKS SH5 <> TUTORIALS <> HOW TO DO IT <> INFORMATION <> DOWNLOAD LINKS Always Here To Help A Fellow 'Subber' | Need An Answer to A Question Just Send Me A PM Last edited by THEBERBSTER; 04-27-18 at 03:23 AM. Reason: Replaced missing pictures |

|

|
 08-20-14, 06:56 AM
|
#139 |
|
Growing Old Disgracefully
|
Last updated 27th April 2018
JSGME How To Delete/Remove An Overwritten Mod By Using A Mep File. 1. In this Tutorial I am going to show you how to Delete/Remove an Overwritten Mod from a Mep File, the most difficult Mod to access > Accurate German Flags. 2. Without the help of a Mep File you would normally have to manually disable each Mod until you reached the one you wanted to remove. 3. This particular Mod would be easy to Disable as you could just let JSGME Disable all of the Mods. 4. However now comes the job of having to Enable each one again Manually in the correct order. 5. If you have been following the Tutorials you will know that there are already 3 Mep File Tutorials. 6. The first task is to make a Copy of Mep File 3. 7. I always make a Copy before doing any work altering any Mep File. 8. This is because if you decide to return to a previous Mep File you always have the original as a Backup. 9. Go to the Mep Files Folder. (Picture 1) Picture 1  10. Highlight the Mep File 3 Folder. (Picture 2) Picture 2  11. Right Click with the Mouse and Select Copy. (Picture 3) Picture 3 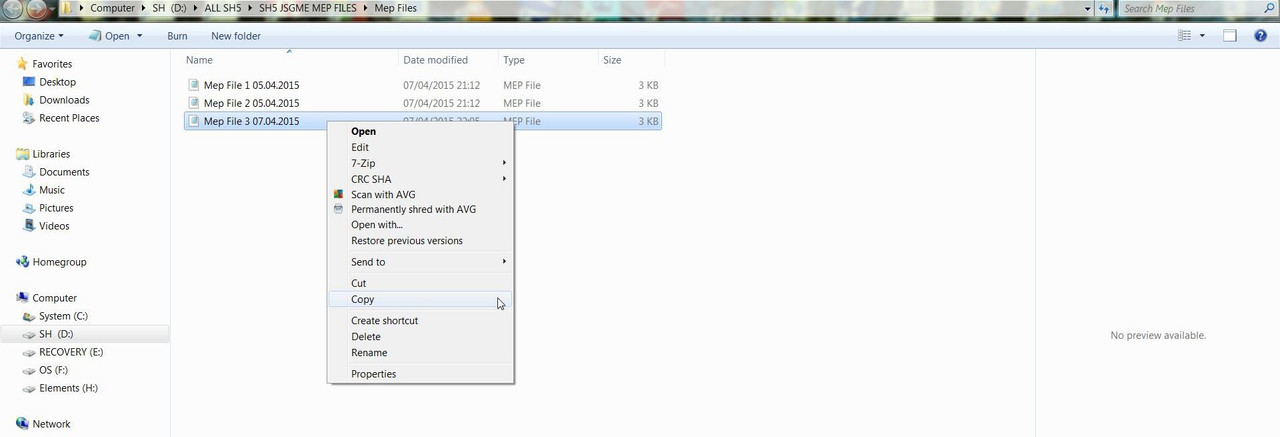 12. Go to an Empty Space and Right Click the Mouse and Select Paste. (Picture 4) Picture 4 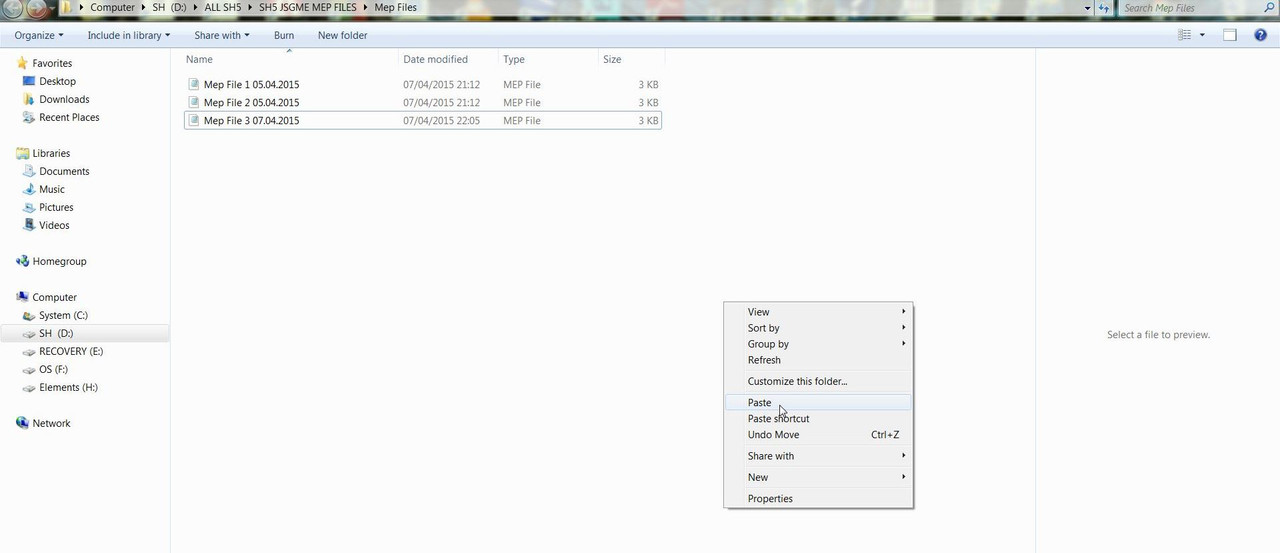 13. Highlight the Copied File. (Picture 5) Picture 5  14. Right Click with the Mouse and Select Rename. (Picture 6) Picture 6 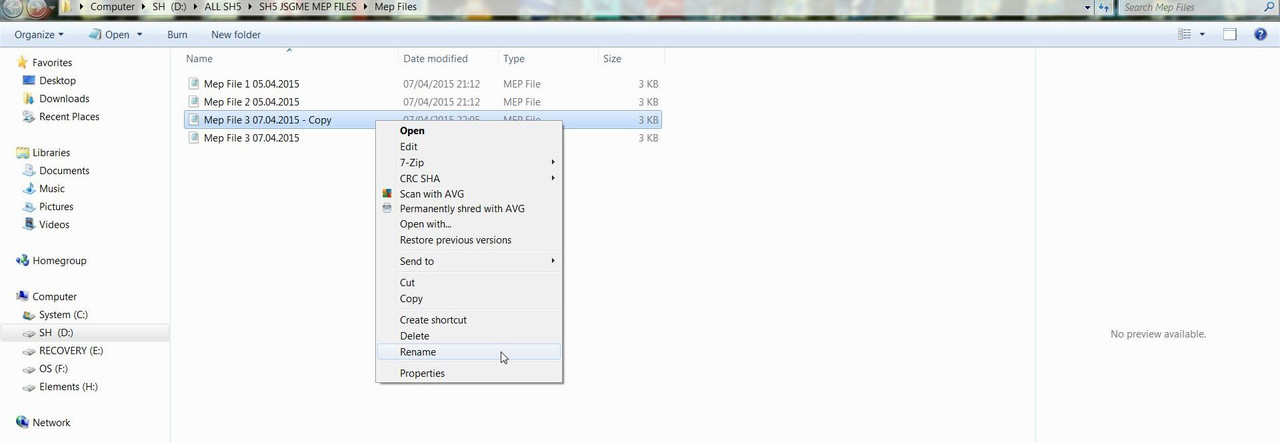 15. I have changed the Mep file Name to Mep File 4 09.04.2015 (Picture 7) Picture 7  16. There are now 4 Mep Files showing in the Mep File Folder. (Picture 8) Picture 8  17. Double click the Mouse on Mep File 4 or Right Click the Mouse and Select Open. (Picture 9) Picture 9 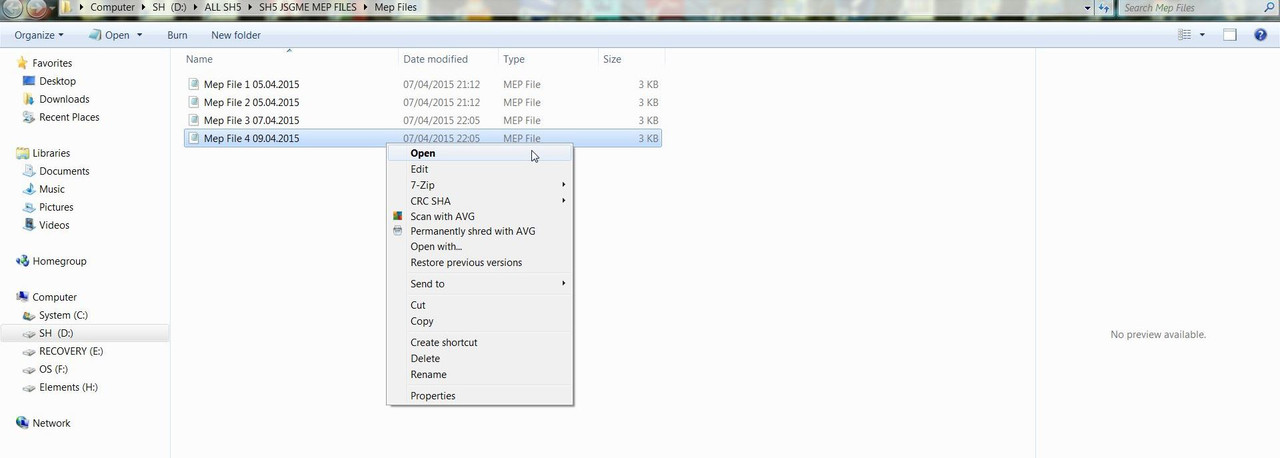 18. Mep File 4 has opened and the Mod to be Deleted/Removed Accurate German Flags is at position 1. (Picture 10) Picture 10 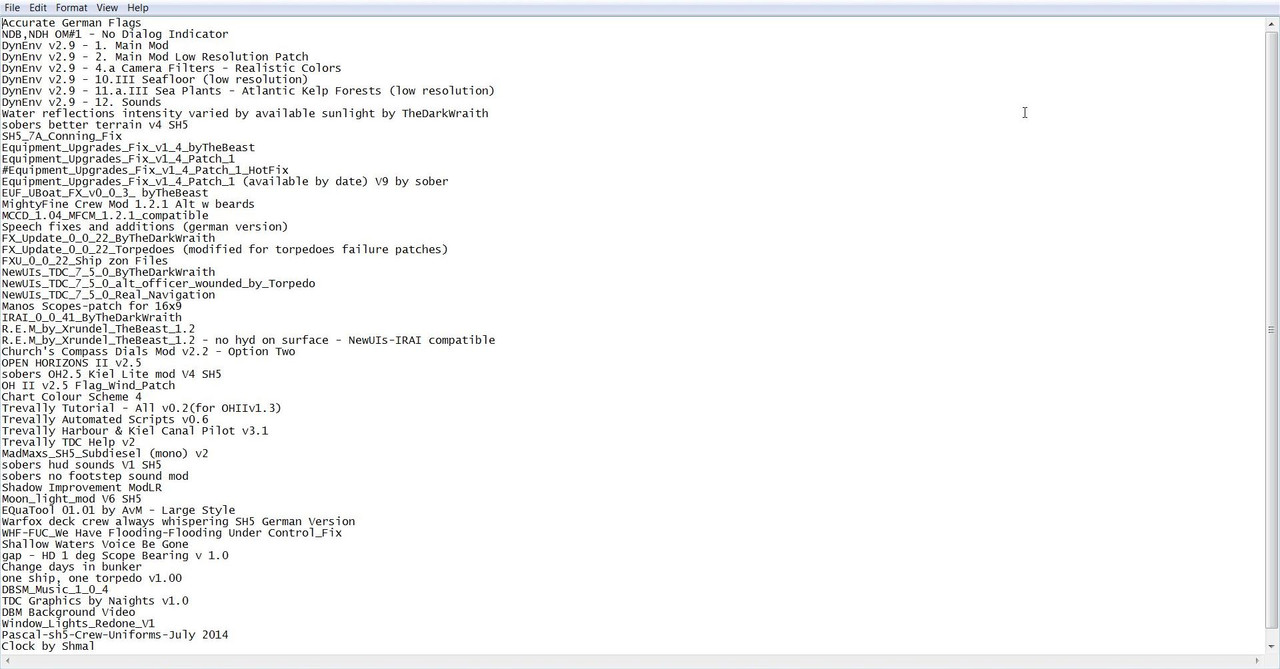 19. Highlight the Mod. (Picture 11) Picture 11 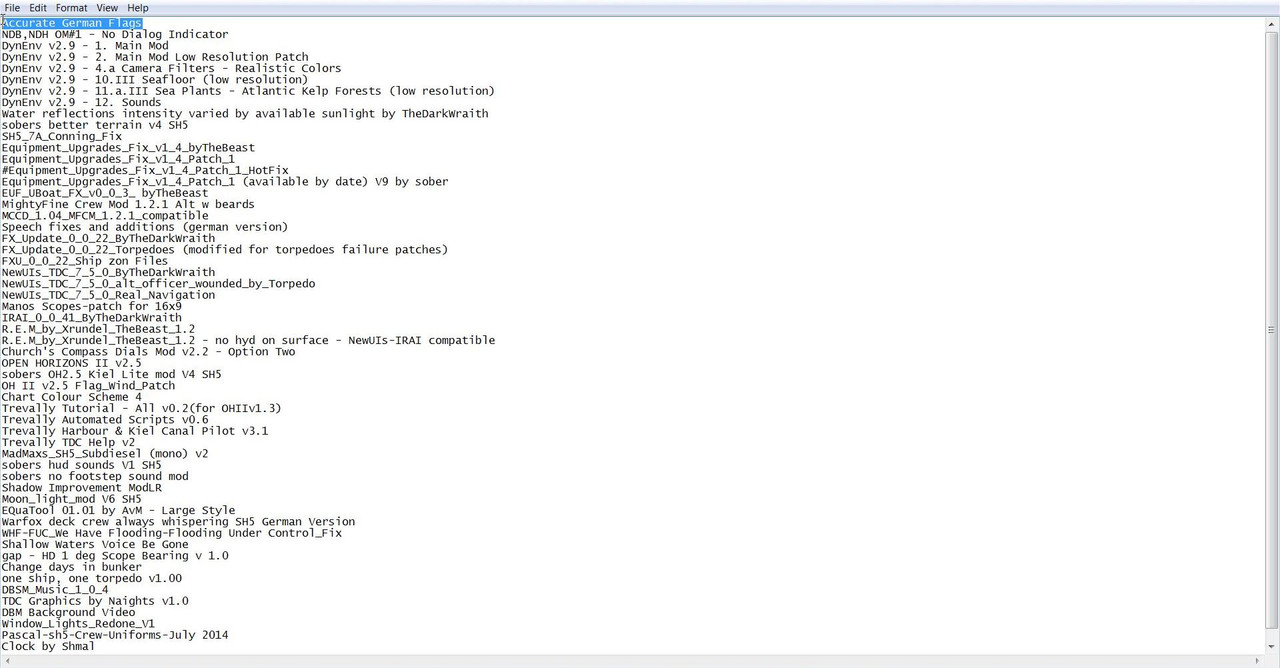 20. Position the Mouse on the Highlighted Mod and Press the DEL Key. (Picture 12) Picture 12 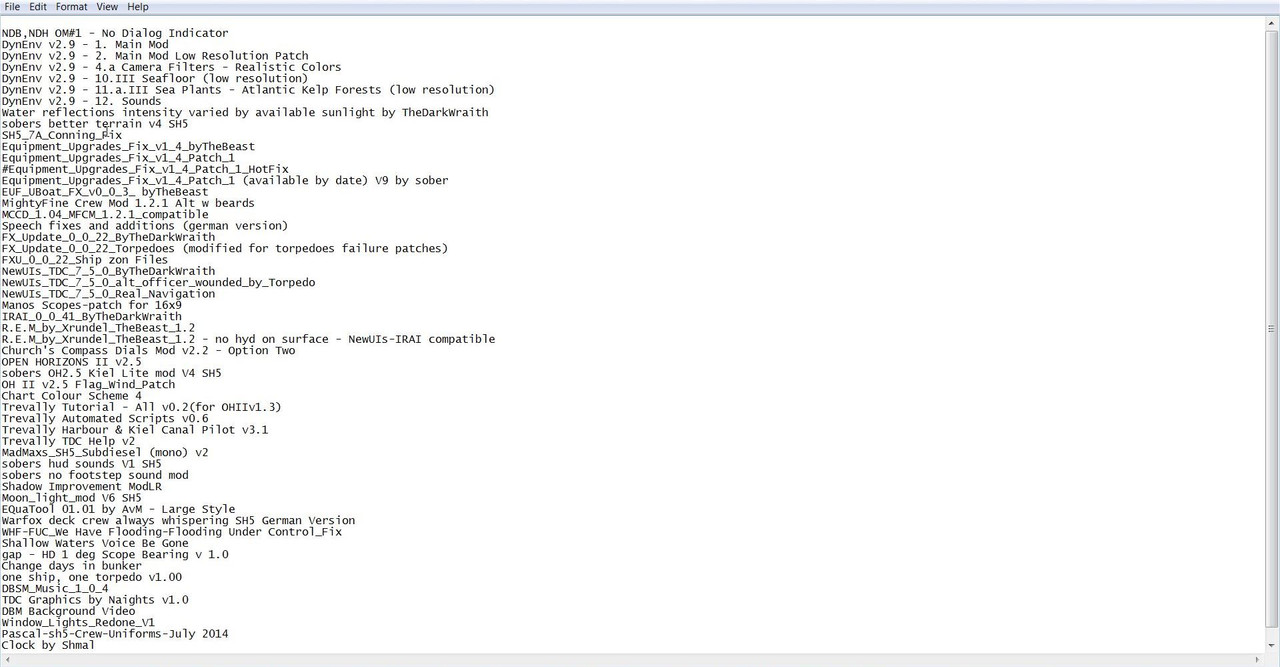 21. Without Moving the Mouse Press the DEL Key again to Remove the Empty Line Space. (Picture 13) Picture 13 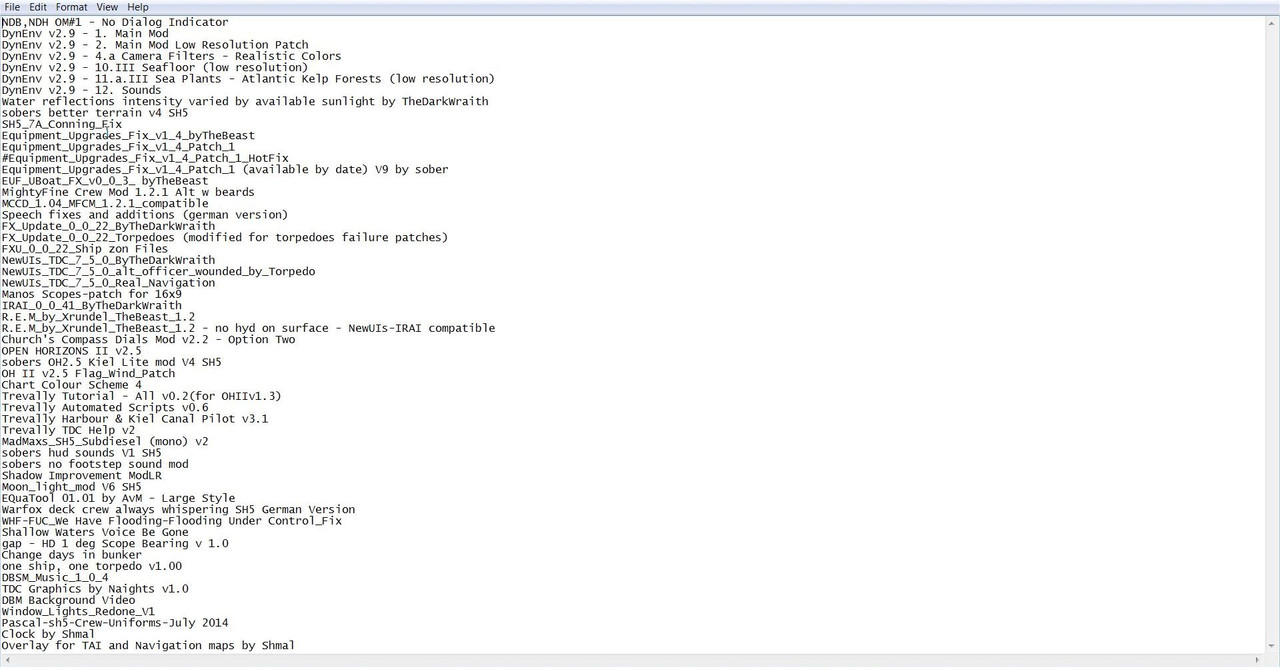 22. You can see that the Empty Line Space has been Removed. (Picture 14) Picture 14 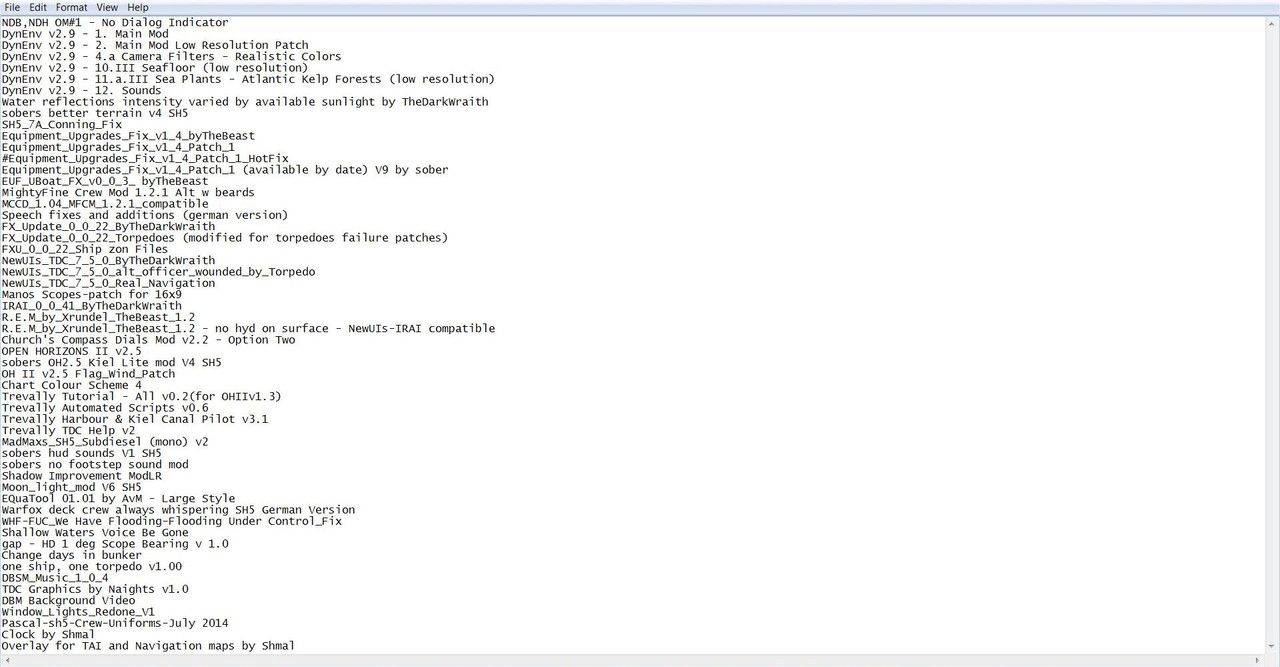 23. Place the Mouse Curser at the very end of the Last Mod’s Text. (Picture 15) 24. This is very important as if this is not done correctly a Load Mod Profile Error will occur. (Picture 15) Picture 15 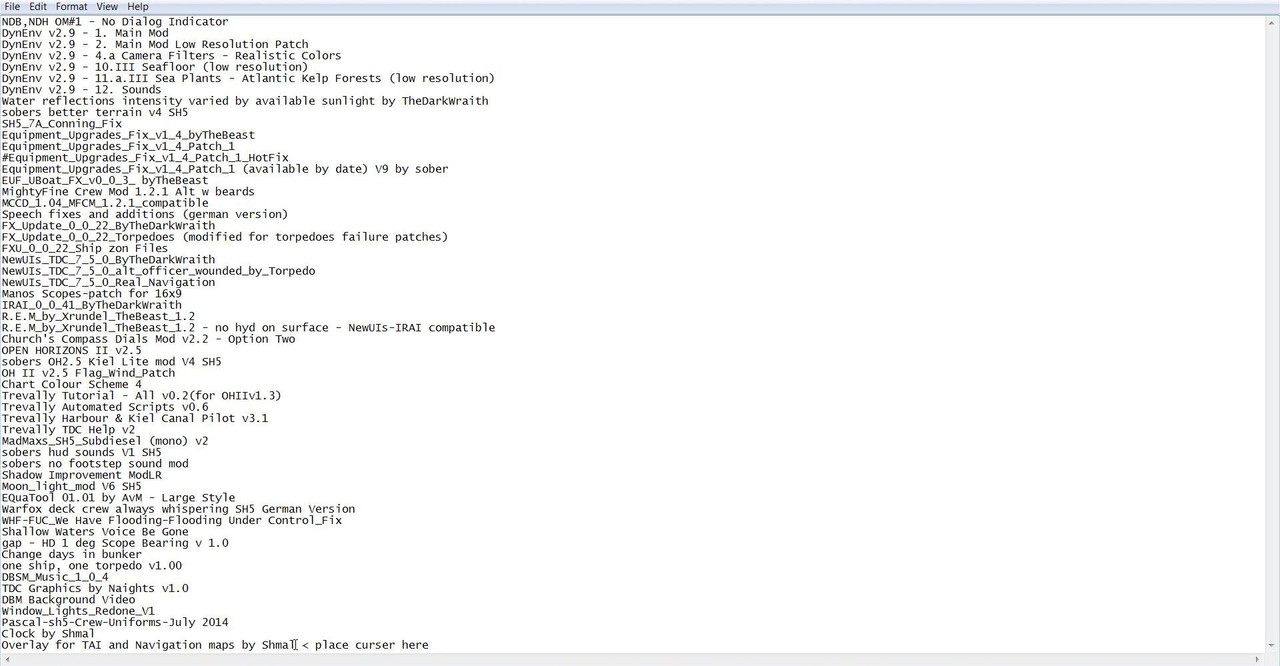 25. Go to the File Tab. (Picture 16) 26. Select Save. (Picture 16) 27. You should see the Mouse Curser still blinking at the very End of the Last Mod. Picture 16 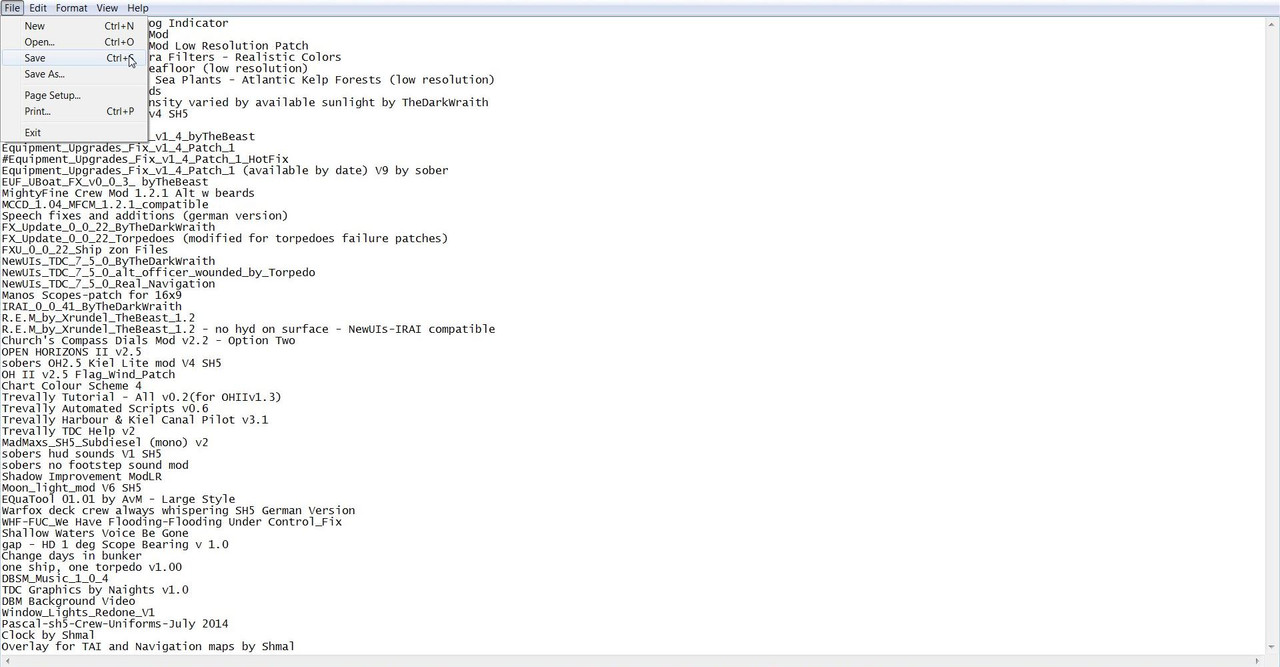 28. Close the Mep File. (Picture 17) Picture 17 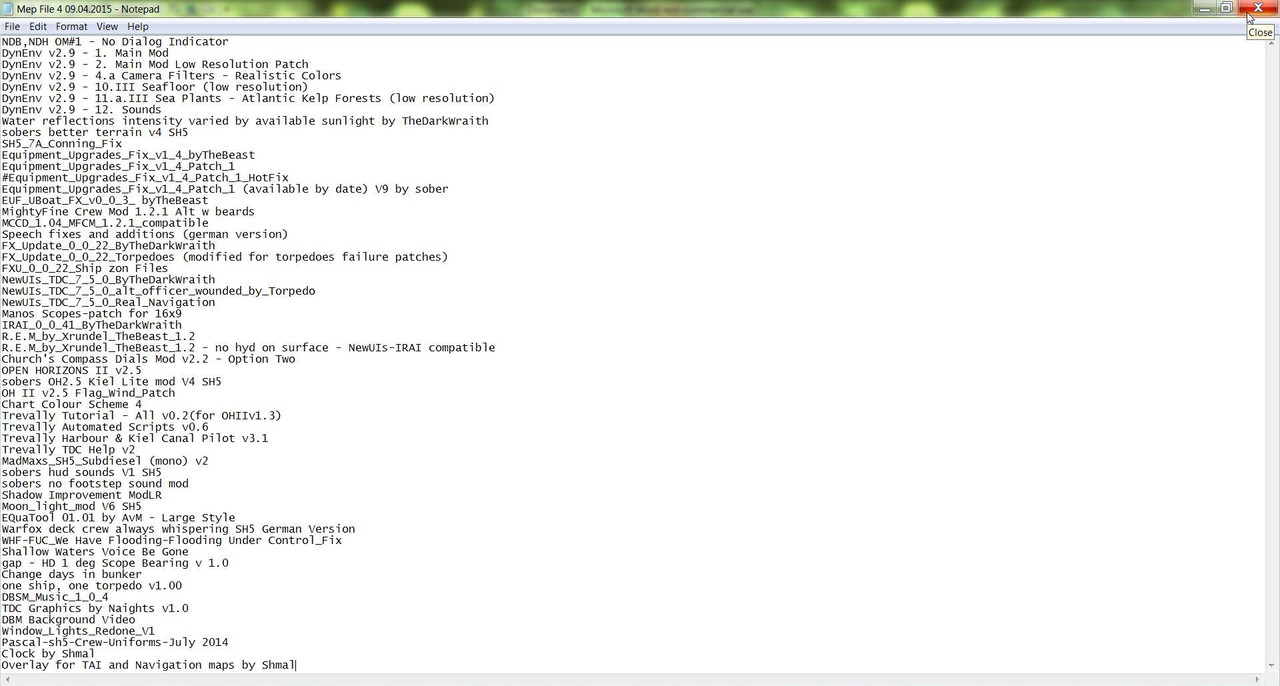 29. Open JSGME. 30. Go to Tasks and Select Load Mod Profile. (Picture 18) Picture 18 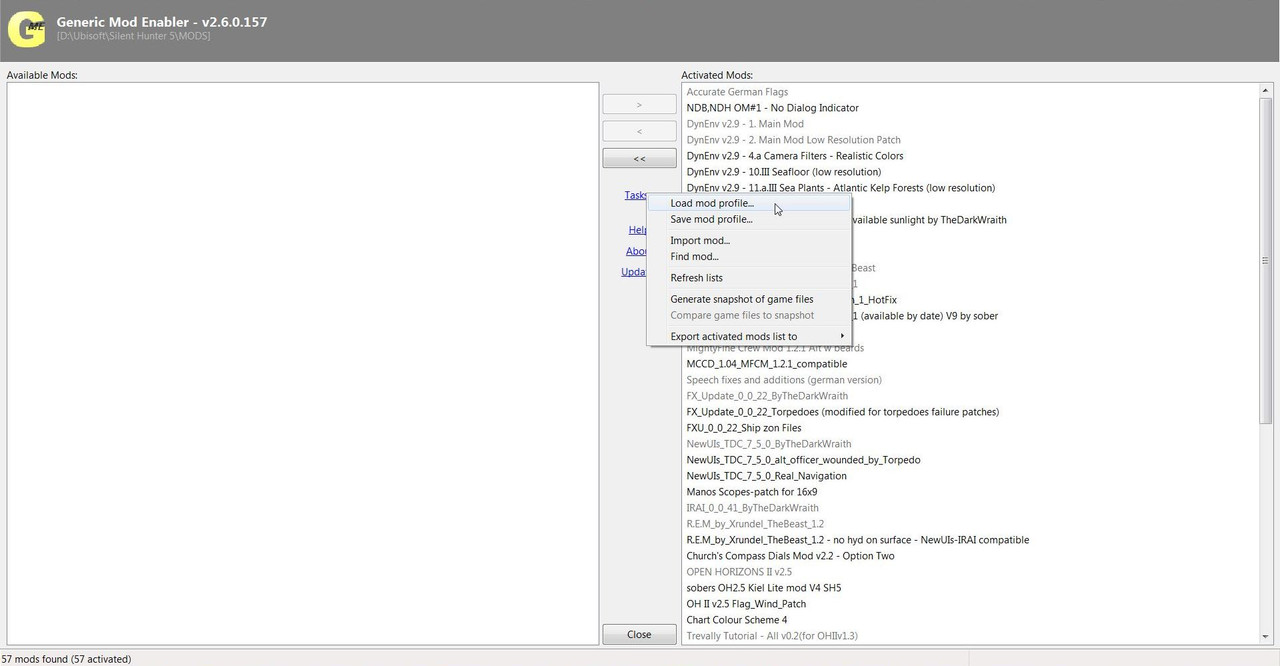 31. Go to the Mep File Folder. (Picture 19) Picture 19 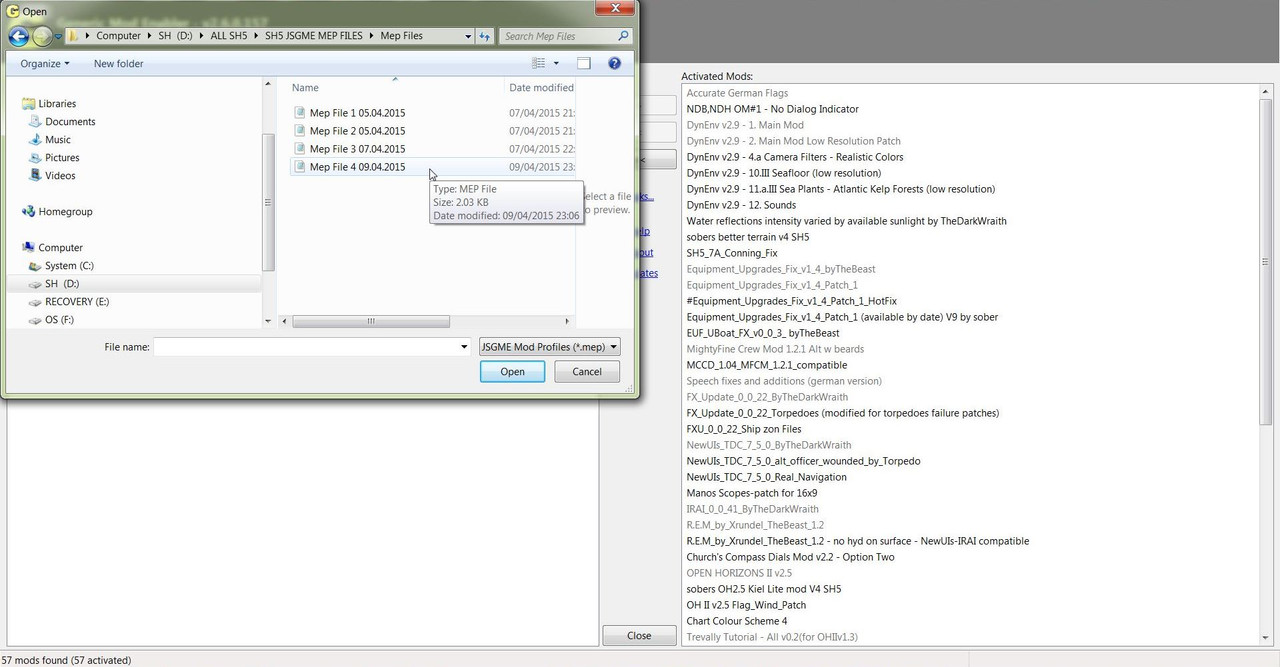 32. Double Click on Mep File 4 or Press Open to start the Process. 33. You can see here JSGME has started the process of disabling the Mods so it can reach Accurate German Flags. (Picture 20) Picture 20 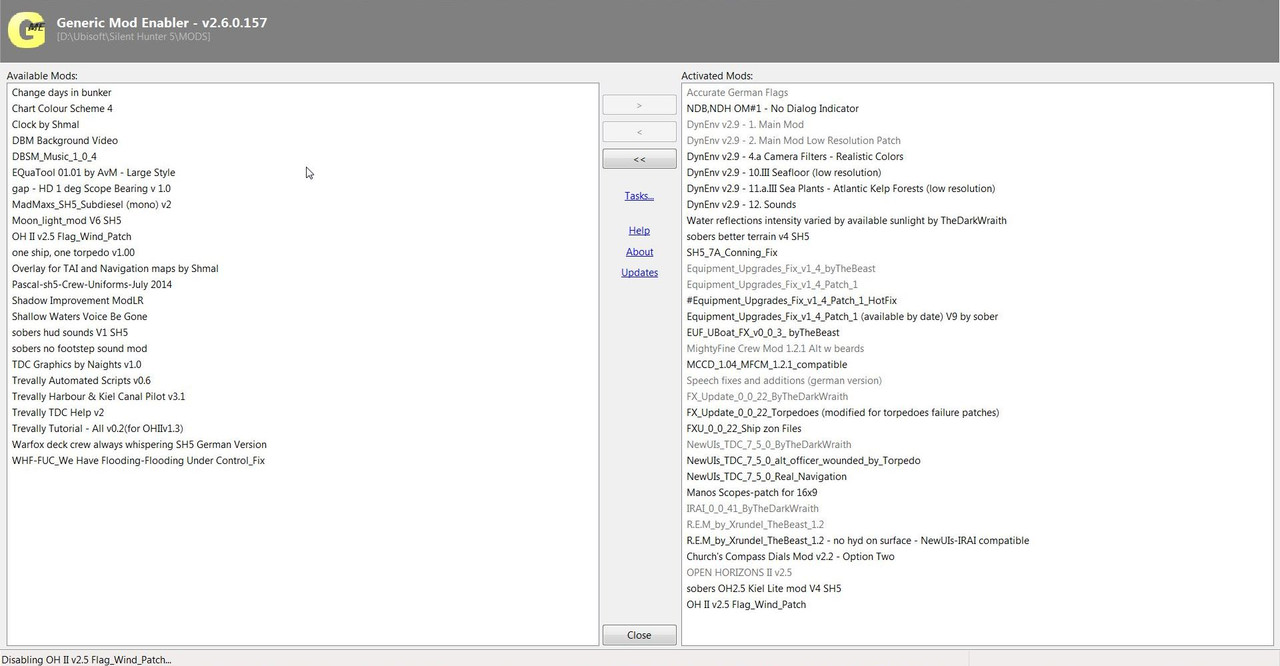 34. The Process has finished and Accurate German Flags is now showing as Disabled. (Picture 21) Picture 21 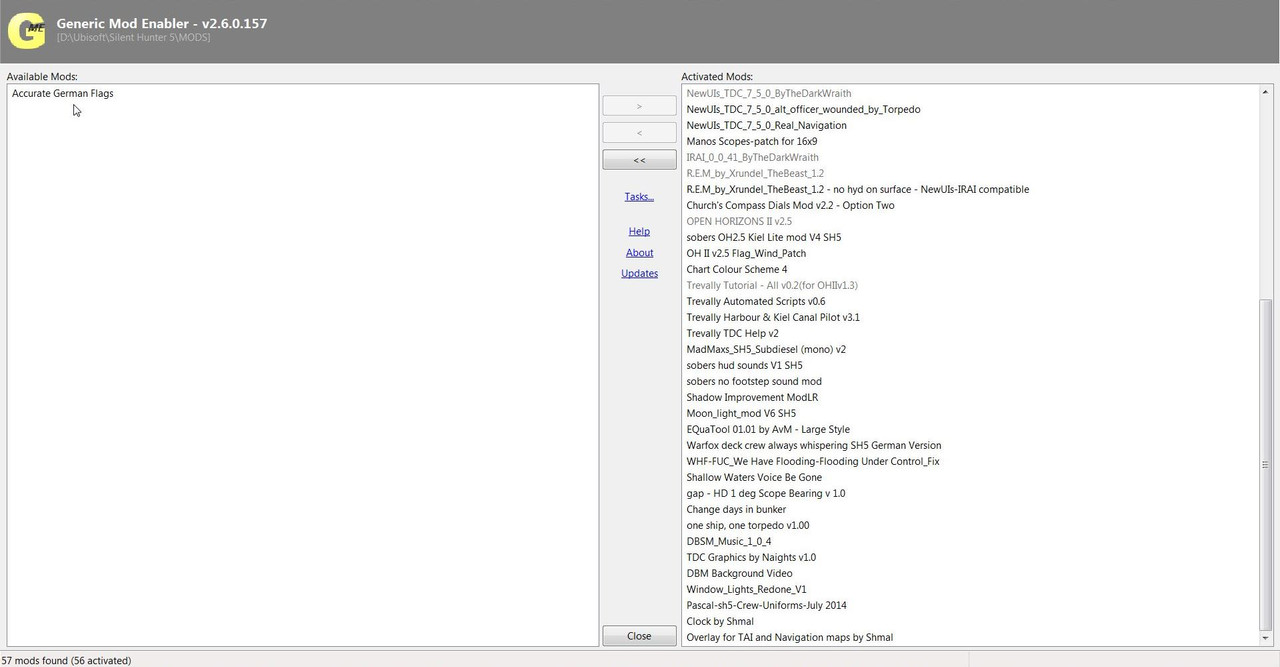 35. Close JSGME. 36. This Final Picture shows the 4 Mep Files that can be used again at any time. (Picture 22) Picture 22 
__________________
LSH3-2015 <> TUTORIALS <> ALL YOU NEED TO KNOW <> ALL IN ONE PLACE SH4 <> TUTORIALS <> HOW TO DO IT <> INFORMATION <> DOWNLOAD LINKS SH5 <> TUTORIALS <> HOW TO DO IT <> INFORMATION <> DOWNLOAD LINKS Always Here To Help A Fellow 'Subber' | Need An Answer to A Question Just Send Me A PM Last edited by THEBERBSTER; 03-16-19 at 03:51 PM. |

|

|
 09-06-14, 12:17 PM
|
#140 |
|
Growing Old Disgracefully
|
Last updated 26th May 2015
Equipment Upgrades Chart 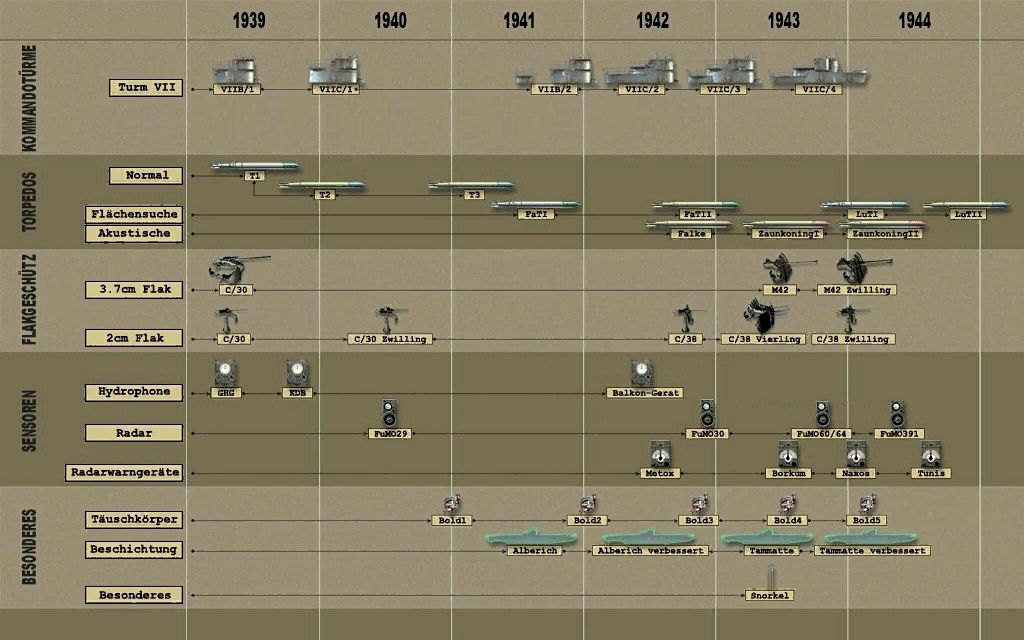 Knots in Meters per Minute Chart  Knots in Kilometers per Hour Chart 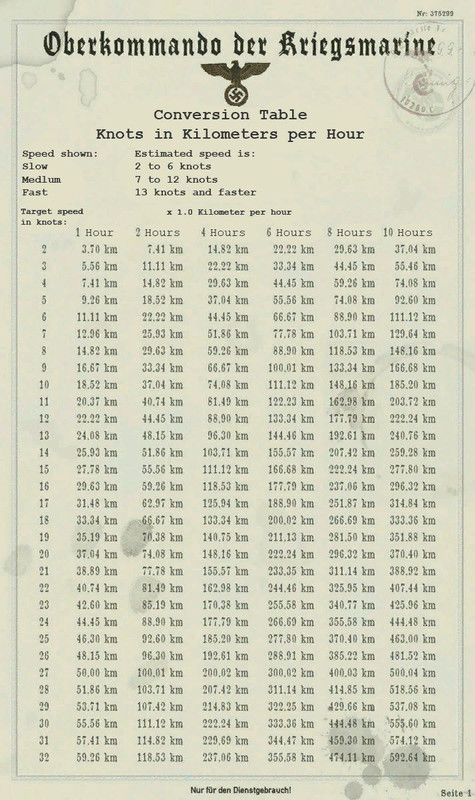 Flag Chart 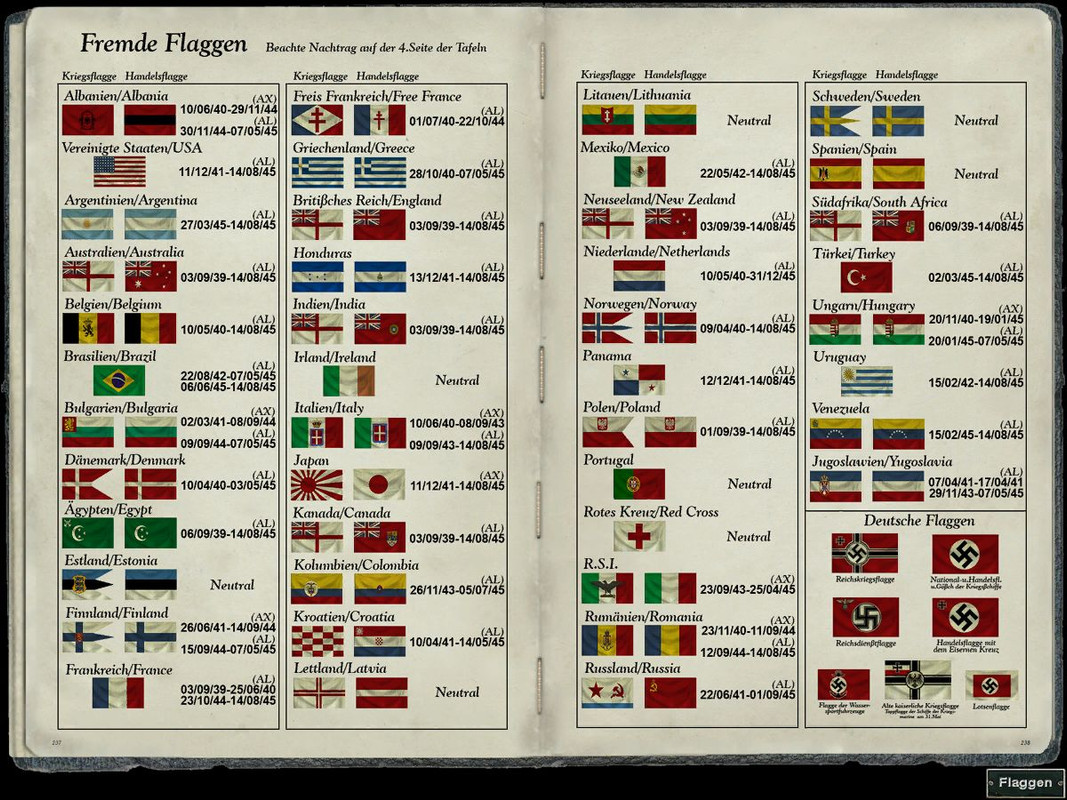 Shipping Chart 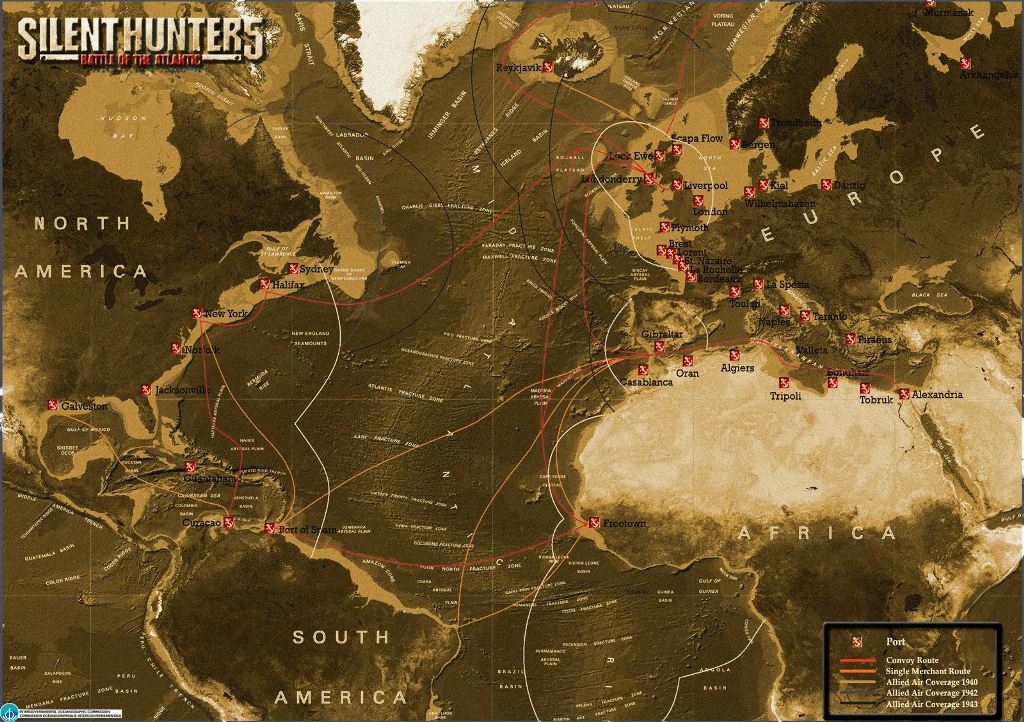 Shippimg Chart Coloured 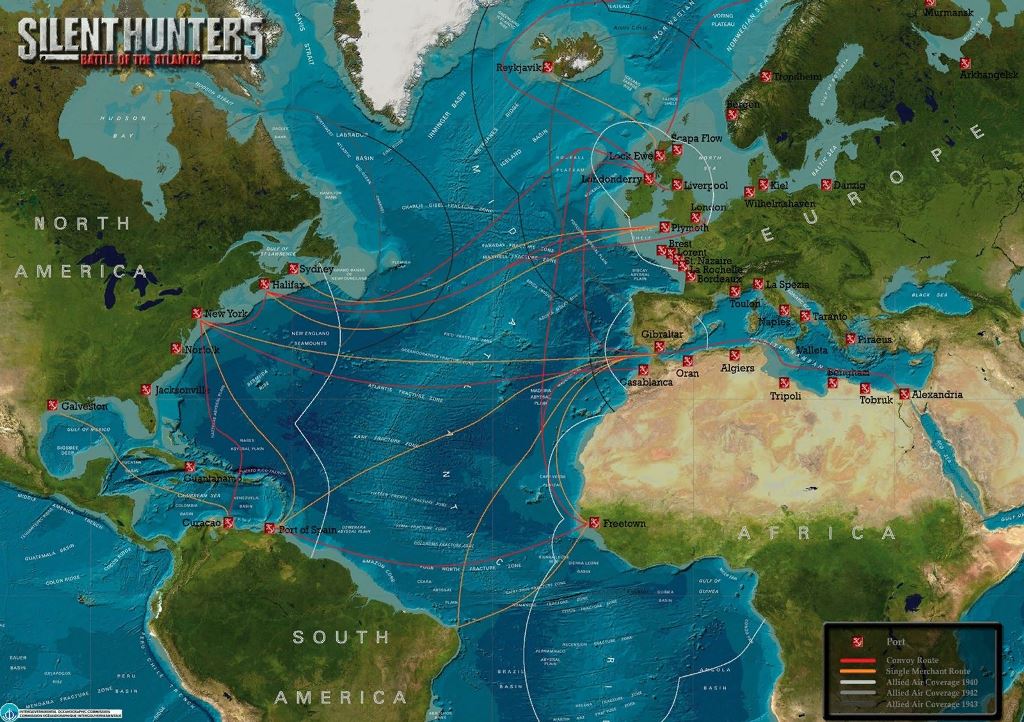 Angle On Bow Pictures 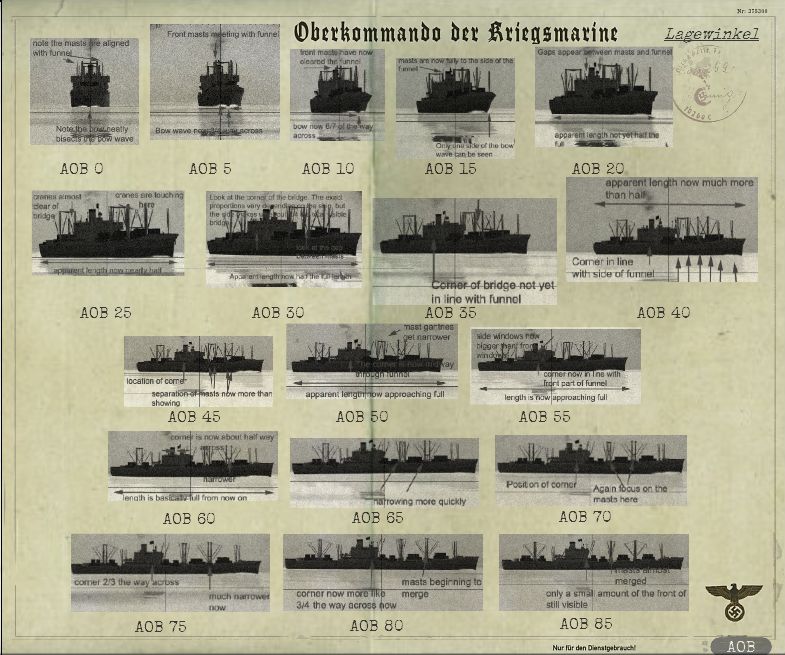 Minefield Map 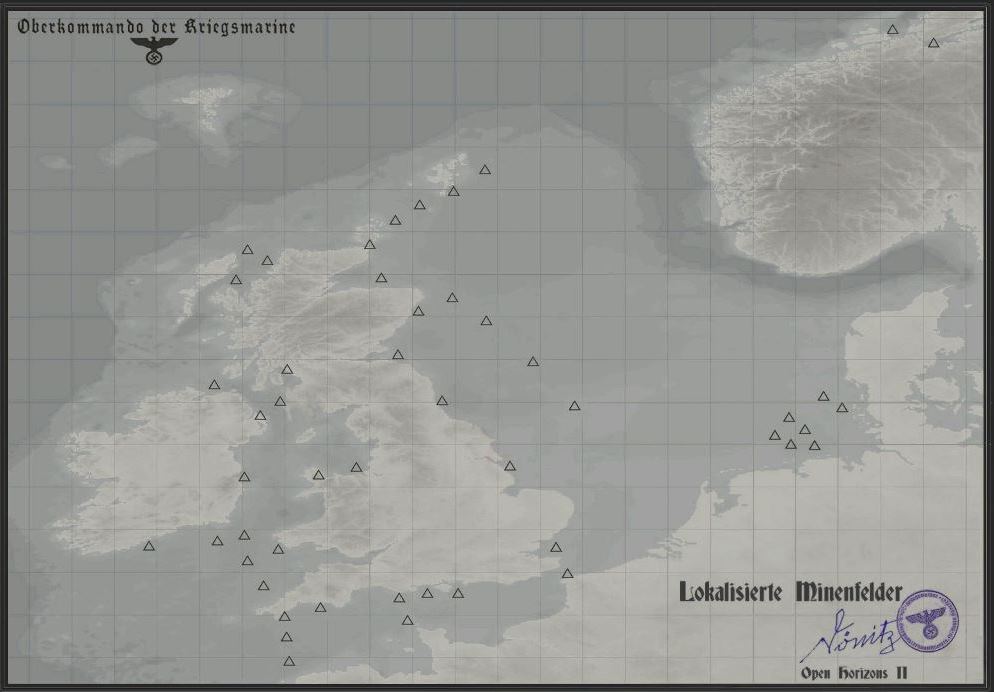 Coastal Navigation 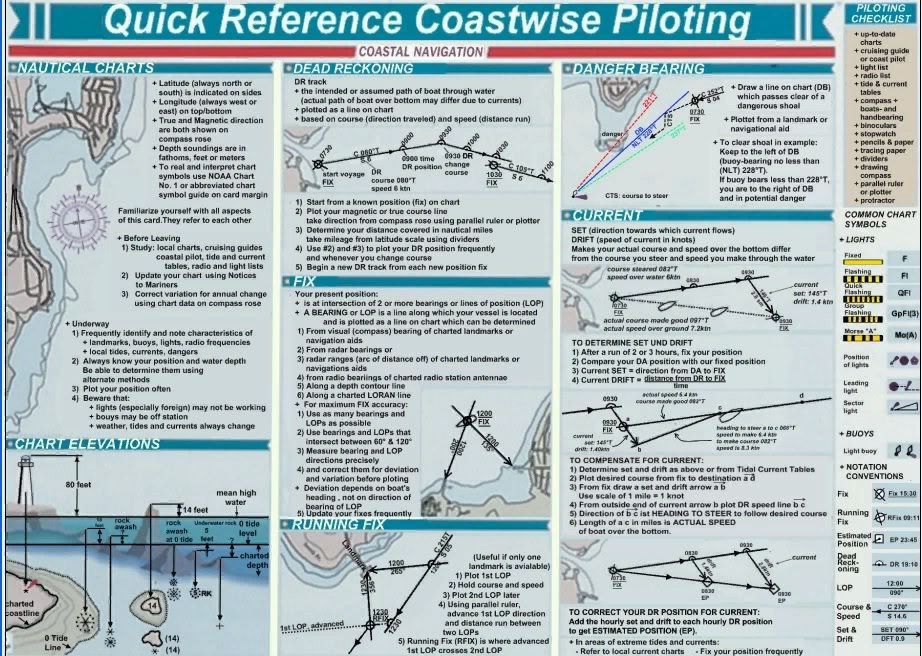 Hydrophone 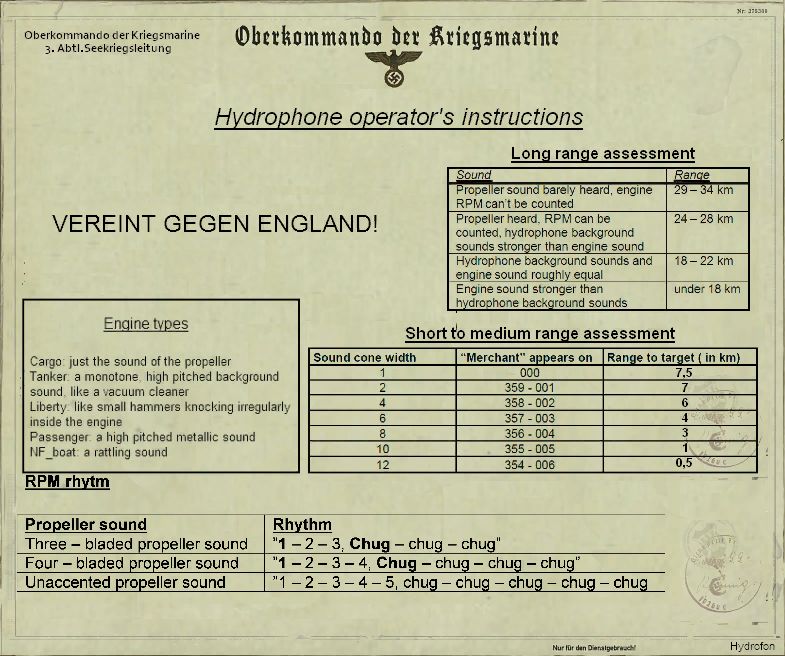 Courtesy acknowledgement to Sjizzle
__________________
LSH3-2015 <> TUTORIALS <> ALL YOU NEED TO KNOW <> ALL IN ONE PLACE SH4 <> TUTORIALS <> HOW TO DO IT <> INFORMATION <> DOWNLOAD LINKS SH5 <> TUTORIALS <> HOW TO DO IT <> INFORMATION <> DOWNLOAD LINKS Always Here To Help A Fellow 'Subber' | Need An Answer to A Question Just Send Me A PM Last edited by THEBERBSTER; 10-05-19 at 02:21 PM. Reason: Replaced missing pictures |

|

|
 09-06-14, 03:27 PM
|
#141 |
|
Bilge Rat
 Join Date: Aug 2014
Posts: 1
Downloads: 140
Uploads: 0
|
Generic Mod Enabler - v2.6.0.157
[C:\Ubisoft\Silent Hunter 5\MODS] Accurate German Flags NDB,NDH OM#1 - No Dialog Indicator sobers multi color mod V5 DynEnv v2.9 - 1. Main Mod DynEnv v2.9 - 2. Main Mod Low Resolution Patch DynEnv v2.9 - 8.b Wave Mechanics - Gale Water reflections intensity varied by available sunlight by TheDarkWraith sobers smoke screen V1 SH5 (DynEnv compatible) sobers more trees SH5 sobers storm Clouds v2 SH5 SH5_7A_Conning_Fix Equipment_Upgrades_Fix_v1_4_byTheBeast Equipment_Upgrades_Fix_v1_4_Patch_1 #Equipment_Upgrades_Fix_v1_4_Patch_1_HotFix Equipment_Upgrades_Fix_v1_4_Patch_1 (available by date) V9 by sober EUF_UBoat_FX_v0_0_3_ byTheBeast MightyFine Crew Mod 1.2.1 Alt faces MCCD_1.04_MFCM_1.2.1_compatible Reworked Morale and Abilities v.1.1 Speech fixes and additions (german version) FX_Update_0_0_22_ByTheDarkWraith FX_Update_0_0_22_Torpedoes (modified for torpedoes failure patches) FXU_0_0_22_Ship zon Files NewUIs_TDC_7_5_0_ByTheDarkWraith NewUIs_TDC_7_5_0_Das_Boot_Crew_Mod_by_Illyustrator Manos Scopes-patch for 16x9 IRAI_0_0_41_ByTheDarkWraith Sjizzle's - MarineQuadrat Charts for NewUIs v. 0.00.2 R.E.M_by_Xrundel_TheBeast_1.2 R.E.M_by_Xrundel_TheBeast_1.2 - no hyd on surface - NewUIs-IRAI compatible Church's Compass Dials Mod v2.2 - Option Two OPEN HORIZONS II v2.5 sobers OH2.5 Kiel Lite mod V4 SH5 OH II v2.5 Flag_Wind_Patch OH II v2.5 Grid Request fix Patch SH5 MQK Gradient_IO MQK LocationMaps_IO MQK ShapeTextures_NO sobers Lights Cfg V10 SH5 Trevally Tutorial - All v0.2(for OHIIv1.3) Trevally Automated Scripts v0.6 Trevally Harbour & Kiel Canal Pilot v3.1 Trevally TDC Help v2 sobers hud sounds V1 SH5 Shadow Improvement ModLR sobers less resources shadows SH5 Moon_light_mod V6 SH5 EQuaTool 01.01 by AvM - Large Style Shallow Waters Voice Be Gone gap - HD 1 deg Scope Bearing v 1.0 GramophoneShuffler Old Style Explosions V1.1 Sober's smoke screen (DynEnv&OldStyle Explosions compatible) SubFlags_0_0_8_byTheDarkWraith one ship, one torpedo v1.00 DBSM_Music_1_0_4 DBSM_Speech_1_0_4 sobers rusty deck pack SH5 TDC Graphics by Naights v1.0 DBM Background Video sobers reduced file sizes SH5 V2 ---------------------------------------------------------- Hello Peter, as you can see I did follow all of your steps and managed to created a fine well smooth working game with your list. I didn't activated Speech Recognition because I work and play this game in a restaurant and it will be weird if people see me screaming at my screen"DEEPER GODDANGIT!!...My only question is,will I have issues with the changed I did? As you can see I replaced the speeche recognition with 3 mods: -Old Style Explosions V1.1 -Sober's smoke screen (DynEnv&OldStyle Explosions compatible) -SubFlags_0_0_8_byTheDarkWraith I don't see any problems so far, but if you think it will cause issues in time than please let me know, again sorry for my poor English. Best, Pascal |

|

|
 09-07-14, 06:20 AM
|
#142 |
|
Swabbie
 Join Date: Aug 2014
Posts: 8
Downloads: 36
Uploads: 0
|
Hi Peter!
Sorry to bother you again. I think i'm having a problem with my saved games. I started a new OH II campaign. While playing E.B.C.W, I reached the patrol area and started attacking some ships (inside the 80km radius), the progress bar filled at first, but then got stuck. So I reload my Autosave Enter Base game and started E.B.C.W again. Once on the patrol area I found 2 ships, I did a manual save before intercepting them. After sinking them, the progress bar filled as expected. Then I found a big tanker, sunk it, and again the bar filled. But... an escort appeared, and destroyed my sub. So I reload my game, but this time the bar got did not fill after sinking the ships. Don't know if related, but my map looks like this: http://s16.postimg.org/t0vq0ogd1/map.jpg This is my mod list: Generic Mod Enabler - v2.6.0.157 [C:\SilentHunter5\MODS] 01-No Damn Bubbles, No Damn Halo Mod 02-SH5_7A_Conning_Fix 03-Equipment_Upgrades_Fix_v1_4_byTheBeast 04-Equipment_Upgrades_Fix_v1_4_Patch_1 05-#Equipment_Upgrades_Fix_v1_4_Patch_1_HotFix 06-Equipment_Upgrades_Fix_v1_4_Patch_1 (available by date) V9 by sober 07-MightyFine Crew Mod 1.2.1 Stock faces 08-Reworked Morale and Abilities v.1.1 09-Speech fixes and additions (english version) 10-FX_Update_0_0_22_ByTheDarkWraith 11-FX_Update_0_0_22_Torpedoes (modified for torpedoes failure patches) 12-FXU_0_0_22_Ship zon Files 13-NewUIs_TDC_7_4_2_ByTheDarkWraith 14-Large Optics for TDW UI 15-Large Optics for TDW UI 16 by 9 16-IRAI_0_0_41_ByTheDarkWraith 17-Sjizzle's - Charts for NewUIs part1_07.06.2013 18-R.E.M_by_Xrundel_TheBeast_1.2 19-R.E.M_by_Xrundel_TheBeast_1.2 - no hyd on surface - NewUIs-IRAI compatible 20-Church's Compass Dials Mod v2.2 - Option Two 21-OPEN HORIZONS II v2.5 22-OH II v2.5 Grid Request fix Patch SH5 23-MQK Gradient_IO 24-MQK LocationMaps_IO 25-MQK ShapeTextures_NO 26-Trevally Automated Scripts v0.6 27-EQuaTool 01.01 by AvM - Large Style 28-Shallow Waters Voice Be Gone 29-gap - HD 1 deg Scope Bearing v 1.0 30-one ship, one torpedo v1.00 31-Trevally Harbour & Kiel Canal Pilot v3.1 Thank!! |

|

|
 09-07-14, 07:08 PM
|
#143 |
|
Growing Old Disgracefully
|
Hi Diego
Mod list order looks ok. Map looks ok. Make sure you are on the correct side of the patrol line otherwise it may not show on the progress bar. Make sure you are surfaced when you do any manual saves. Cannot be more helpful on this. Peter
__________________
LSH3-2015 <> TUTORIALS <> ALL YOU NEED TO KNOW <> ALL IN ONE PLACE SH4 <> TUTORIALS <> HOW TO DO IT <> INFORMATION <> DOWNLOAD LINKS SH5 <> TUTORIALS <> HOW TO DO IT <> INFORMATION <> DOWNLOAD LINKS Always Here To Help A Fellow 'Subber' | Need An Answer to A Question Just Send Me A PM |

|

|
 09-08-14, 11:51 AM
|
#144 |
|
Swabbie
 Join Date: Aug 2014
Posts: 8
Downloads: 36
Uploads: 0
|
Hi!
I usually save my game when the sub is submerged... I will try doing only surfaced saves. Thanks again! |

|

|
 10-04-14, 12:31 PM
|
#145 |
|
Growing Old Disgracefully
|
Last updated 27th April 2018
Auto TDC Targeting Without Using The 3 Circles If you already have a Career you do not need to start a new one. I recommend using TDW’s Options File Editor Viewer to setup your TAI and Navigation Map patches first. This will save you having to make unnecessary changes every time you load a saved game. Picture 1 > TAI Options in TDW’s Options File Editor Viewer.  Picture 2 > NAV Options in TDW’s Options File Editor Viewer. These tools can be further customized depending on your in game circumstances in both the TAI and Navigation Maps but these settings are only good for the current gaming session.  Picture 3 > Got to the XO Tab and make sure the Manual Targeting Enforced patch is disabled (False = Red) The big advantage with Auto TDC without the 3 Circles in the method I will show you is the extended range you can shoot at. Auto TDC can be recommended using The Wolves Of Steel Mega Mod as I am showing in this tutorial. You will soon see how easy it is to use this system and be able to use it in your own game play.  Picture 4 > Start a New Campaign and select the Low setting. 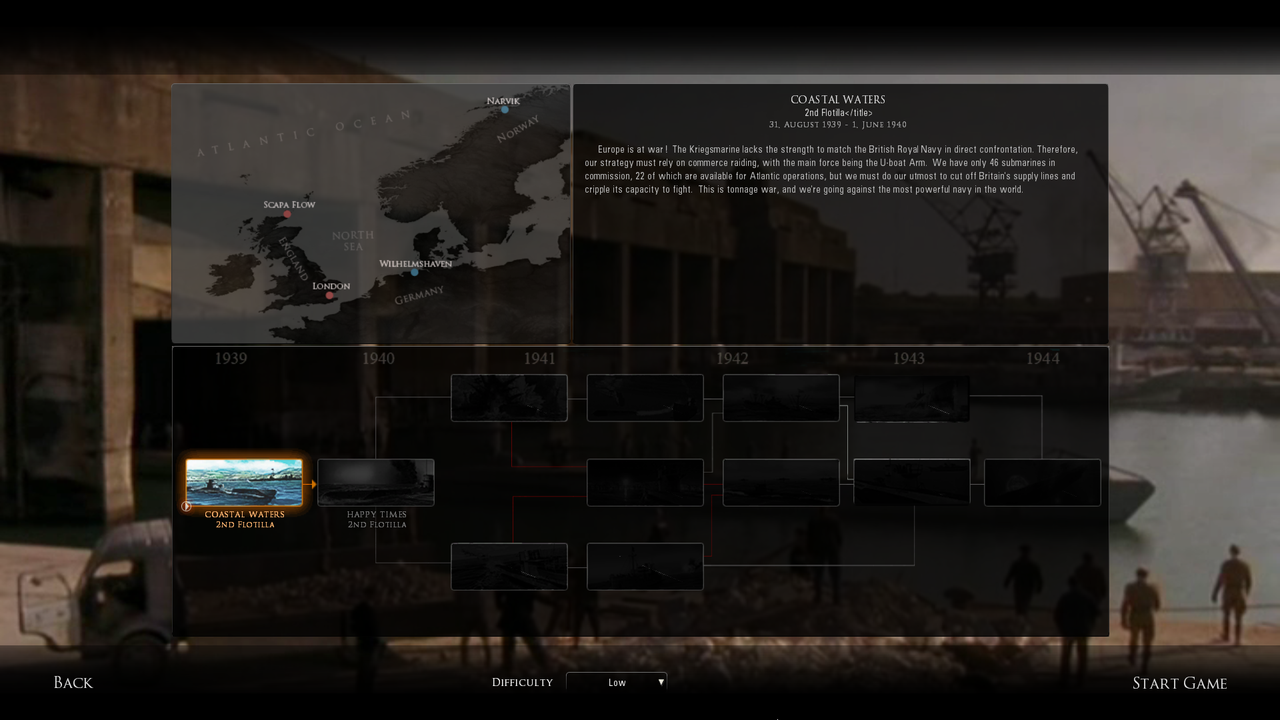 Picture 5 > Shows the Game Play Settings when the Low New Campaign setting is selected. These settings can be changed at any time you are in the Bunker to suit your game play. A Bunker save must be made to keep any changed Game Play Settings and then used to load the Game and Start the Mission. 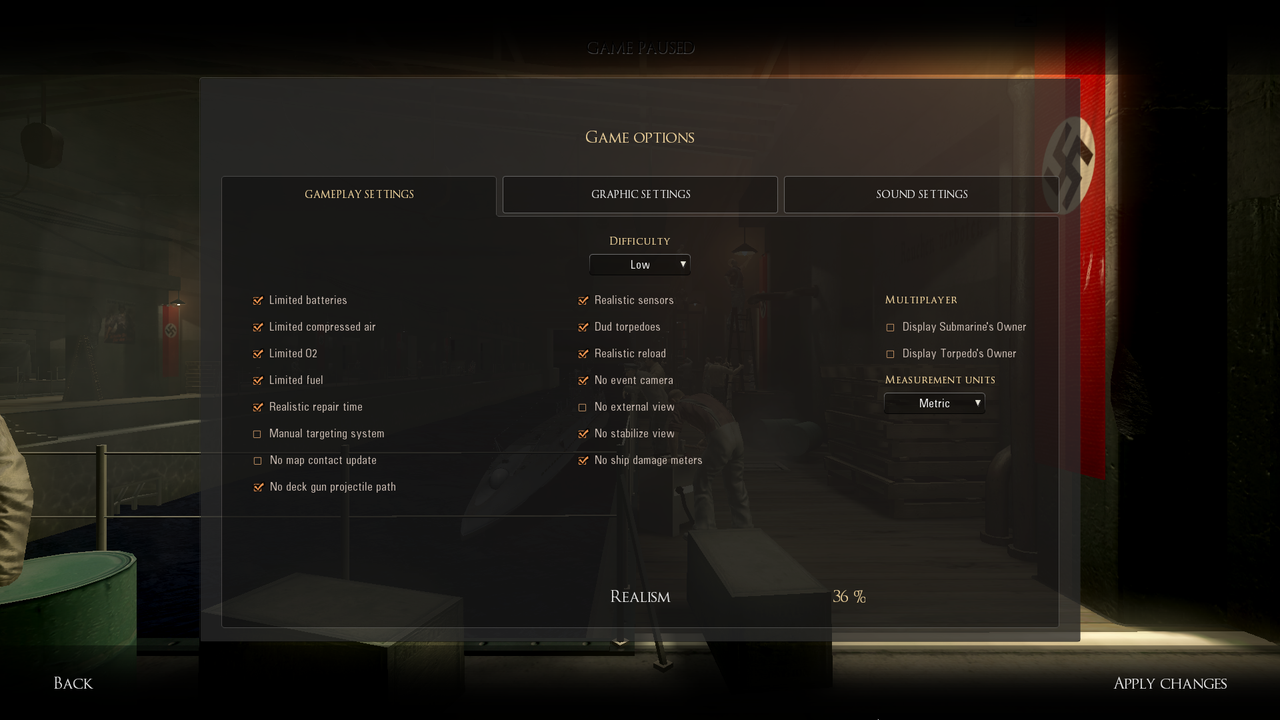 Picture 6 > Shows the TAI Map button. Click on it to show the map. Use the Alt Tab key to Minimize Map > Open Map Full > Close Map You will see how easy it is use when you have a target marked and using the Space Bar.  Picture 7 > Shows the TAI Map in the Minimized position and shows the customizing button. 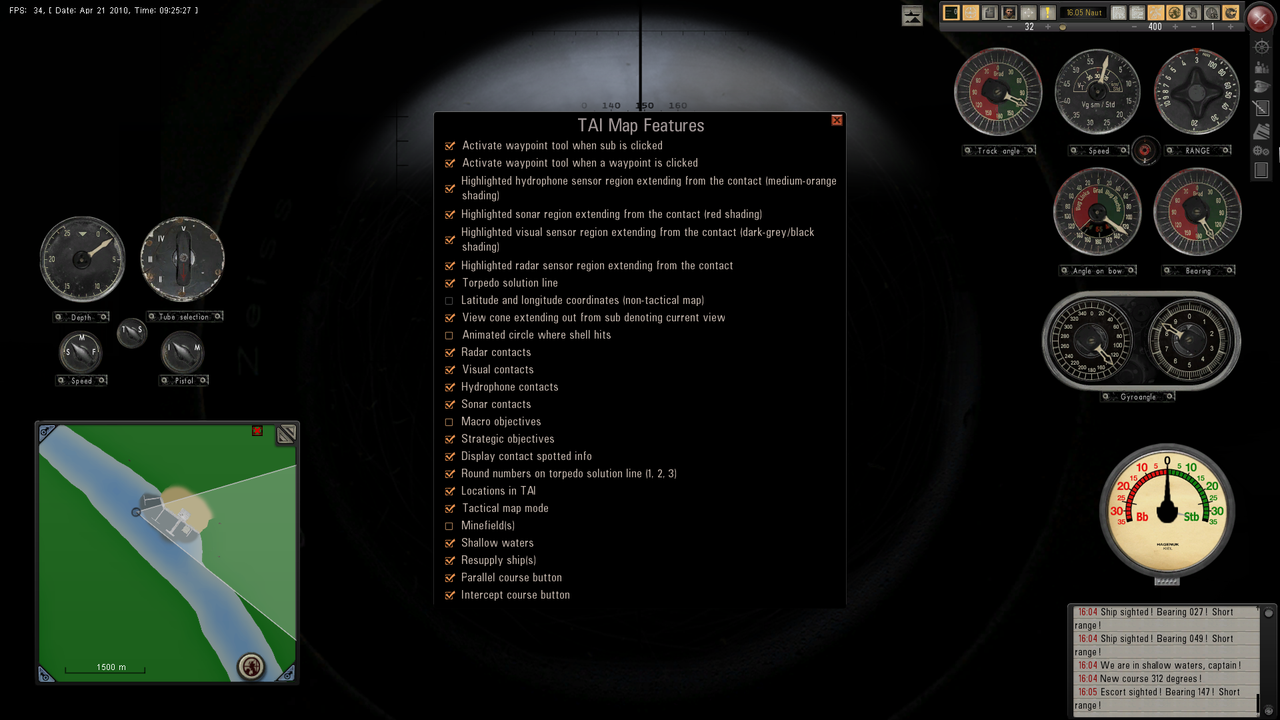 Picture 8 > Shows the patches that can be changed. There are now 2 addition buttons showing. Parallel course button Intercept course button. The picture shows the view cone extending from the U-Boat. This is the visual current view. 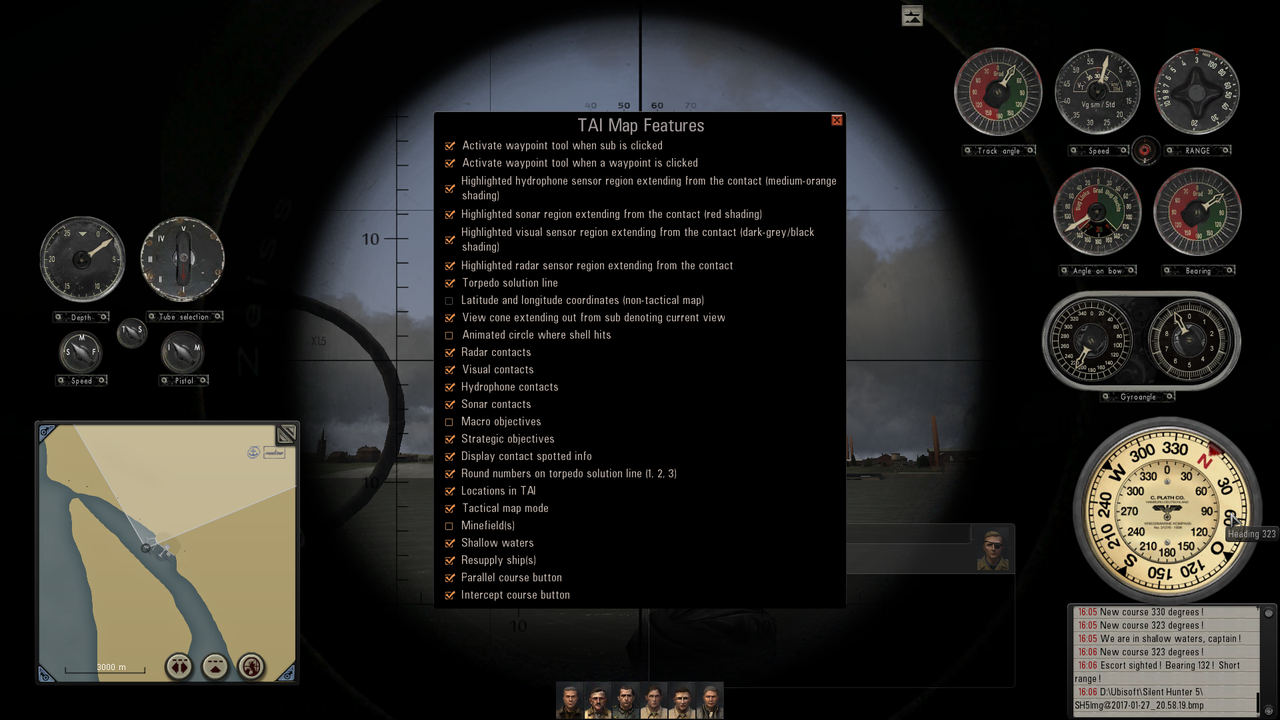 Picture 9 > The Navigation Map button works exactly the same as the TAI button does. 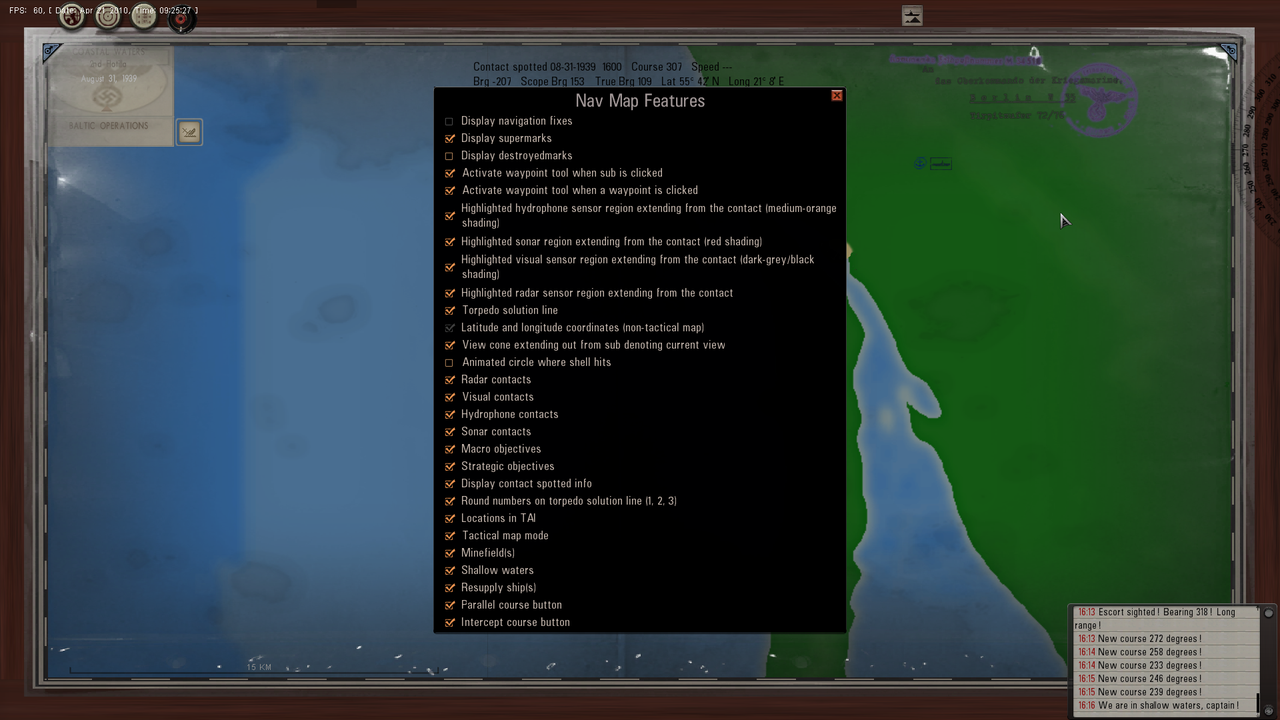 Picture 10 > Do not take any notice of the Dials as they are not needed in Auto TDC The picture shows “Break Lock” which means the Space Bar has been used to lock the target. I have drawn out the targets course on the TAI Map and positioned the U-Boat at 90ᴼ by using the protractor. This is only a guide to show you the best shooting position but does not need to be drawn out for Auto TDC unless you wsnt to. Notice the curved line extending from the U-Boat. This is the Torpedo Solution Line (TSL) Picture 11 > Shows the TAI Map fully extended with the TSL positioned on the Target. Use the mouse scroll wheel to zoom in and out. 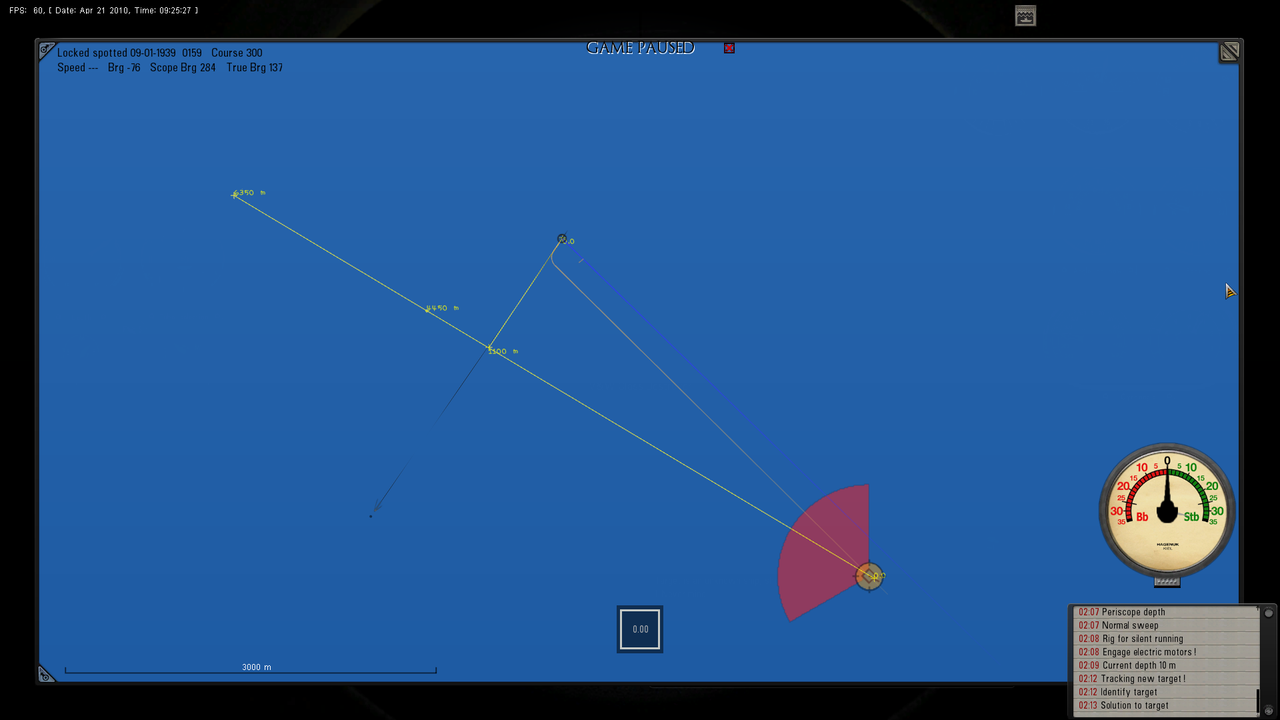 Picture 12 > Target locked with the Space Bar and showing the TSL (The line the Torpedo follows). If the torpedo was fired now it would miss because obviously the Target will have moved a further distance along its course. 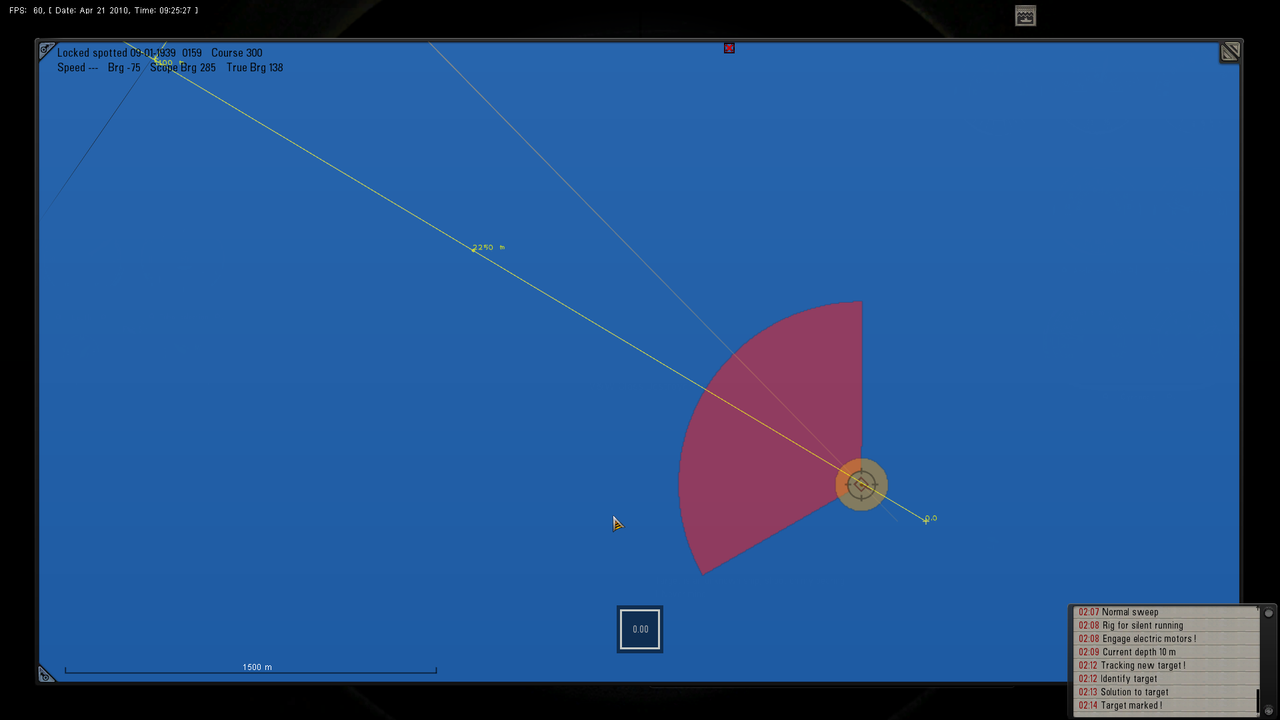 Picture 13 > Pressing the Space Bar has unlocked the Target. Notice the new position of the TSL (The line the Torpedo follows). The TDC has automatically calculated where the Targets position will be when the Torpedo reaches it. 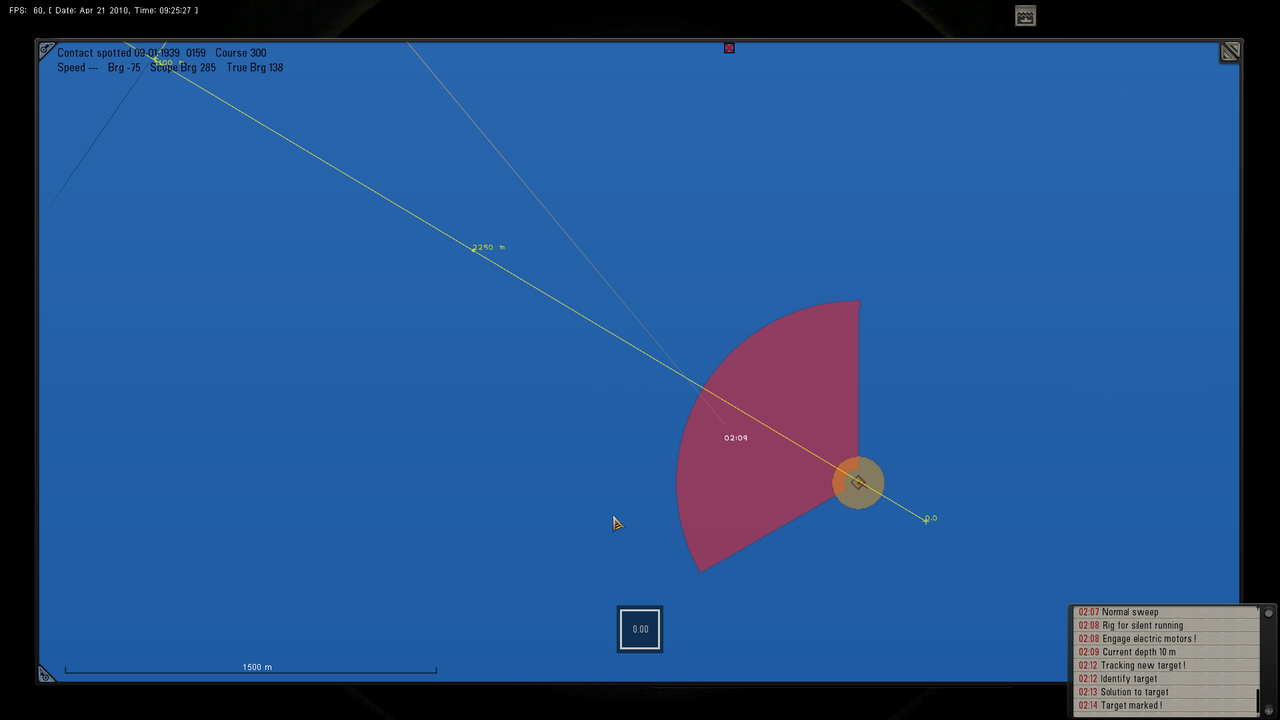 Picture 14 > Shows how you can keep the Target constantly locked by using the Torpedo Man to lock the Target. Using the TAI Map and locking and unlocking the Target to show the TSL is not be affected by the Torpedo Man by keeping the Target locked. 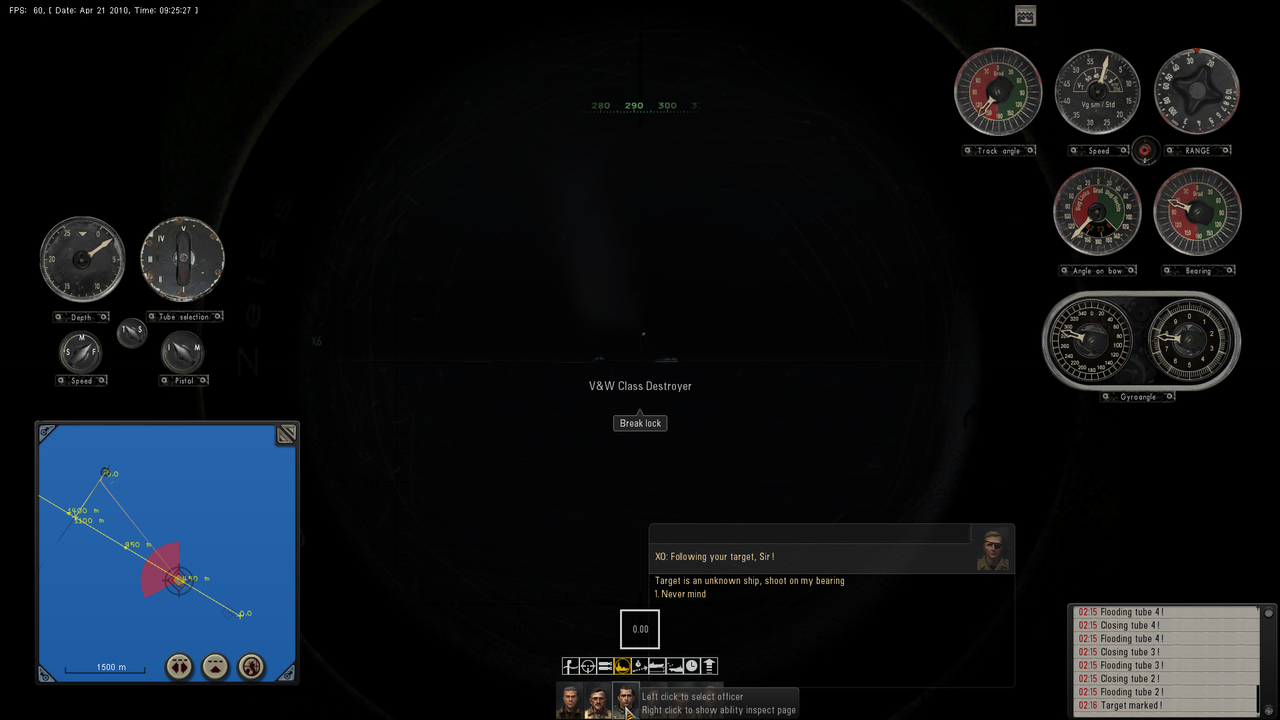 Picture 15 > Final check with the Space Bar locked. 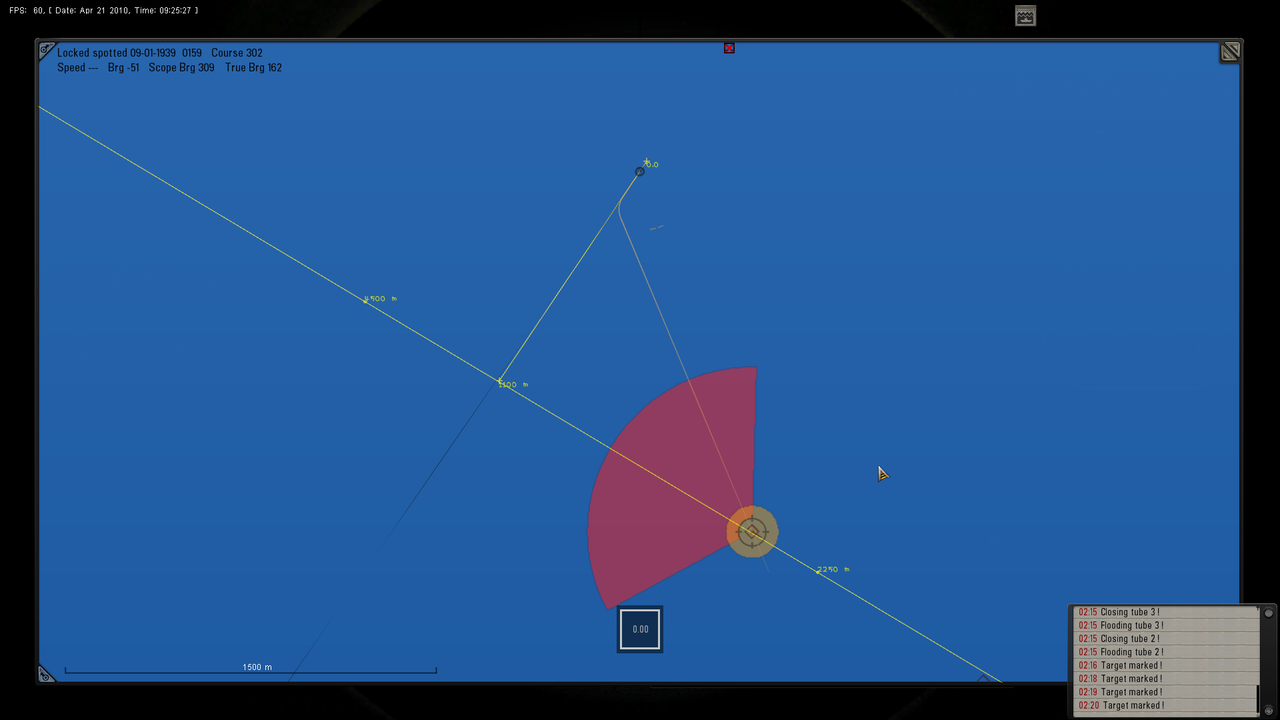 Picture 16 > Final check with the Space Bar unlocked. 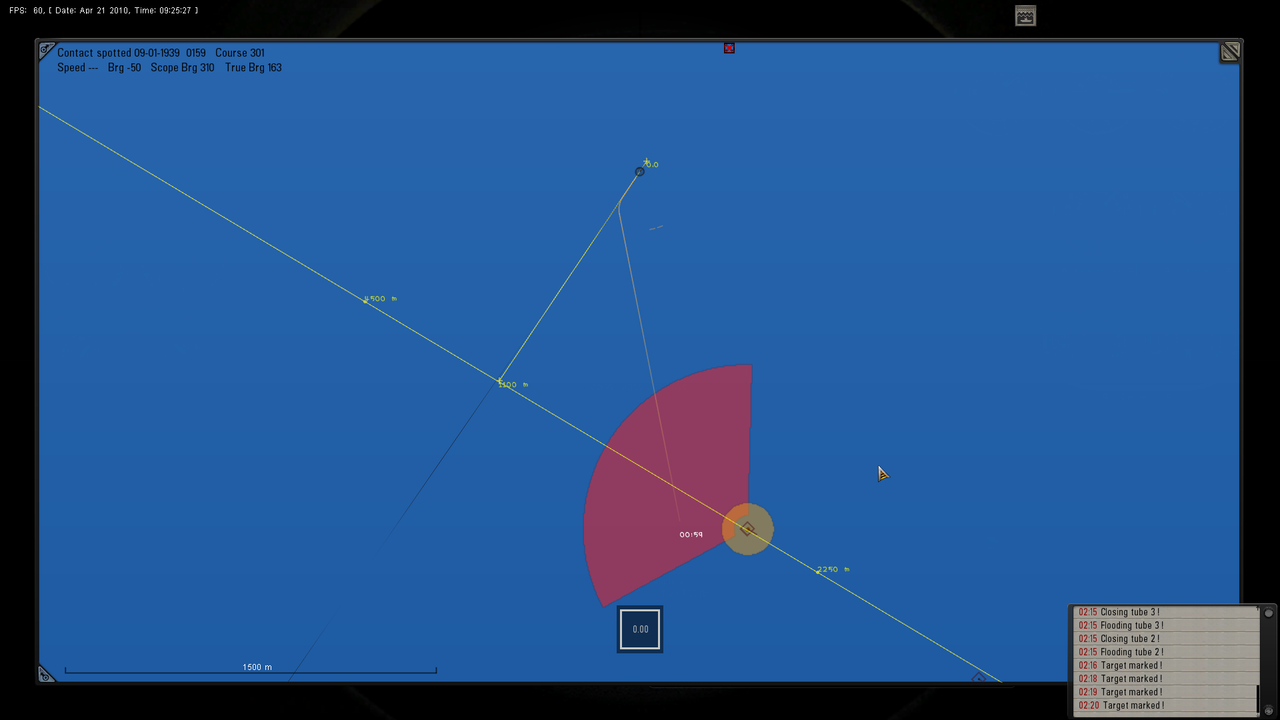 Picture 17 > First Torpedo fired and on its way to the Target was a Deep runner. 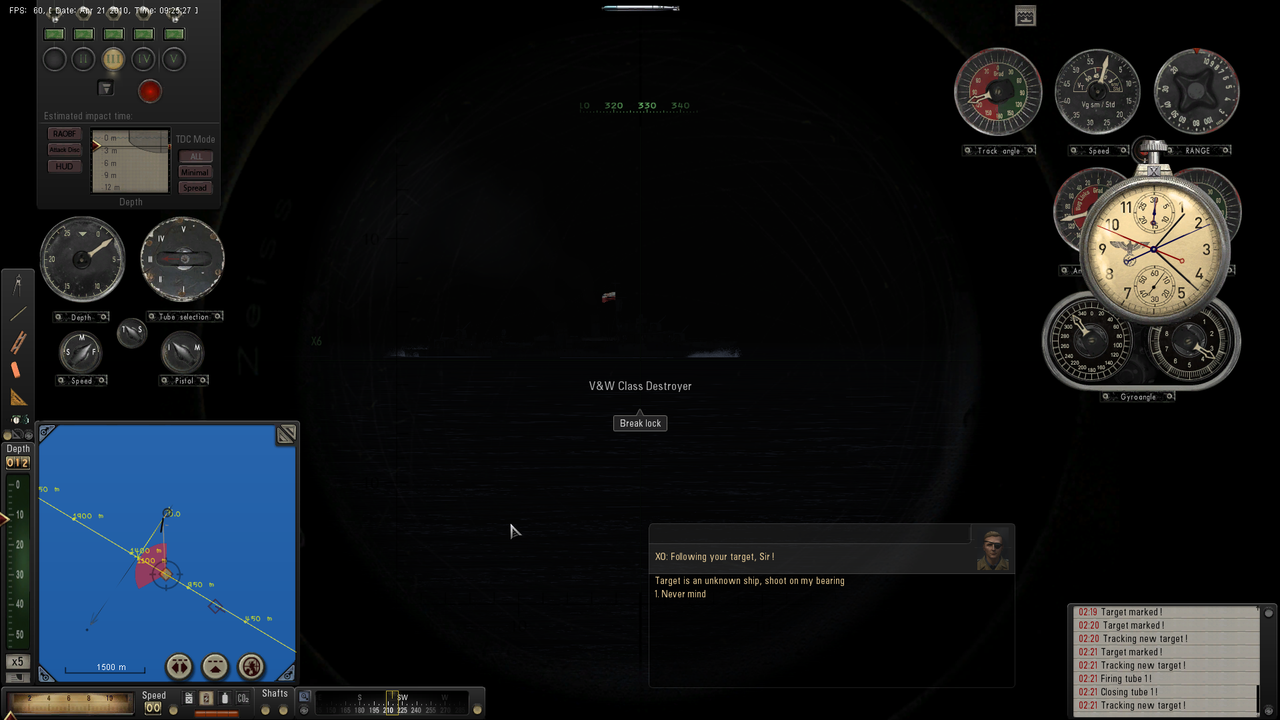 Picture 18 > 3 Torpedoes were on Target and all were deep runners going under the Destroyer. Notice the Torpedo has followed the TSL even though it ran deep. 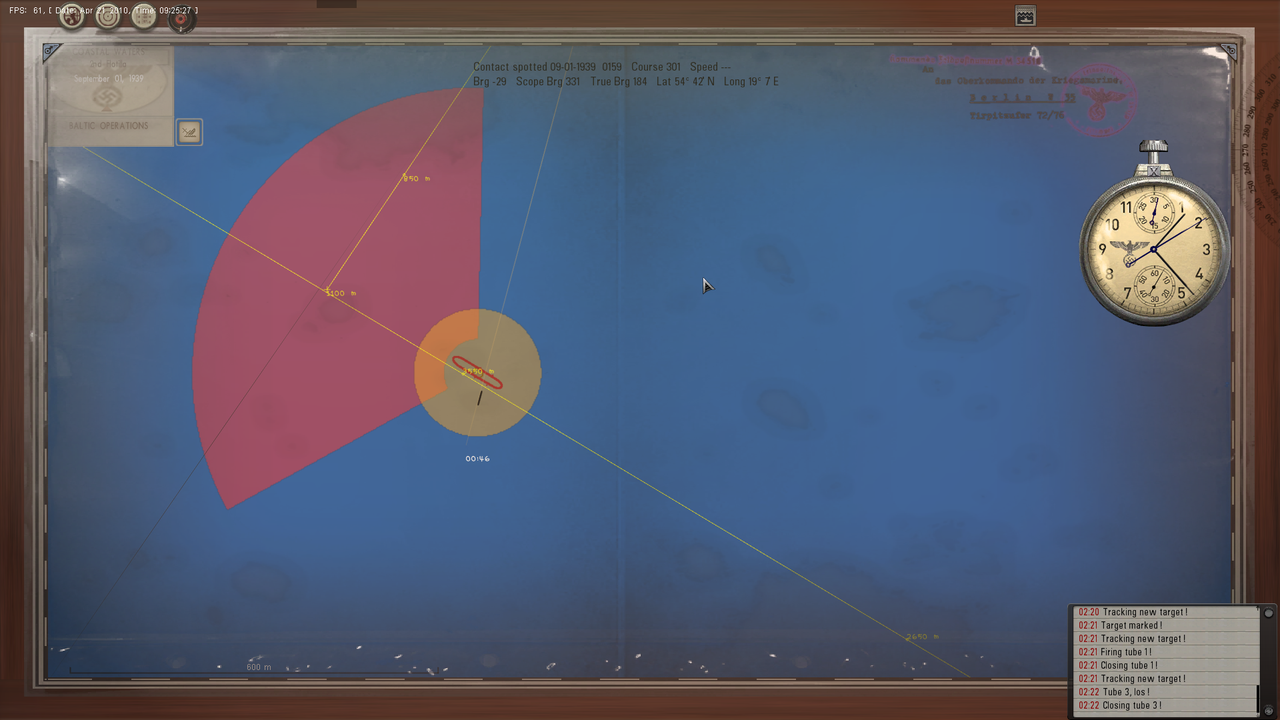 Picture 19 > Torpedo 4 hits the Target. I still had time to re-lock the Target with the Space Bar and then un-lock and Fire Torpedo 4 at a different draft Torpedo 4 hit. 3 Torpedoes still running. This is a very flexible system and you will always have the opportunity to re-lock, un-lock the Spacebar and fire more torpedoes at ranges over 5,000 meters. 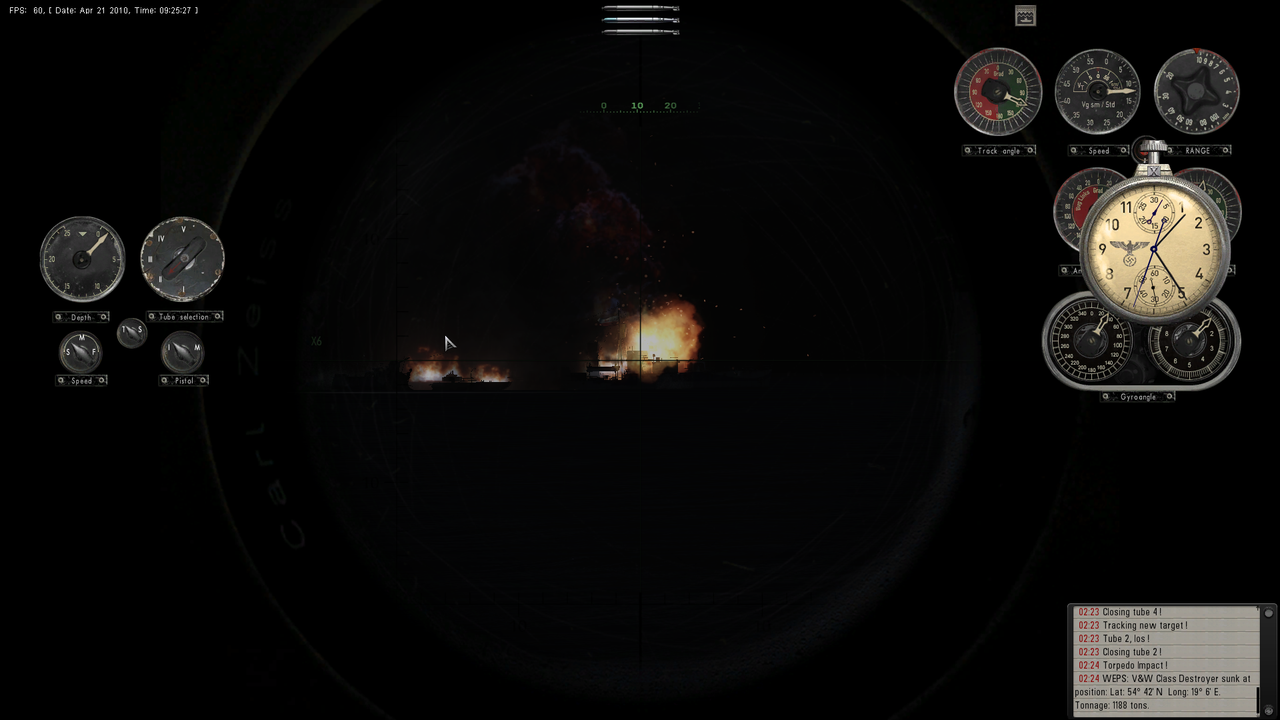
__________________
LSH3-2015 <> TUTORIALS <> ALL YOU NEED TO KNOW <> ALL IN ONE PLACE SH4 <> TUTORIALS <> HOW TO DO IT <> INFORMATION <> DOWNLOAD LINKS SH5 <> TUTORIALS <> HOW TO DO IT <> INFORMATION <> DOWNLOAD LINKS Always Here To Help A Fellow 'Subber' | Need An Answer to A Question Just Send Me A PM Last edited by THEBERBSTER; 04-27-18 at 02:52 PM. Reason: Replaced missing pictures |

|

|
 10-06-14, 05:21 PM
|
#146 |
|
Bilge Rat
 Join Date: Oct 2014
Posts: 1
Downloads: 0
Uploads: 0
|
Hi all:
I think I've done everything correctly when it comes to running SH5 offline, but I am still not able to accomplish missions. 1st mission: British Coastal Waters: I can highlight and choose it while at base (on the map) so that I can go out on patrol. But regardless of how many ships I sink, whether it's behind the red line OR patrolling around (360dgs and 91km circum) the highlighted patrol point, that mission is never complete and the white line at the bottom remains empty. It might be senility (I'll bet I'm one of the oldest players here) but I would love some suggestions on what I could try -Ronco |

|

|
 10-06-14, 06:54 PM
|
#147 |
|
Growing Old Disgracefully
|
Hi Ronco
The ability to fill the tonnage bar seems to be a bit of a problem for some of us at the moment. I have only had the problem since reinstalling from the dvd as the Uplay part kept of the installation kept coming up as a windows error. I get the Game Play Launcher from Ubi.com although it is also available from Uplay. I am also experiencing the same problem as you but on the Baltic Patrol. I do not have an answer I am afraid. It is generally recognised as not being a mod problem. I normally play with around 40 mods but am just using 14 at present for the Baltic. The most likely cause is the Ubisoft Game Launcher. I have tried numerous combinations of the UBL in and out of the x86 Program folder and also I have tried using a UBL from a backup last June. So for me it is w.i.p. Check this thread out as it may be of some help to you http://www.subsim.com/radioroom/showthread.php?t=215401&page=4 Did you install from a dvd or download? Peter
__________________
LSH3-2015 <> TUTORIALS <> ALL YOU NEED TO KNOW <> ALL IN ONE PLACE SH4 <> TUTORIALS <> HOW TO DO IT <> INFORMATION <> DOWNLOAD LINKS SH5 <> TUTORIALS <> HOW TO DO IT <> INFORMATION <> DOWNLOAD LINKS Always Here To Help A Fellow 'Subber' | Need An Answer to A Question Just Send Me A PM |

|

|
 10-07-14, 09:33 AM
|
#148 |
|
Chief of the Boat
|
Welcome to SubSim ronco

__________________
Wise men speak because they have something to say; Fools because they have to say something.
Oh my God, not again!!  GWX3.0 Download Page - Donation/instant access to GWX (Help SubSim) |

|

|
 10-25-14, 07:07 PM
|
#149 |
|
Growing Old Disgracefully
|
Let's Play Silent Hunter 5, The Wolves Of Steel Modpack By Potus
__________________
LSH3-2015 <> TUTORIALS <> ALL YOU NEED TO KNOW <> ALL IN ONE PLACE SH4 <> TUTORIALS <> HOW TO DO IT <> INFORMATION <> DOWNLOAD LINKS SH5 <> TUTORIALS <> HOW TO DO IT <> INFORMATION <> DOWNLOAD LINKS Always Here To Help A Fellow 'Subber' | Need An Answer to A Question Just Send Me A PM Last edited by THEBERBSTER; 03-16-19 at 03:53 PM. |

|

|
 11-21-14, 06:31 AM
|
#150 |
|
Watch
 Join Date: Apr 2012
Posts: 16
Downloads: 400
Uploads: 0
|
Hi all!
With the explosion of the torpedo, the ship jumps up to tens of meters and rotates until to fall. What from the mods caused this phenomenon? |

|

|
 |
|
|
