
|
|
SUBSIM: The Web's #1 resource for all submarine & naval simulations since 1997
|
SUBSIM: The Web's #1 resource for all submarine & naval simulations since 1997 |
|
|
 03-07-14, 12:13 PM
|
#1 |
|
Growing Old Disgracefully

 Join Date: Dec 2012
Location: Dibden Purlieu - Southampton
Posts: 9,606
Downloads: 1123
Uploads: 0


|
Last updated 16th June 2017
No Binoculars were used in these tests. Icons are to be read from the right to left for numbering purposes. 1st Test using Dieter Epp Officer on the bridge 1. Give the order to officer on the bridge to > M.T.D.G. (This will bring the Gun Crew on to the Deck) 2. Watch Officer > Icon 1 3. Battle Stations > Icon 5 4. Crew on Deck > Icon 10 5. M.T.D.G. > Icon 4 (This will already be yellowed) 6. Deck Gun > Icon 8 7. F.A.W. > Icon 9 8. Hold Fire > Icon 8 9. Battle Stations > Icon 5 (Will reposition the Deck Gun properly) 10. Give the order to officer on the bridge to > Secure The Deck Gun. Note 1: The Battle Station icon is essential before and after. Note 2: Before the Gun automatically fires there is a slight time delay which can be explained as Time to receive the order to fire. Note 3: Do not use F7 Battle Stations. Battle Stations must be from the Watch Officer 2nd Test only using the icons from the Watch Officer 1. Watch Officer > Icon 1 2. Battle Stations > Icon 5 3. Crew On Deck > Icon 10 4. M.T,D.G. > Icon 4 5. Deck Gun > Icon 8 6. F.A.W. > Icon 9 7. Hold Fire > Icon 8 8. Battle Stations > Icon 5 (This will secure the Deck Gun in the proper position) Notes 1 2 3 all apply to test 2 Note 4: There is no way to remove the Deck Gun Crew from the Deck Gun If the officer on the bridge is given the order to M.T.D.G. and then the order S.T.D.G. The Deck Gun will not be positioned correctly. The Deck Gun Crew will normally fire at the nearest target. When this is destroyed they will automatically reposition the Deck Gun and start firing at the next nearest target. The binoculars can be locked on to select the target of your choice using the above instructions. It is not necessary for the Binoculars to be looking at the target once firing has commenced. Courtesy acknowledgement to TheDarkWraith Tip If you shade this Tutorial and then copy and paste it to your PC Notepad you can then edit it.
__________________
LSH3-2015 <> TUTORIALS <> ALL YOU NEED TO KNOW <> ALL IN ONE PLACE SH4 <> TUTORIALS <> HOW TO DO IT <> INFORMATION <> DOWNLOAD LINKS SH5 <> TUTORIALS <> HOW TO DO IT <> INFORMATION <> DOWNLOAD LINKS Always Here To Help A Fellow 'Subber' | Need An Answer to A Question Just Send Me A PM Last edited by THEBERBSTER; 01-17-18 at 05:33 PM. |

|

|
|
03-07-14, 12:29 PM
|
#2 |
|
Growing Old Disgracefully
Join Date: Dec 2012
Location: Dibden Purlieu - Southampton
Posts: 9,606
Downloads: 1123
Uploads: 0
|
Last updated 31st December 2014
Instructions > How To Fire The Deck Gun Manually. Main Menu select Options Selecting Game Play Settings will change the way the Deck Gun operates. No Deck Gun Projectile Path When this Box is Ticked. 1. No Green Gun Sight. 2. No Shell will be seen on the TAI Map No Deck Gun Projectile Path Box Not Ticked 1. Green Gun Sight will be the first Gun Sight showing. 2. Your TAI Map will show where your Shells are falling. It is essential that the Battle Station order is given by the Watch Officer Icon 1. If this is not done then the Deck Gun Crew will not place the Deck Gun in the correct position after leaving it. (Before) You give the orders then either Walk or Teleport to the Deck Gun. 1. Watch Officer > Icon 1 2. Battle Stations > Icon 5 3. Crew On Deck > Icon 10 4. M.T.D.G. > Icon 4 (Or After) You now either Walk or Teleport to the Deck Gun Then give the above orders. When you get to the Deck Gun you will see a Green Gun Sight. (Depending on your Game Play Settings). To Traverse the gun and Elevate it is all done by moving your mouse. There is an annoying glitch that causes you to lose your Deck Gun Crew. This happens when the U-boat is pitching up and down. You will notice this when you cannot move the Deck gun from side to side. To call the Deck Gun Crew back you need to do the following every time this happens. 1. Crew On Deck > Icon 10 2. M.T.D.G. > Icon 4 Leave your Icons showing so that you can see them. Any Yellowed Icon is active. The second way to fire the Deck Gun. Click on the Gun Sight in the top left corner. This opens the Standard Gun Sight. Click on the Gun Sight again in the top left corner. This opens up the High Power Gun Sight Moving your mouse will move the Deck Gun from left to right (Traversing) Using your mouse wheel will raise and lower the Deck Gun (Trajectory) There are 3 types of Ammunition available. 1. A.P. > Armour Piercing. 2. H.E. > High Explosive. 3. A.A. > Anti Aircraft The amount of Ammunition available is shown under each shell. To select the shell type just click on it with your mouse. 1. Place the Deck Gun Sight Crosshairs on the target. 2. Adjust the Elevation 3. Press the Space Bar to Fire You will see in the Message Box Gun Loading If you look at the Shell you will see it filling up. You can keep pressing the Space Bar down and still move your mouse. The next Shell will then Fire immediately when the Deck Gun has loaded. You will need to learn when to Fire so as to take in to account the rise and fall of the u-boat. I would suggest that you test your Gun Practicing by going to Historical Missions and selecting Bullet Spark Test and select Start. This will give you 2 Merchants to practice your shooting on. When you have finished Firing altogether click on the Red X in the Top Right Corner You can either Walk or Teleport back to the Bridge To finish 1. Watch Officer > Icon 1 2. Battle Stations > Icon 5 (Yellowed) Using the Officer on the Bridge Dieter Epp will mess with the Deck Gun being placed correctly when you give him the order Secure The Deck Gun Courtesy acknowledgement to TheDarkWraith Tip If you shade this Tutorial and then copy and paste it to your PC Notepad you can then edit it.
__________________
LSH3-2015 <> TUTORIALS <> ALL YOU NEED TO KNOW <> ALL IN ONE PLACE SH4 <> TUTORIALS <> HOW TO DO IT <> INFORMATION <> DOWNLOAD LINKS SH5 <> TUTORIALS <> HOW TO DO IT <> INFORMATION <> DOWNLOAD LINKS Always Here To Help A Fellow 'Subber' | Need An Answer to A Question Just Send Me A PM Last edited by THEBERBSTER; 01-17-18 at 05:33 PM. |
|
|
|
|
03-07-14, 01:24 PM
|
#3 |
|
Growing Old Disgracefully
Join Date: Dec 2012
Location: Dibden Purlieu - Southampton
Posts: 9,606
Downloads: 1123
Uploads: 0
|
Last updated 23rd August 2018
How To Change Your Game Play Settings In The Bunker This can be done at any time when you are in the bunker. This cannot be done if you are in the middle of a patrol. 1. Load the Autosave Enter Base game save which will load to the Bunker. 2. Select your mission from the Officer. 3. Press the > Esc key to the Main Menu. 4. Go to > Options. 5. In Game Play Settings tick or un-tick the boxes for the settings you want to see in your game. 6. Apply to save the changes 7. Press the > Esc key. 8. Go to > Save Game. 9. Make a Manual Save by typing in the space at the bottom of the screen. 10. Press > Save 11. Go to > Main Menu. 12. Go to > Load Game. 13. Load the Manual Save you made which will load to the bunker 14. Start your mission Do not upgrade your boat if your game is modded, wait until your are in Kiel.
__________________
LSH3-2015 <> TUTORIALS <> ALL YOU NEED TO KNOW <> ALL IN ONE PLACE SH4 <> TUTORIALS <> HOW TO DO IT <> INFORMATION <> DOWNLOAD LINKS SH5 <> TUTORIALS <> HOW TO DO IT <> INFORMATION <> DOWNLOAD LINKS Always Here To Help A Fellow 'Subber' | Need An Answer to A Question Just Send Me A PM Last edited by THEBERBSTER; 08-23-18 at 02:46 PM. Reason: Revised |
|
|
|
|
03-07-14, 01:29 PM
|
#4 |
|
Growing Old Disgracefully
Join Date: Dec 2012
Location: Dibden Purlieu - Southampton
Posts: 9,606
Downloads: 1123
Uploads: 0
|
Last updated 25th January 2018
Steam needs "Evaporating" get the Dvd if you can or otherwise consider a download version which will be cheaper. With a dvd you actually own it and it is easier to re-install. Before loading the Dvd. Make sure that you leave no trace of Steam on your system. Use a registry cleaner like "Ccleaner" and restart your system afterwards. Go to your start button and use search and check again for any left over SH5. If you find anything delete it and run the registry cleaner again. If you already have a Uplay account play it safe and set up a new one for your new Silent Hunter 5 installation. This will come up at the end of the installation. If you want to play the game with the 'German Voices' then choose the 'Custom' install. After the install go to the following folders. In the path Ubisoft\Silent Hunter 5\Data\Support\GameUpdater There is a "GU" exe application that will update your game to v1.2 Tip If you shade this information and then copy and paste it to your PC Notepad you can then edit it.
__________________
LSH3-2015 <> TUTORIALS <> ALL YOU NEED TO KNOW <> ALL IN ONE PLACE SH4 <> TUTORIALS <> HOW TO DO IT <> INFORMATION <> DOWNLOAD LINKS SH5 <> TUTORIALS <> HOW TO DO IT <> INFORMATION <> DOWNLOAD LINKS Always Here To Help A Fellow 'Subber' | Need An Answer to A Question Just Send Me A PM Last edited by THEBERBSTER; 01-25-18 at 03:46 PM. |
|
|
|
|
03-07-14, 04:43 PM
|
#5 |
|
Swabbie
 Join Date: Feb 2014
Posts: 10
Downloads: 22
Uploads: 0
|
Useful tutorials, thanks berbster
|
|
|
|
|
03-08-14, 04:21 AM
|
#6 |
|
Admiral
 Join Date: Mar 2007
Posts: 2,200
Downloads: 172
Uploads: 0
|
Amazing work
 , thank you THEBERBSTER , thank you THEBERBSTER 
__________________
What we do in life echoes in Eternity |
|
|
|
|
03-11-14, 08:54 AM
|
#7 |
|
Watch
 Join Date: Dec 2012
Location: Middle Europe
Posts: 15
Downloads: 199
Uploads: 0
|
Great work Kaleun THEBERBSTER
Just one idea. In order to get your walkthroughs better maintained, what do you think to creat e.g. word document and put it to download section? It's just an idea, newertheless, thank you for your effort. I wish to have such information before.. For me it was a tough and long way to mod SH5 until |
|
|
|
|
02-15-24, 07:47 PM
|
#8 |
|
Gunner
 Join Date: Jan 2015
Posts: 95
Downloads: 177
Uploads: 0
|
i have been patrolling in the north Atlantic for several weeks now and the weather is not what it ought to be. from my understanding the climate is turbulent in the north Atlantic. i get 0 wind and no clouds for days at a time, this can't be realistic.
is this just the way the game is? i read Darkwraith's comment on the subject I think he said that it was just too involved to make the weather more dynamic.
__________________
nygm tonnage war v2.5 nygm3 new nygm3_6f iablshipsfornygm 3rdflotillamod nygm_hires_subs ahnenerbe |
|
|
|
|
03-12-14, 11:23 AM
|
#9 |
|
Growing Old Disgracefully
Join Date: Dec 2012
Location: Dibden Purlieu - Southampton
Posts: 9,606
Downloads: 1123
Uploads: 0
|
Last updated 5th May 2018
4 Bearing Method by Kuikueg and Videos by Stoianm, Step By Step Tutorial This method can be used with Real Navigation or with Map Contacts. This is a very useful Attack Plan if you are in Fog and will not be able to see a Visual Contact. Stoianm has produced his Tutorial Videos in 4 parts. In his Tutorial Stoianm is using Real Navigation and the Hydrophone. There is nothing to say if you want to use the Periscope at any time then that is up to you. The Kuikueg Method does not use the True Bearing Method and also uses the Protractor as the main tool rather than the Compass. Important Note. Please note that if you are using the Stock Keyboard with W - A S D then you will not be able to use the Z Key as this is used for Rig For Silent Running. You will need to use the Sonar Station or use Follow Nearest Contact. Stormys_DBSM_ SH5_ V1.3 mod has the Z Key function. Stormys_DBSM_ SH5_ V1.3_Hotfix_3 (essential mod). Link to Stormys mods. http://www.subsim.com/radioroom/showthread.php?t=164552&highlight=stormys+dbsm As Stormy uses German Language in his mod you will also need to download this mod if you do not want to make manual changes in your Silent Hunter Files. German U-Boat Crew Language Pack Link to mod. http://www.subsim.com/radioroom/showpost.php?p=1465509&postcount=23 If you want to change your Keyboard Layout you might be interested in this mod. SH_Keymapper Link to mod. http://www.subsim.com/radioroom/showthread.php?t=168297 Link to YouTube Video 1 (Time 14 minutes) My part in this Tutorial can be used with the YouTube Videos and also as a Stand Alone Tutorial. This might seem complicated but trust me it is not. Just look at the videos and it will all fall in to place. All Calculations and Data are taken from the videos. 1. Set the Speed to > 0 Knots. 2. Set the Depth to > 19 metres. 3. Order the Navigator to calculate our new position. 4. This needs to be done as Stoianm is playing Real Navigation at 100% and only our last plotted position is showing on the Navigation Map and needs to be updated. 5. Go to the Hydrophone Stationand search for a Contact. 6. Contact found. 7. Send the Crew to Battle Stations. 8. Show the Stopwatch. 9. Press the Z Key and start the Stopwatch. 10. Contacts Bearing is showing 258 degrees. 11. Pressing the Z key anytime will show the Contacts Bearing in the Message Box. 12. The Navigator has calculated our position as 30 degrees. 13. Take the Ruler and draw out 30 degrees. 14. Our First Calculation will be 360 258 = 102 degrees on our Left Side. 15. Take the Protractor Zoom Out and draw 102 degrees. 16. Now take the Ruler and draw a line On Top of the Protractor Line near to the top of the Protractor Line and down to the U-Boat Mark. Zoom Out so as to make an accurate mark. 17. Now take the Compass and place this On Top of the Ruler Line and down to the U-Boat Mark. Zoom Out so as to get make an accurate mark. 18. Bearing 1 is now showing. 19. This process happens only on the 1st and the 3rd Bearings. 20. You now have to decide how much time you are going to allow between the bearings. 21. This will depend on a number of factors. 22. The further the Contact is away and closing will allow a longer time and a more accurate end result. 23. Ideally 30 Minutes is good. This gives enough time for the Contact to move a distance for you to get at least 5 or 6 degrees of movement between bearings. 24. Whatever time you decide that time must be the same time for all of the Bearing Calculations. 25. Use Time Compression to move the Stopwatch time close to the 30 Minute Mark. 26. When the Stopwatch Hand goes to 30 Minutes immediately press the Z Key. 27. We now have our information to set up our 2nd Bearing 263 degrees. 28. Our 2nd Calculation will be 360 263 = 97 degrees on our Left Side. 29. Take the Protractor from Line 1 and move it until you see 97 degrees. 30. Now take the Ruler and draw a line On Top Of the Protractor Line near the to the top and then down to the U-Boat Mark. Zoom Out so as to get an accurate mark. 31. Bearing 2 is now showing. 32. Use Time Compression to move the Stopwatch time close to the 30 Minute mark. End of Video 1 Link to YouTube Video 2 (14 minutes) 33. When the Stopwatch Hand goes to the 30 Minute Mark press the Z Key. 34. We now have our information to set up our 3rd Bearing 281 degrees. 35. Our 3rd Calculation will be 360 281 = 79 degrees on our Left Side. 36. Take the Protractor from Line 2 and move it until you see 79 degrees. 37. Now take the Ruler and draw a line On Top of the Protractor Line near to the top and then down to the U-Boat Mark. Zoom Out so as to get an accurate mark. 38. Now take the Compass and place this On Top of the Ruler Line and then down to the U-Boat Mark Zoom Out so as to get an accurate mark. 39. Bearing 3 is now showing. 40. Move the Protractor from the 3rd Bearing Line and move it out to the right. It does not matter where yet. 41. You will now notice that we have 2 Compass Circles passing through the U-Boat Mark. 42. With the Marker put an X about half way along our 2nd Bearing Line. Zoom Out so your X is accurately placed on the line. 43. This will be known as Mark 1 on the 2nd Bearing Line. 44. We now take a Parallel Line by taking the Compass and moving our Compass Circle from Line 1 and placing it on the Line 2 Mark 1 Zoom Out so as to get an accurate alignment. 45. We now take another Parallel Line by taking the Compass and moving our Compass Circle from Line 3 and also placing it on the Line 2 Mark 1 Zoom Out so as to get an accurate alignment. 46. What you now see is that one of the Parallel Lines Crosses the 1st Bearing Line. and the other Parallel Line Crosses the 3rd Bearing Line. 47. Take the Marker and Mark an X where the lines cross each other on the 1st Bearing Line. Zoom Out so as to get an accurate alignment. 48. This will be known as Mark 2. 49. Take the Marker again and Mark an X where the lines cross each other on the 3rd Bearing Line. Zoom Out so as to get an accurate alignment. 50. This will be known as Mark 3. 51. We can now erase the 2 Compass Circles and the X Mark 1 on Line 2. 52. We can see the X Mark 2 on Line 1 and the X Mark 3 on Line 3. 53. Take the Ruler and draw a line from the X on Line 1 to the X on Line 3. 54. We can see by Zooming out that the Contacts Heading is 98 degrees. 55. Continue out to the right with your Ruler at 98 degrees for around 30km. 56. Recheck your alignment with the X Mark on Line 3 and adjust the Contacts Line closer to cross the X Mark if necessary. 57. This is the Contacts Heading. 58. We are now showing a New Line Crossing Line 2. 59. Take the Marker and Mark an X where the lines cross each other on the 2nd Bearing Line. Zoom Out so as to get an accurate alignment. 60. This will be known as Mark 4. 61. To take the 4th Bearing we need to move the U-Boat. 62. We know the direction that the Contact is Heading but we do not know how far Up or Down. 63. Take the Ruler and move your original 30 degrees position to 90 degrees out to the right side. 64. Order the Course Change to 90 degrees. 65. Order Flank Speed. 66. Order Surface the Boat. 67. Keep an eye on your Stopwatch as you need to be Dived and Stopped in position when the Stopwatch reaches your last 30 minutes. 68. Take the Compass and place it on the Mark 4 on Line 2. 69. Draw the Compass Out as far as the X Mark on Line 1 and the X Mark on Line 3. 70. If your previous measurements have been accurate you should see your Compass Circle passing through both of the X Marks. 71. Now move the Compass from Line 2 to Line 3. 72. You will now notice that on the Contacts Heading Line (CHL) the Compass Circle is crossing the CHL. 73. Take the Marker and Mark an X where they cross. 74. This will be Mark 5. 75. Take the Protractor that you previously moved to the right and place it so that it crosses the Mark 5 on the CHL. 76. This is the 4th Bearing. 77. Take the Eraser and remove the Compass Circle. 78. We do not need to overlay the Ruler on the 4th Bearing Line as shown on the video. 79. We now need to make another Parallel Line. 80. Take the Compass and put in on the End of the CHL. 81. Draw it out and place the other end on the Mark 2 on the 1st Bearing Line. 82. Keep your eye on the Stopwatch remembering that you need to allow 10 Minutes to Dive and be at 0 Knots so you can take the Last Bearing. 83. Now is maybe a good time to set up your Torpedoes. 84. With the Torpedoes now set up use some Time Compression to take us to the Dive time. End of Video 2 Link to YouTube Video 3 (14 minutes) 85. Order All Stop after 20 Minutes. 86. Order a Dive to 17 Metres if you are only going to attack using the Hydrophone 87. Order a Dive to Periscope Depth if you intend to view. 88. If you are now at 0 Knots we need to order our Navigator to give us our new position. 89. The Navigator tells us our Heading is 91 degrees. 90. When the Stopwatch shows 30 Minutes press the Z Key to get the latest Contacts Bearing. 91. This is now showing in the Message Box as being 208 degrees. 92. Our 5th Calculation will be 360 208 = 152 degrees on our Left Side. 93. You no longer need the Stopwatch. 94. Take the Ruler and draw out our 91 degrees Course. 95. Take the Protractor and draw out 152 degrees making sure that the Protractor Line passes through Line 4. 96. Take the Marker and put an X where the lines cross. Zoom Out so as to get an accurate alignment. 97. This will be known as Mark 6 on Line 4. 98. Erase all lines on the U-Boat. 99. On the CHL you have the Compass Parallel Line. 100. Move this to Mark 6 on Line 4. 101. You will now see a New Line Crossing on Line 3. 102. Take the Marker and put an X where the lines cross. Zoom Out so as to get an accurate alignment. 103. This will be known as Mark 7 on Line 3. 104. Erase the Old CHL. 105. Take the Compass and from Mark 7 to Mark 6 measure the distance. 106. We know it took 30 Minutes to travel the distance between these marks. 107. The Compass shows that our Target travelled 8,550 Metres. 108. We now need to go to the Speed Chart and in the 30 Minute Column we see that the speed is between 9 and 10 Knots for the distance travelled. 109. Take the Compass that is on the Mark 7 and put it on the Mark 6 on Line 4. 110. We now have a Parallel Line passing in front of our U-Boat. 111. Take the Protractor and draw out a 90 degree angle from the U-Boat to the New CHL. 112. With the Protractor on the CHL we see that we are 9 degrees out from the 90 degrees we are looking for. 113. You can use the U-Boats Compass and order Ahead Slow. I personally would use the Rudder and watch the degrees changing. 114. With 1 degree to go order Rudder Amidships 115. It is important to get the 90 degree Angle Correct as we will be firing blind just using the Hydrophone and the Z Key. 116. Order All Stop. 117. Use the Hydrophone or use the Z Key to check where our Target is. 118. Go to the TDC as it is time to Enter Our Data. 119. Press the Red Button to show Green. 120. Enter the Speed 9.5 Knots in to the TDC. 121. Take the Compass and measure the distance from the U-Boat to the CHL. 122. Enter 2,700 Metres in to the TDC. End of Video 3 Link to YouTube Video 4 (9 minutes 29 seconds) 123. Because we are firing at 90 degrees the Range entered in to the TDC is not critical. 124. Set the AOB to 90 degrees Starboard. 125. Press the TDC Button to show Red again. 126. Now we need to check the Gyroangles. 127. We want Both Gyroangles Arrows pointing vertically 0 degrees. 128. We move the Periscope until we get the Gyroangles we are looking for. 129. We now have the final piece of the Firing Solution 347 degrees. 130. This is what we will be looking for in the Message Box. 131. Go to the Sonarman. 132. Select Follow Nearest Contact. 133. He will give us a continuous update of the Targets Bearing. 134. Be careful if you decide to use some Time Compression as the Target will close very quickly. 135. Use the Z Key if possible which will be more accurate than the bearing the Sonarman is giving. 136. We have Torpedoes 1 - 3 4 set up for firing. 137. We are going to Fire our 1st Torpedo when we see 346 degrees. 138. Our 2nd Torpedo on 347 degrees. 139. Our 3rd Torpedo on 348 degrees. 140. In between the Sonarmans Bearings we keep pressing the Z Key and watch the Message Box. 141. We are getting to the crucial stage now. 142. Keep pressing the Z Key. 143. Fire 1. 144. Fire 3. 145. Fire 4. 146. Up to this point you may well have been using the Periscope. 147. For those that have not then it is time to go to the Sonar Station and listen to the sound of our Torpedoes as they track towards the Target. 148. Set the Sonar to 0 degrees. 149. We hear 3 Torpedo Impacts without ever seeing the Target. End Of Tutorial Bearing Line Mark Numbers For Quick Reference Mark 1 <> Place on the 2nd Bearing Line Mark 2 <> Place on the 1st Bearing Line Mark 3 <> Place on the 3rd Bearing Line Mark 4 <> Place on the 2nd Bearing Line Mark 5 <> Place on the Contacts Heading Line (CHL) Mark 6 <> Place on the 4th Bearing Line Mark 7 <> Place on the 3rd Bearing Line Trevally also does a 4 Bearing Method Tutorial. This is available as a mod Trevally Tutorial All v0.2 (for OHII v1.3) Link to his Mod http://www.subsim.com/radioroom//downloads.php?do=file&id=3329 This version uses the True Bearing Method using the Compass instead of the Protractor. The Tutorial is part Practical and part Actual. This all takes place in Historical Missions after you have selected Tutorial in the Main Menu this will take you to the 4 Bearings Tutorial in Historical Missions. Note > Further useful information. The 4 Bearing Method v1 by Kuikueq > Pictorial The 4 Bearing Method v2 by Kuikueq > Pictorial Courtesy acknowledgements To Kuikueg for his 4 Bearing Version To Stoianm for his informative Videos To JAFO- for the missing links. Tip If you shade this Tutorial and then copy and paste it to your PC Notepad you can then edit it.
__________________
LSH3-2015 <> TUTORIALS <> ALL YOU NEED TO KNOW <> ALL IN ONE PLACE SH4 <> TUTORIALS <> HOW TO DO IT <> INFORMATION <> DOWNLOAD LINKS SH5 <> TUTORIALS <> HOW TO DO IT <> INFORMATION <> DOWNLOAD LINKS Always Here To Help A Fellow 'Subber' | Need An Answer to A Question Just Send Me A PM Last edited by THEBERBSTER; 05-05-18 at 06:21 AM. Reason: Added new information |
|
|
|
|
03-12-14, 06:17 PM
|
#10 |
|
Growing Old Disgracefully
Join Date: Dec 2012
Location: Dibden Purlieu - Southampton
Posts: 9,606
Downloads: 1123
Uploads: 0
|
Due to broken OSI application which is slipped by Ubisoft to legitimate SH5 owners, many (if not all) SH5 players will experience problem which is manifested as game's inability to update gamesave Camaign.cfg file, the file which is really important for player's progress and campaign transfers.
The problem itself is best known and can be observed as infamous SH5 "tonnage bar bug"... I have removed this distracting element from the game but even without arcade tonnage bar, the problem has another ugly side effect which is reflected in game's inability to update macro objective/campaign status. This means that upon reaching individual campaign ending date, campaign transfer will not be initiated and player will be doomed to continue without any side missions, objectives and with shipping/units settings characteristic only for early war... However, there is workaround for this issue which will allow the player to continue campaign and which is IMO even more realistic that stock instant "jump" from patrol to bunker when final ending date of individual campaign is reached. Before we start you should know that all SH5 gamesaves are stored in "My documents/SH5/data/cfg/SaveGames" folder and they are named something like "0000000d" or "00000001a" ect... In order to track down your game saves better, you should sort your game save folders by date modified and especially pay attention to time of the game save creation because this is the best indicator which will help you to match your silly named game save folders to those shown in in the game save/load menu. OK, so you have reached first campaign (Coastal Waters) ending date (1st June 1940), campaign transfer failed to initialize and you have lost all objectives/mission visible in upper left corner of your navigation map. This is what you should do... SH5 campaign progress workaround 1. Replacing files - Make your best speed to your home port, end patrol there and make a manual game save when you enter the bunker. Note the time of the game save creation, we will call this one "Last CW save"... - Then, restart your game and start new campaign in which you wish to continue your career using "silentotto" cheat (in this case Happy Times). Again, make a manual game save when you enter the bunker, we will call this one "HT save"...Exit the game... - Now, go to your SH5 SaveGames folder and locate your "HT save". In it, you will find folder named "Campaign-2015-xx-xx_xxxx" with 4 files in it: Campaign.cfg CampaignMission.mis CampaignProgress.cfg CampaignMission.tsr - Copy/paste these files from your "HT save" to an equivalent location in your "Last CW save" and overwrite all files. Now, all necessary campaign files are replaced and we are almost done. The only thing left to do is to edit our flotilla settings located in CareerTrack.upc file. Note that flotilla settings are not necessary for CW to HT transfer because both campaigns features the same 2nd Flottila... 2. Flotilla settings - Open with notepad CareerTrack.upc file located in your "Last CW save" and you will find there these lines responsible for flotilla settings: Code: [CareerTrack 1] ID=IDCareerTrack1 [CareerTrack 1.CareerStatusHeader] ID=ID UserPlayerNameDisplayable=Cpt.Kurtz CareerOptionsDate=1939-08-31 13:00:00 [CareerTrack 1.CareerStatusLast] ID=ID Reason=CSS_LastStatus NameDisplayable=NULL CurrentDate=1939-09-29 17:36:57 UniqueID=3957285610582654 Title=NULL Text=NULL EntryStatus=0 PlayerRankAchieved=Captain-Rank-10 PlayerCurrentLastPromotionDateTime=1939-08-31 13:00:00 CurrentFlotilla=2ndFlotilla CurrentFlotillaBase=F2Wilhelmshaven CurrentSDepartureDescription=979352,6.42534e+006,1 80.777 CurrentUPCFlotillaUserPlayerUnitType=F2VIIA CurrentDifficulty=Realistic ... ... - Now depending on which campaign you wish to enter, you should edit your flotilla settings to match following: for Mare Nostrum 15/03/41 - 01/12/41 Code: CurrentFlotilla=23rdFlotilla CurrentFlotillaBase=F8Kiel CurrentUPCFlotillaUserPlayerUnitType=F8VIIC for Western Approaches 20/03/41 - 01/12/41 Code: CurrentFlotilla=6thFlotilla CurrentFlotillaBase=F4Kiel CurrentUPCFlotillaUserPlayerUnitType=F4VIIC for Battle of the Mediterranean 15/12/41 - 01/09/42 Code: CurrentFlotilla=29thFlotilla CurrentFlotillaBase=F9Kiel CurrentUPCFlotillaUserPlayerUnitType=F9VIIC for Arctic Convoys 19/12/41 - 19/09/42 Code: CurrentFlotilla=11thFlotilla CurrentFlotillaBase=F7Bergen CurrentUPCFlotillaUserPlayerUnitType=F7VIIC for Operation Drumbeat 12/12/41 - 01/09/42 Code: CurrentFlotilla=2ndFlotilla CurrentFlotillaBase=F2Lorient CurrentUPCFlotillaUserPlayerUnitType=F2VIIC for Distant Waters 15/09/42 - 15/02/43 Code: CurrentFlotilla=3rdFlotilla CurrentFlotillaBase=F3Toulon CurrentUPCFlotillaUserPlayerUnitType=F3VIIC for The Black Pit 20/09/42 - 15/02/43 Code: CurrentFlotilla=9thFlotilla CurrentFlotillaBase=F6Brest CurrentUPCFlotillaUserPlayerUnitType=F6VIIC for Turning Point 01/03/43 - 15/06/44 Code: CurrentFlotilla=9thFlotilla CurrentFlotillaBase=F6Kiel CurrentUPCFlotillaUserPlayerUnitType=F6VIIC41F for Monsun Gruppe 01/03/43 - 15/06/44 Code: CurrentFlotilla=7thFlotilla CurrentFlotillaBase=F6LaPallice CurrentUPCFlotillaUserPlayerUnitType=F6VIIC41 for The Final Years 01/07/44 - 09/05/45 Code: CurrentFlotilla=9thFlotilla CurrentFlotillaBase=F6Wilhelmshaven CurrentUPCFlotillaUserPlayerUnitType=F6VIIC41 Save your changes and now you are ready to continue your career. Start the game, load your modified "Last CW save" , request your secondary mission and patrol grid and happy hunting! Best regards... Vecko Courtesy acknowledgemt to vdr1981 (Vecko)
__________________
LSH3-2015 <> TUTORIALS <> ALL YOU NEED TO KNOW <> ALL IN ONE PLACE SH4 <> TUTORIALS <> HOW TO DO IT <> INFORMATION <> DOWNLOAD LINKS SH5 <> TUTORIALS <> HOW TO DO IT <> INFORMATION <> DOWNLOAD LINKS Always Here To Help A Fellow 'Subber' | Need An Answer to A Question Just Send Me A PM Last edited by THEBERBSTER; 01-17-18 at 05:36 PM. |
|
|
|
|
04-02-14, 04:29 PM
|
#11 |
|
Growing Old Disgracefully
Join Date: Dec 2012
Location: Dibden Purlieu - Southampton
Posts: 9,606
Downloads: 1123
Uploads: 0
|
Last updated 21st August 2018
This has been removed from the TWOS installation and is no longer necessary. When a New Career is started for the first time you are automatically taken to the Stock Tutorial so The Career History File can be created. It is not necessary to complete the Stock Tutorial as this can be changed manually unless you wish to gain some experience of using SH5 maybe for the first time. If the Tutorial is completed then the Career History File will then automatically show 'true' and has been completed. If the Tutorial is exited the Career History file will be created but the Tutorial will show as 'false' not completed. Simply changing 'false to 'true' and then saving the file completes the setup. If an uninstall has been done without the Saved Games SH5 folder being kept then the Silent Hunter 5 Tutorial would normally have to be done again. Saving the Career History CFG File by Copying and Pasting it to a safe place will help you at any future time should you need to reinstall Silent Hunter 5. The Career History File is removed along with all the other files when a full uninstall is selected. Once Silent Hunter 5 has been reinstalled it is just a case of Copying and Pasting the Career History CFG File back to its original position. The Career History File can be found in the following path: C:\Documents\SH5\data\cfg\CareerHistory CFG File File path to Career History CFG File's position. 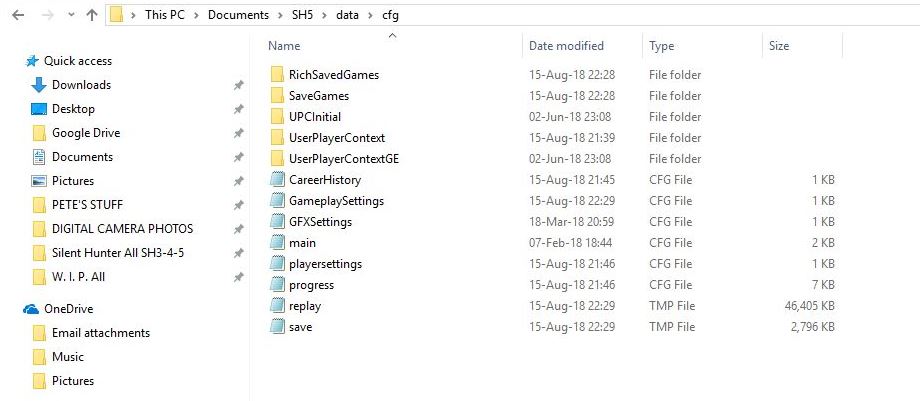
__________________
LSH3-2015 <> TUTORIALS <> ALL YOU NEED TO KNOW <> ALL IN ONE PLACE SH4 <> TUTORIALS <> HOW TO DO IT <> INFORMATION <> DOWNLOAD LINKS SH5 <> TUTORIALS <> HOW TO DO IT <> INFORMATION <> DOWNLOAD LINKS Always Here To Help A Fellow 'Subber' | Need An Answer to A Question Just Send Me A PM Last edited by THEBERBSTER; 08-21-18 at 07:52 AM. Reason: Revised |
|
|
|
|
03-03-15, 10:49 AM
|
#12 |
|
Canadian Wolf

Join Date: Jul 2006
Location: The one and only East Coast
Posts: 10,776
Downloads: 946
Uploads: 5

|
Hi Peter,
Just a suggestion. In your first few posts where you list your various tutorials. How about making each one a link to the post. You have some great stuff, just makes it a little quicker and easier to access. So like the following: Post # 2 Installing TDW's Generic File Patcher Anyway, just a thought. Keep up the great work. |
|
|
|
|
03-03-15, 04:00 PM
|
#13 |
|
Growing Old Disgracefully
Join Date: Dec 2012
Location: Dibden Purlieu - Southampton
Posts: 9,606
Downloads: 1123
Uploads: 0
|
Hi RDP
I think this is what Pinner2010/Graham was trying to explain to me the other day in a PM but I did not understand what he mean't. Showing me your explanation is what I needed. I will put it in to practice a.s.a.p. Thank you for your help. Peter
__________________
LSH3-2015 <> TUTORIALS <> ALL YOU NEED TO KNOW <> ALL IN ONE PLACE SH4 <> TUTORIALS <> HOW TO DO IT <> INFORMATION <> DOWNLOAD LINKS SH5 <> TUTORIALS <> HOW TO DO IT <> INFORMATION <> DOWNLOAD LINKS Always Here To Help A Fellow 'Subber' | Need An Answer to A Question Just Send Me A PM |
|
|
|
|
03-22-15, 07:26 AM
|
#14 |
|
Planesman
 Join Date: Apr 2007
Location: China
Posts: 190
Downloads: 618
Uploads: 0
|
please tell me how to repair damage,or how to activate damage control team?
my damage cannot be repaired to 100%... |
|
|
|
|
03-22-15, 12:10 PM
|
#15 |
|
Growing Old Disgracefully
Join Date: Dec 2012
Location: Dibden Purlieu - Southampton
Posts: 9,606
Downloads: 1123
Uploads: 0
|
Hi JT
Reply on your original post. Peter
__________________
LSH3-2015 <> TUTORIALS <> ALL YOU NEED TO KNOW <> ALL IN ONE PLACE SH4 <> TUTORIALS <> HOW TO DO IT <> INFORMATION <> DOWNLOAD LINKS SH5 <> TUTORIALS <> HOW TO DO IT <> INFORMATION <> DOWNLOAD LINKS Always Here To Help A Fellow 'Subber' | Need An Answer to A Question Just Send Me A PM |
|
|
|
 |
|
|


 Hybrid Mode
